IDEAS

In this article, I will be talking about the Ideas fikirler/ideas  feature of Excel.


Explore your data in more detail with Ideas.

The Ideas button -one of the new features- explores the order within your data and offers smart and custom ideas by using that.
Ideas in Excel empowers you to understand your data through natural language queries that allow you to ask questions about your data.
Simply click a cell in a data range, and then click the Ideas button on the Home tab.
Ideas in Excel will analyze your data, and return interesting visuals about it in a task pane.
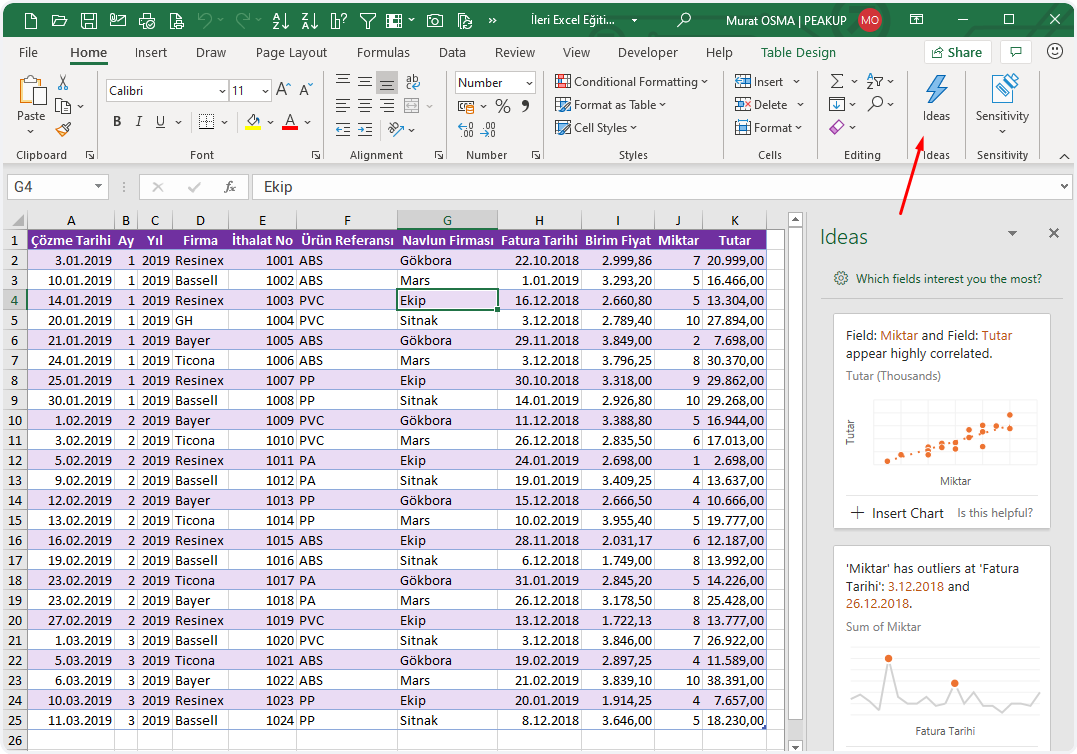
 

fikirler tablo


Creates dozens of artificial intelligence analysis and reports from the data in your table for you.
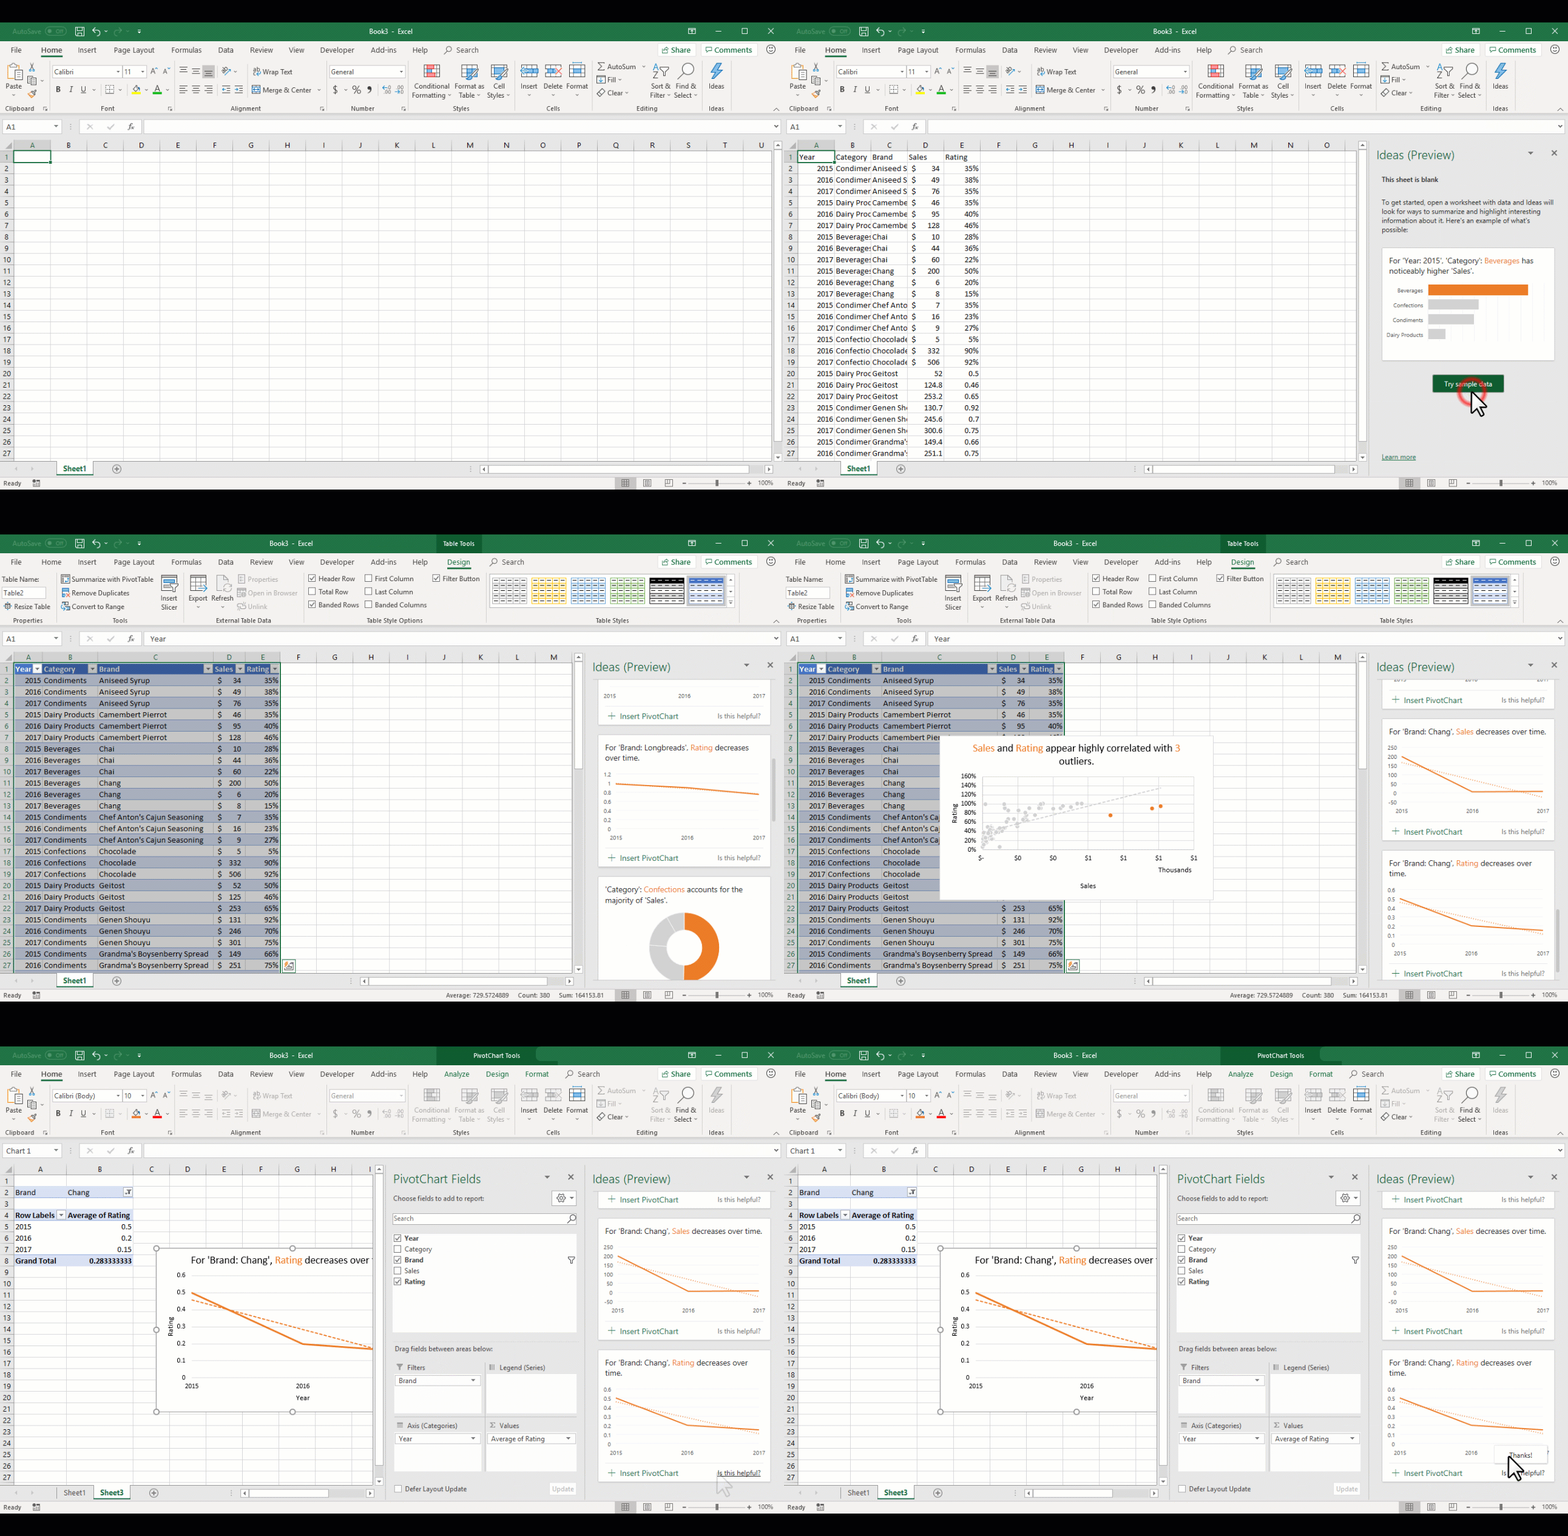
 

excel fikirler gif


On which data do Ideas work?

Ideas work best when data is formatted as an Excel table with a single title row on top.

Here is an example:
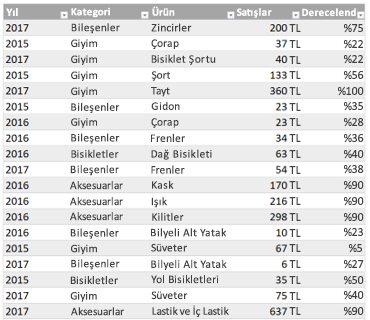
excel tablo


Ideas works best with clean, tabular data.

Here are some tips for getting the most out of Ideas:

  1. Ideas works best with data that’s formatted as an Excel Table. To create an Excel Table, click anywhere in your data and then press Ctrl+T.
  2. Make sure you have good headers for the columns. Headers should be a single row of unique, non-blank labels for each column. Avoid double rows of headers, merged cells, etc.
  3. If you have complicated, or nested data, you can use Power Query to convert tables with cross-tabs, or multiple rows of headers.

Didn’t get Ideas?

Here are some reasons why Ideas may not work on your data:

  • Ideas doesn’t currently support analyzing datasets over 1.5 million cells. There is currently no workaround for this. In the meantime, you can filter your data, then copy it to another location to run Ideas on it.
  • String dates like “2017-01-01” will be analyzed as if they are text strings. As a workaround, create a new column that uses the DATE or DATEVALUE functions, and format it as a date.
  • Ideas can’t analyze data when Excel is in compatibility mode (i.e. when the file is in .xls format). In the meantime, save your file as an .xlsx, .xlsm, or xslb file.
  • Merged cells can also be hard to understand. If you’re trying to center data, like a report header, then as a workaround, remove all merged cells, then format the cells using Center Across Selection. Press Ctrl+1, then go to Alignment > Horizontal > Center Across Selection.

We’re always improving Ideas

Even if you don’t have any of the above conditions, we may not find a recommendation. That’s because we are looking for a specific set of insight classes, and the service doesn’t always find something. We are continually working to expand the analysis types that the service supports.

Here is the current list that is available:

  • Rank: Ranks and highlights the item that is significantly larger than the rest of the items.
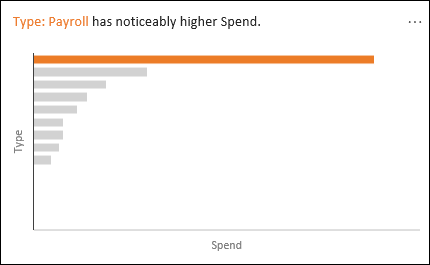
Line chart showing Payroll with noticeably higher Spend

  • Trend: Highlights when there is a steady trend pattern over a time series of data.
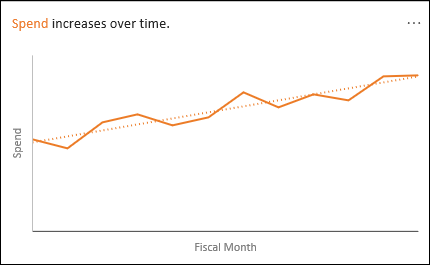
Line chart showing Spend increasing over time

  • Outlier: Highlights outliers in time series.
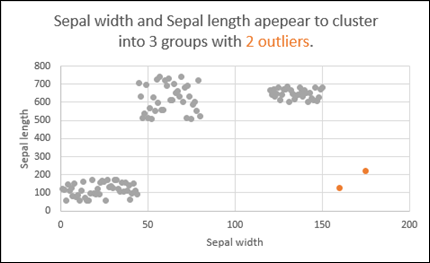
Scatter chart showing outliers

  • Majority: Finds cases where a majority of a total value can be attributed to a single factor.
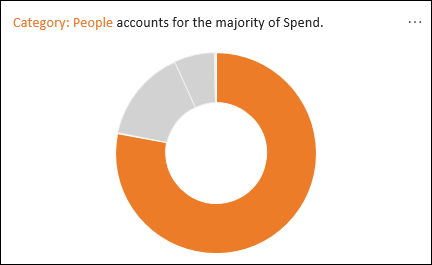
Donut chart showing People accounting for the majority of Spend

See you in other articles, bye. 🙋🏻‍♂️

You can share this post with your friends and help them get informed as well.👍🏻

Start Up Magazine/ KadirCan Toprakçı

THE FIRST MARKET

The best region that allows Start Ups to grow depends on the business model, target audience and products and service its offers. While Fintech and technology areas are more prone to London in UK, Berlin is more prominent in Germany. Especially the fact that London is the financial center of the world, makes UK appealing for the Start Ups. PEAKUP that has been in the first 50 companies in Deloitte Technology 2019  Fast 50 Turkey Program 3 years in a row, has entered the international market by opening an office in London. COO Kadir Can Toprakçı said: “First, we created sales channels with local sources after entering the international market. “

Send the File added to OneDrive in Mail Attachment

Hello! In this article, we will be sending the file added to OneDrive in mail attachments. Of course, as you might have guessed, we will be using Power Automate.

Before we start the flow, there are some files we need to create on OneDrive.

OneDrive for Business

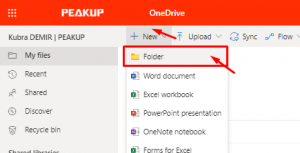
Go to OneDrive–> New–>Folder and create a folder named Mail Folder.

Create another folder named Attachments in the Mail Folder. We will add the mail attachments into this folder.

OneDrıve'a Eklenen Dosyayı oluşturma

Now we can move on to Power Automate.

Power Automate

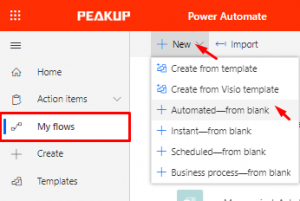
Go My flows –>New–> Automated- from blank and create the process with a blank flow.

Power Automate

You don’t have to choose anything in the window that opens up. You can skip to the flow window directly with the Skip button.

Atla (Skip) butonu

Flow Actions

Our flow will run when the file added to OneDrive is added. So, we start by choosing OneDrive for Business –> When a file is created (properties only).
When a file is created (properties only)
contains details like the name and root of the file that has been added to Drive.

Akış İşlemleri

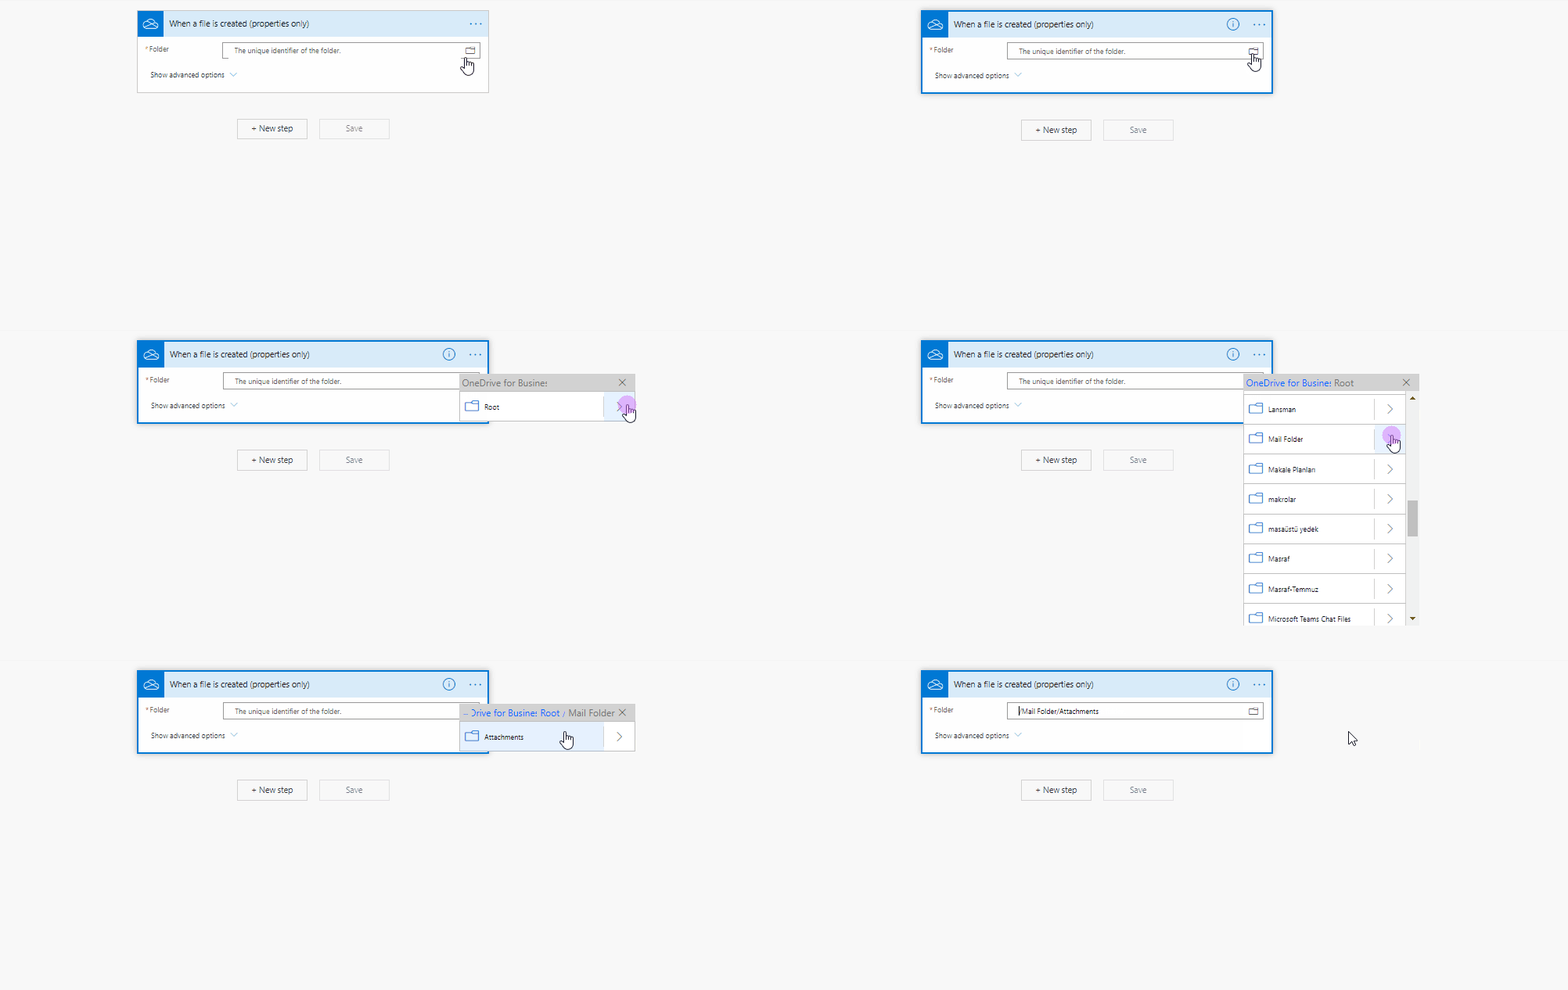
After adding this item, we will indicate the file into which attachments will be uploaded.

Choose Root–>Mail Folder–> Attachments.

Dosya yolu seçim alanı

In the new step, we add the Get File Content item to use the file added to the folder in a tangible way.

We need to give the unique identifier info to this item to detect the file that has been added to the folder.

Click Add dynamic content and choose List of Files Id.

Dinamik içerik ekle

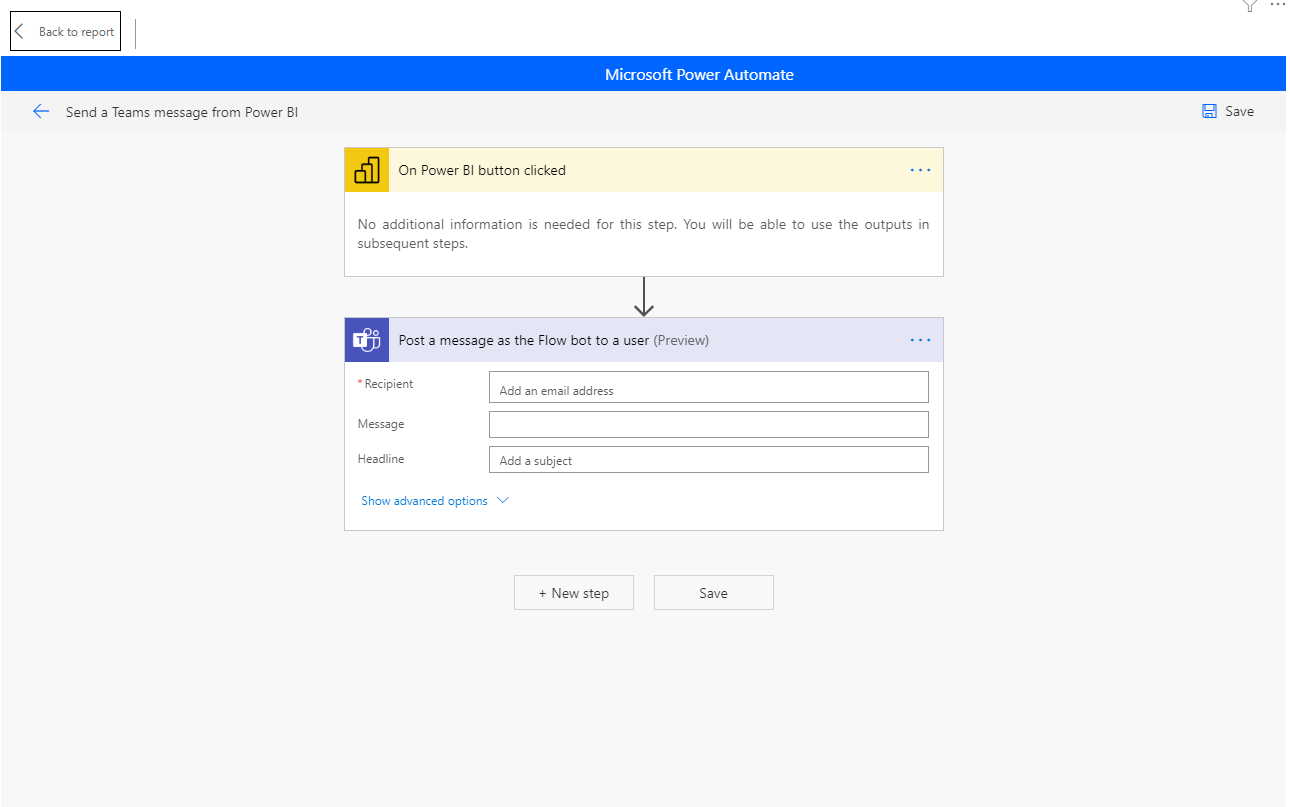
In the next step, add the Send an Email(V2) item.

In this item:

To: The mail address of the person you’ll send the mail to.

Subject: Mail’s subject (optional)

Body: Mail content (optional)

Open mail sending details with Show advanced options that is located on left bottom corner to add the mails to the flow.

Add File Attachments to the Mail

Choose Attachments name: List of Files Name.

File Content that has been gotten with the Attachments Content: Get File Content object is added to this field.

Maıle Dosya Eklerini Ekleyin

And the flow is complete.

You can name the flow on top left corners and then save it by clicking the save button on top right corner.

Now when you add any file into the Attachments folder, it will be sent as an e-mail with attachment automatically.

You can click here for the other Power Apps articles.

Send Calendar to a Guest List with Power Automate

You can send meeting calendars with customized data like addressing each person, event content and location for all your event invitations through Power Automate.

This way, you don’t have to deal with creating calendars one by one. You only need to indicate the guest list and event details.

Create a Table

Open en Excel in OneDrive. Add a Table from the Insert tab.

Write Mail, Name Surname and mail details into the columns of this table like below.

For each row of this table, e-mails will be sent separately by the flow.

The event date and hour was written as 2020-03-23T13:00:00 in order for it to be in the format Power Automate expects. The time format is 24-hours and the event will be created for the exact hour you determine.

Flow Process with Power Automate

Start a new blank flow.

After the data in the table is filled, flow will be run by being triggered individually. For this reason, start the flow with Manually trigger a flow.

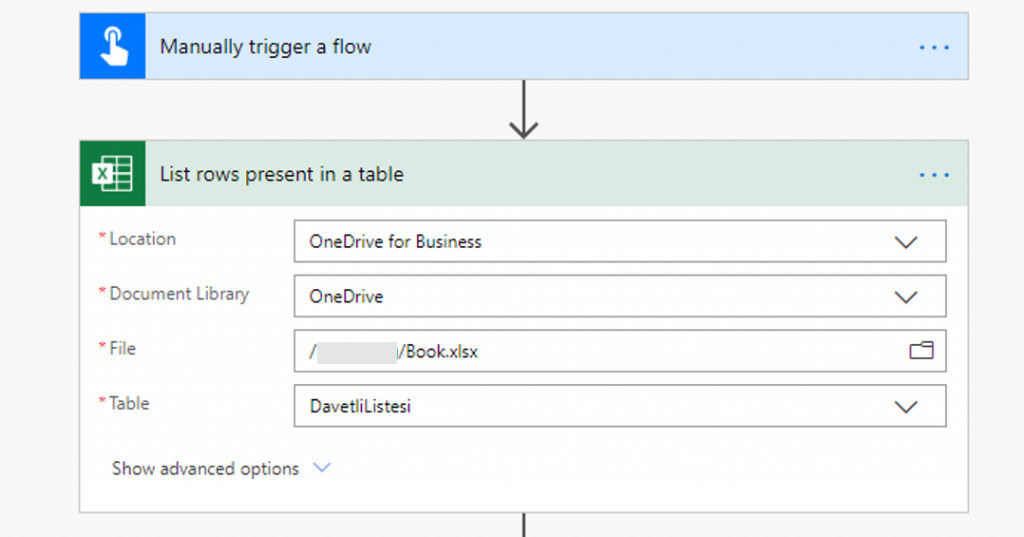
In the next step, add Excel for Business (List rows present in a table) to be able to add the data in the Excel table. Add the table you’ve just created into this item.

In the next step, add Outlook (Send an e-mail).

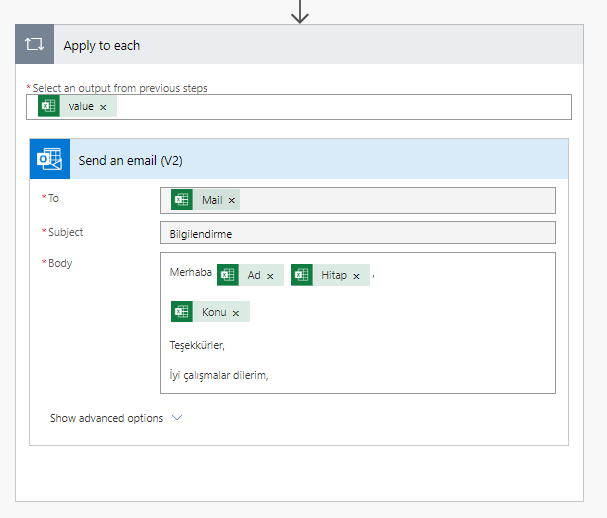
In this step, the columns of the Excel table is added to the related fields. With you choosing the Excel fields (mail, name, etc.) the Apply to each item will be added to the flow automatically. An event will be created for each row in the Excel file thanks to the Apply to each item.


After filling the related fields, name the flow on top left corner. For example: Send Mails to a Certain List. You can save and close the flow on top right corner.

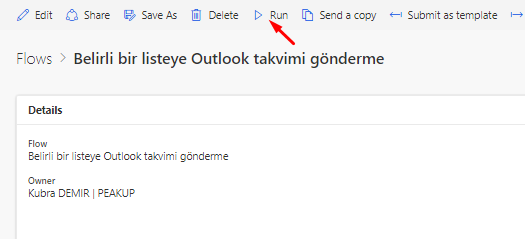
You can verify the data in the Excel table and run the flow.


You can take a look at this link for the Power Automate Outlook Connector.

We Had “Digital Strategy” Breakfast at our Office

We had “Digital Strategy” breakfast in our office and talked about the inspiring digital development applications for the Human Resources in 2020. We kindly thank everyone who participated in our event where we talked about topics like the role of change of the HR and reasons of digital transformation.


Using Collections

Usually it is necessary to store the data in temporary storage while calculation or processing. Then, the processed data is transmitted to the data source by saving permanently as ultimate data. Temporary records are stored in the variable tables called Collection. In this method, the data is calculated, processed and quickly written to the cache memory on the app screen only.

These tables are created virtually. Tables and columns can be named however wanted. Columns’ data types are automatically shaped based on the data they contain or the data source that will be saved tı later.

The Collect formula is used to create the collection tables. It is written as (table name ; { columns}) like below:

Collect(name_of_table;
{ column1:   textbox1.Text;
column2:   textbox2.Text;
column3:   textbox3.Text    } )

For example, you can write this formula into the OnSelect property of the SAVE button of OnTimerStart/OnTimerEnd property of the timer.

Using Collections

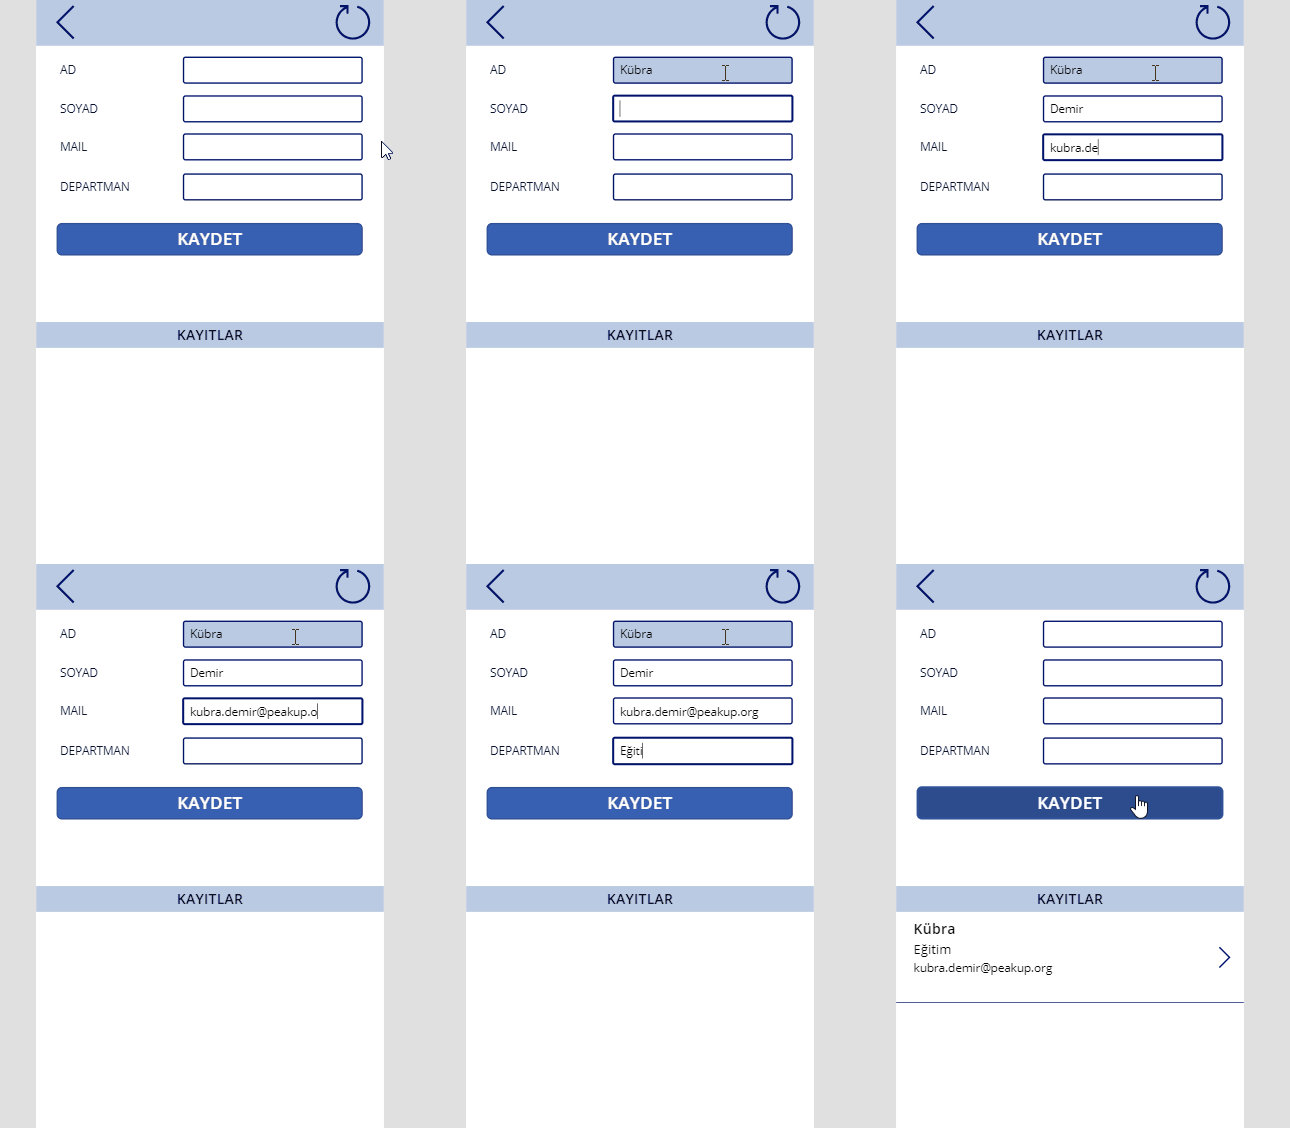
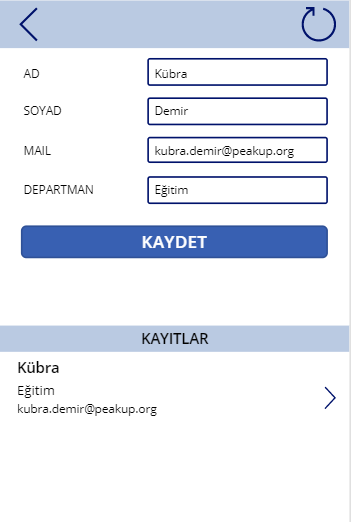
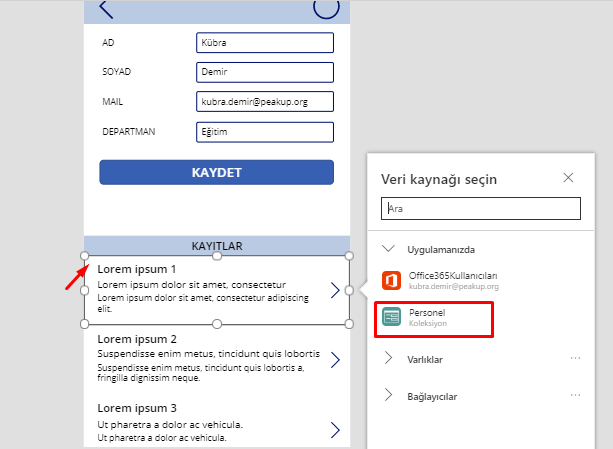
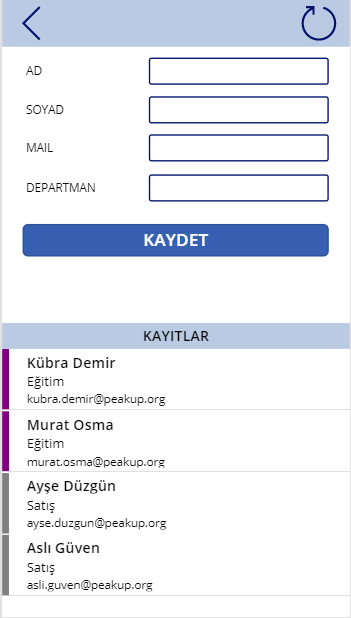
The personnel records will be written on collection in the screen of the image you see. 4 textboxes, 4 labels, button and gallery items have been used in this screen.

Item names are frequently used in formulas. So, the functional items in the screen should be named based on what they do or the data they contain.

Textbox names are: txt_name, txt_surname, txt_mail, txt_department

The formula below has been written into the OnSelect property of the SAVE button for the data entered in textboxes to be written to the Collection table.

*Table and columns can be named as desired.

Collect( Personnel;
{
P_name:    txt_name.Text;
P_surname:    txt_surname.Text;
P_mail:    txt_mail.Text;
P_department:    txt_department.Text   } )

When you click the save button, the data will be transmitted to the collection in seconds.

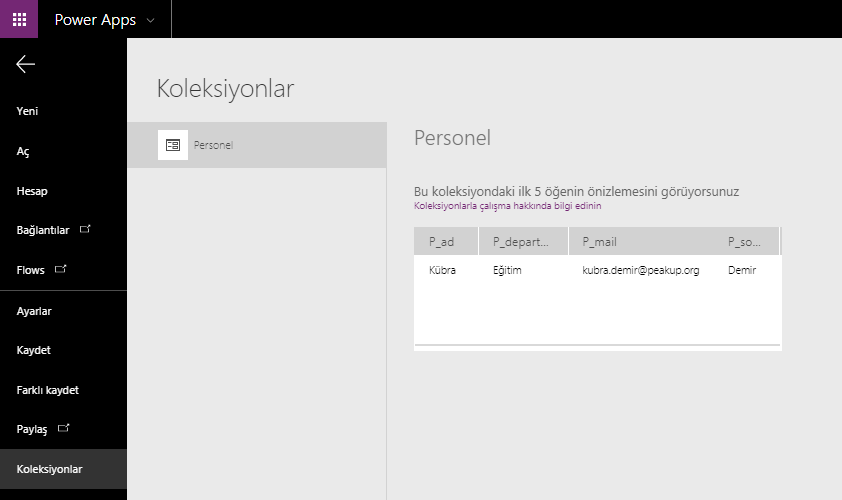
How to View Collection Data

All collections and their contents can be analyzed on a single screen with the Collections button in the View tab.

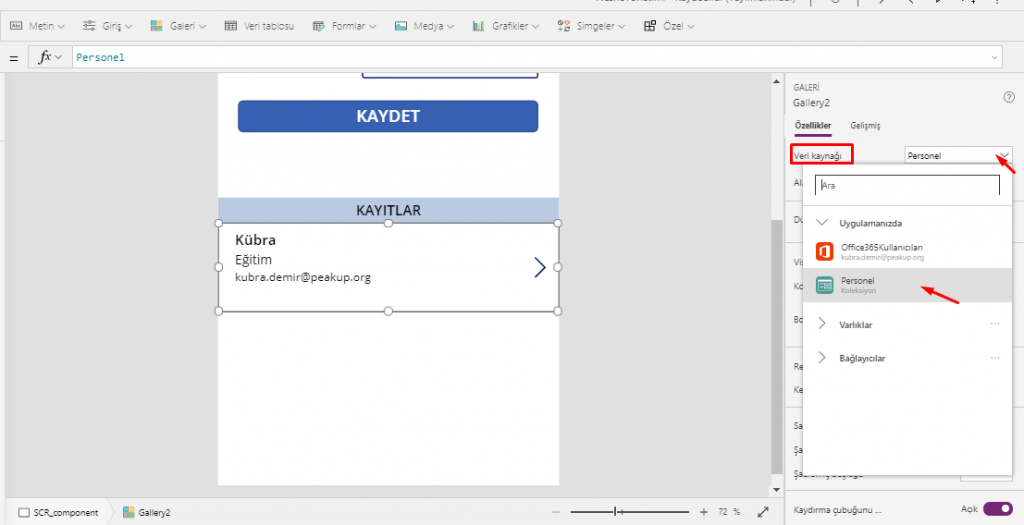
Click the gallery item to view the data in lists and choose the related Collection in the screen that opens up.

For the older versions, you can choose in the Data Source field in the Properties Window. Or you can execute the same action why writing the table name into the Items property of the gallery through formula bar.

To reset the textboxes after clicking the save button, the Reset() function is used.

*;; is used in actions that need to be executed successively.

Collect( Personnel;
{
P_name:    txt_name.Text;
P_surname:    txt_surname.Text;
P_mail:    txt_mail.Text;
P_department:    txt_department.Text   } );;

Reset(txt_name);;
Reset(txt_surname);;
Reset(txt_mail);;
Reset(txt_department)


Send E-Mails with Attachments Weekly with Power Automate

Do you send the latest version of the excel file on which you work with your team to your manager? Spare 10 minutes of your time now and create your own flow with Power Automate and send your e-mails with Excel attachments to your manager automatically every week at any hour your want.

When you want to create a flow, you start off with an action (trigger). The flow we will create needs to be run automatically every week, so we will start the flow with the Recurrence(Schedule) trigger.
*If you want, you can do monthly, daily, hourly controls.

In the next step, we need to indicate the location of the file that we want to send as an attachment to the flow. Thus, we need to add the related connector (for example: OneDrive) to the action flow. This way, the file we want to send with mail attachment will be accessed.

Actions are very short and simple. You can follow the steps below and create the flow quickly.

Power Automate Steps

  • Recurrence(Schedule) -> For weekly control
  • OneDrive(Get File Content)->
  • (List Files in Folder)-> To get the data there
  • To be able to choose the one we want among the files we have called Add Condition- > (We get the control of the file we want to call by writing [Name without Extension=ExcelName] through Name without Extension.
  • This action brings the apply to each command to the screen automatically ->
    Power Automate Uygulama Adımları 
  • If the condition is met, to send the mail: we need to add the content coming from OneDrive to the attachments content field in the Advanced Options in Outlook (Send an e-mail). Also, we need to fill in the attachments name field.
    mail atma işlemi

You can send the latest version of your Excel file in Outlook mail attachment with Recurrence(Schedule) control every week by following the steps above.

Send Mass E-mails with Power Automate

You can send the mails with custom subject and content in which you address people specially in cases like congratulating, events, special day celebrations. This is something that especially the HR needs.

This way, you don’t deal with sending mails one by one. You only need to indicate the mail list and details.

Create a Table

Open en Excel in OneDrive. Add a Table from the Insert tab.

Write Mail, Name Surname and mail details into the columns of this table like below.

Each row of this table will be sent as separate e-mails by the flow.

Flow Process with Power Automate

Start a new blank flow.

After the data in the table is filled, flow will be run by being triggered individually. For this reason, start the flow with Manually trigger a flow.

In the next step, add Excel for Business (List rows present in a table) to be able to add the data in the Excel table. Add the table you’ve just created into this item.

In the next step, add Outlook (Send an e-mail).

In this step, the columns of the Excel table is added to the related fields. With you choosing the Excel fields (mail, name, etc.) the Apply to each item will be added to the flow automatically. An event will be created for each row in the Excel file thanks to the Apply to each item.


After filling the related fields, name the flow on top left corner. For example: Send Mails to a Certain List. You can save and close the flow on top right corner.

You can verify the data in the Excel table and run the flow.

You can take a look at here for the Power Automate Outlook Connector.

Conditional Formatting Lists

You can design lists with a condition with the If Formula in the gallery. It is possible to control a lot of features of the objects like color, look, size and place with these conditions. You can authorize based on person/department , hide/show buttons on the screen and highlight status in tracking processes.

Designing Lists with a Condition

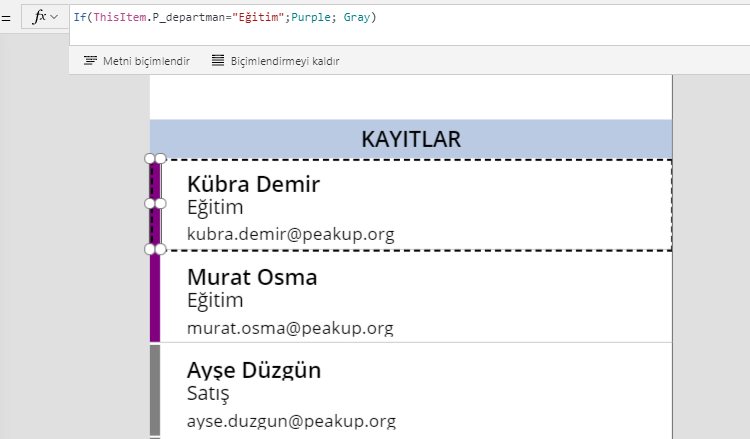
In this example, items indicated with colors depending on the information they contain. While all the items of the “Education” department are indicated with purple, the Sales department is displayed with Grey.

ThisItem word is used to individually evaluate each item in the gallery. This way, it is possible to access the data of a certain row among the items.

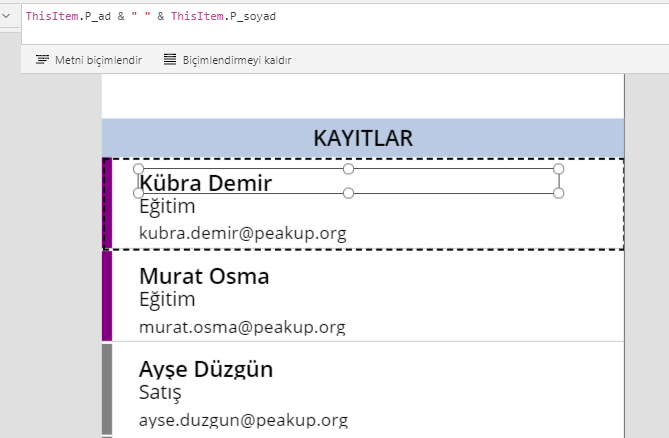
While registering, people enter their names and surnames separately. And the & concatenation operator is used to write the name and surname next to each other.

ThisItem.P_name & ” ” & ThisItem.P_surname

Adding a Condition

An empty Label is added to the gallery and placed on the left of the gallery to highlight the items.

If(ThisItem.P_departman=”Education”;Purple; Gray) is written into the Fill property of the Label.

With this syntax, each row in the gallery will be evaluated one by one and the department info will be checked. If the department is Education, it will be displayed with Purple. If it is another department, it will be displayed with Grey.

As well as you can write the color as Purple, Red, Blue; you can also write it through the RGB codes.

When you want to use a special color code, the RGBA() function is used.
This function is written as RGBA(255; 255 ; 255 ; 1) as well. The last parameter of the formula gets a value between 0 and 1 and affects the transparency of the color.

You can click here for the other Power Apps articles.

You can click here for the details of the use of the If function.