In this article, I will be talking about how we can execute an action which I know that many users need in Excel Training. Without further ado, let’s see how we can send a mass e-mail with Excel through Outlook.

First of all, we will be sending mass e-mails with Excel through Outlook with the power of VBA, a.k.a macros. So, it wouldn’t hurt you to know a bit about macros but I will be explaining the topic simply and since a lot of the code lines are cliche, it is not a must for you to know about macros. Also, I will be indicating what each code line means. First, I will give you all the codes. And then I will be explaining them. Of course, it can be enhanced way more but for now I will be explaining how to send a mass e-mail with a simple method. In addition, I will attach a sample file.
Let’s start.👍🏻
First, let’s assume that we have a table like this.
When we push the Send button, we will send all the e-mails starting from the 2nd row to the last row.
Send a Mass E-Mail with Excel through OUTLOOK – ALL CODES
Sub PEAKUP_Mail_Send()
   Dim Outlook As Object, newAs Object, i As Long
   Set Outlook = CreateObject("Outlook.Application")
   For i = 2 To Cells(Rows.Count, "A").End(3).Row
      Set new = Outlook.CreateItem(0)
      With new
         .To = Range("B" & i).Value
         .Subject = Range("C" & i).Value
         .Body = Range("D" & i).Value
         .Display
         '.Send
     End With
   Next i
   Set Outlook = Nothing: Set new= Nothing: i = Empty
   MsgBox "Your e-mails have been sent.", vbInformation, Application.UserName
End Sub
Yeap, these codes are all we need. Now, let’s move on to what each code line does. As I stated below, you can think of all the codes below as a template/cliche. It will be enough for you to take these codes and set to, subject and description parts according to your file.
Sub PEAKUP_Mail_Send()
We name our Macro/Procedure PEAKUP_Mail_Send.
Dim Outlook As Object, new As Object, i As Lon
We define the variables we’ll use. It is not a must to define variables but it is pretty helpful. I will be talking about the details in our article about variables and defining methods.
Set Outlook = CreateObject("Outlook.Application")
We created the Outlook application with the Late Binding method. (There are two methods; Early Binding and Late Binding)
For i = 2 To Cells(Rows.Count, "A").End(3).Row
We create a For loop from the 2nd row to the last filled row number in the A column. We use it to send the mail to all the addresses in all rows.
Set new= Outlook.CreateItem(0)
We create a new mail by setting just like pushing the New button in Outlook.
With new
Since the codes below indicate the fields in the new mail, in order not to write “new” each time, we say With new and indicate that it has to do with the new mail. If you pay attention, the codes continue as .To – .Subject. So, they are all lines about the New mail.
.To = Range("B" & i).Value
We determine who we’ll send the mail to. Here we indicate that it will be sent to those on the B column.
.Subject = Range("C" & i).Value
We determine the subject. We indicate that the subjects are the ones on the C column.
.Body = Range("D" & i).Value
And we request the ones on the D column to be written into the mail body.
.Display
It enables you to display the mail before you send it.
.Send
Sends the mail.
End With
We must close the With statement with End With.
Next i
We request it to move on to the next line in the loop.
Set Outlook = Nothing: Set new= Nothing: i = Empty
We empty the created variable. It is not a must, but helps to not hold up space in storage.
MsgBox "Your e-mails have been sent.", vbInformation, Application.UserName
With MsgBox, we get a information window indicating that mails have been sent.
End Sub
We end our macro/procedure.
ADD EXTRA INFORMATION TO THE MAIL
Add a File
If you want, you can add a file in your computer with the code below to your mail. You can write the code line below under the .To – .Subject statements.
.Attachments.Add "file location"
Make the Look of The Text in the Message Body HTML
Instead of using .Body and writing a plain text, you can use .HtmlBody and make the text visually pleasing with html tags.
For example;
.HTMLBody = "
“Add CC and BCCIf you want to add other people to the CC or BCC, you can write these codes under the .To line..CC = “Mail address to be added to CC .BCC = “Mail address to be added to BCCSet the Importance of the MailIf you want to send your mail with high importance, you can add this code line..Importance = 2
Well… if you have analyzed and learned everything I have written so far, we can move on to the application part. 😃
When we run the codes, the mails will be sent to all the addresses like in the GIF below.Note: If you activate .Send instead of .Display, the mails will be sent without displaying.
You can download the application file here 👉🏻  .
.
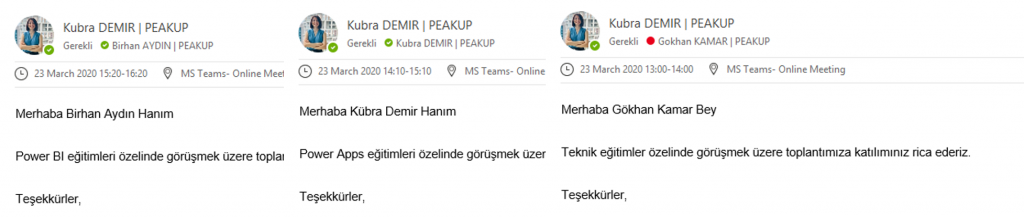
And here is another example for you.
See you in other articles, bye. 🙋🏻♂️
You can share this post with your friends and help them get informed as well.👍🏻
| Hello, |
| ” & Range(“D” & i).Value & “ |