ADD A POWER BI REPORT TO SHAREPOINT ONLINE

You can easily and interactively add your Power BI reports to SharePoint only using the Power BI report section of SharePoint Online.  When using the “Add to SharePoint Online” option, the attached report complies with all project permissions and data security through row-level security (RLS), so you can easily create a secure internal portal.
Now ,with the last update released by the Power BI team, the action bar of Power BI reports are also included in SharePoint. Let’s see and analyze it together!


WHAT IS SHAREPOINT?

The SharePoint application is a data storage system developed by Microsoft. The system prevents data loss by enabling companies to copy their documents to cloud records. Microsoft Sharepoint makes data transfer between programs easier by collecting all documents prepared by Microsoft under a single roof. The SharePoint application supports the integration and transfer of data between all applications (such as OneDrive for Business and Microsoft Office). Also, its licensing is the same as the Microsoft Office application.

WHAT DOES SHAREPOINT DO?

You can use SharePoint to speed up document conversion in your workflow. Documents created and saved in Microsoft systems can be easily managed through SharePoint. The SharePoint application is used to make document management and data management easier by providing all data flows between Microsoft applications, document management, information transfer between systems, search options between archives, and various Excel services. When any change is made to the saved document, the data owner gets informed. SharePoint enables documents and information to be controlled with high-level security measures. It also enables the documents to be used together and to be easily accessed in all studies.

ADDING A POWER BI REPORT TO THE SHAREPOINT ONLINE PAGE

1. Go to Pages -> New -> Site Page to create a new site page in Sharepoint Online.

2. Click the button shown with (+) and choose the Microsoft Power BI add-in.

3. Select the Microsoft Power BI add-in.

4. Use the “Add Report” button to add our report to the SharePoint Online service.

5. On the right of the screen, we need to give the link address of the Power BI report that we want to add. Now, go to the Power BI Web service and copy the link address of the report we want to add. Today, I will use a sample report offered by the Power BI team.

6. Open the report on the Power BI Web service and copy the link address.

7. Paste the link address of the report into the Power BI report link box on the right. When you complete the process, you will see that the report you wanted to use is already on SharePoint Online. You can click ‘Publish’ to embed the report in SharePoint Online.

Now your report is on the SharePoint Online Service.


THE ACTION BAR OF THE POWER BI REPORTS IS NOW ON SHAREPOINT ONLINE!

Power BI has now included the action bar of the Power BI reports that we add to the SharePoint Online section with its brand new update. We can now use many features such as export, share, bookmarks that we have made in the report in the Power BI web service.

What is Power Automate? – An Overview

Hi there dear readers! Today, we will talk about Microsoft’s Power Automate (formerly called Flow). Power Automate is a member of Microsoft’s Power Platform family, and allows you to automate your business processes and design them with as little code as possible. It integrates with nearly 300 connectors and handles your work automatically without the need to visit multiple sites or run multiple programs. To begin with, I recommend reading this article and then looking at the templates on Power Automate’s site. These are ready-made templates that you can get started with right away. Here I leave a few of them for you to review:

POWER AUTOMATE FOR EVERYONE

One of the best parts of Power Automate is that you can perform a variety of business processes in the simplest level possible, even without having the tiniest idea of how to code. Of course, every now and then you will need formulas here as well when appropriate, And for that kind of situations, Power Automate has its own formulas. Many of these formulas, referred to as “Expressions”, are similar to those of Excel.

FUNDAMENTAL COMPONENTS

Flows have 2 main components:

  1. Trigger
  2. Action

The main question when it comes to the trigger title would be “What will be required to happen for this flow to run?”

The titles like:

  • When an e-mail is received,
  • At 10 o’clock every day,
  • When a new task is created,
  • When a new line is added to the Sharepoint list,
  • When a button (Power Automate button, Power Apps button, Power BI button) is pushed,

etc. are all triggers. A flow doesn’t work without a trigger.

The main question when it comes to the action title would be “Which actions will be executed once this flow starts running?”

Here, we will select the actions we want to execute and connect them one after the other.

  • Send an e-mail.
  • Create a task.
  • Send a message on Teams.
  • Add a new record to the Sharepoint list.
  • Create a new file on Sharepoint.

etc. are all actions.

As a matter of fact, most of our business processes depend on various conditions and approvals. For example, you will save the files to a folder, but your administrator must approve these files first. Here the process gets a little more complicated and you have to apply various conditions to the processes as well. Since these situations are quite normal, Power Automate also has a solution for this situation: Flows can be designed to create special reactions to the results of certain conditions by selecting conditions as an action and working according to these conditions.

Everything goes step-by-step in the Power Automate flow. Thus, one of the main points to know here is that when you add an action, you can use the outputs of the actions or triggers from the previous steps. In the Dynamic Content area, Power Automate already shows you what and which titles you can use.


Below you can see an image of a conditional process.

The steps here are as follows:

  1. We have created a survey, and we want this flow to be triggered when a new answer comes in.
  2. We get the details of the answer that caused the trigger.
  3. In the survey, we’ve got the question of: “Did you like our event?”. We will execute 2 different actions depending on the answer to this question. For this very reason, we add a condition.
  4. We choose the title to which we will apply the condition: “Did you like our event?”. We want it to check if the answer here is equal to 5. 5 is the highest value.
  5. If it is equal to 5, then we send an e-mail to the sender saying “Thanks”.


You can click here to check out our other articles about Power Automate. And if you ever have a question, feel free to let us know. See you in other articles.

Good game, well played.

How to Subcrıbe to a Hıdden Page ın Power BI Reports?


Hello dear reader! Today we bring you an important study topic that hasn’t been solved for the Power BI users yet. What if we want to subscribe to a hidden page in Power BI reports? What do we do? Actually, there was a poll in the community page for this feature to come and it has been approved, but hasn’t been added to the roadmap yet. With the “Hide Page” feature of Power BI, we can prefer not to show certain pages to some users in the reports uploaded to the portal. These pages usually consist of the detail pages. What is on these detail pages? The detail pages consist of very detailed information -usually charts- that we don’t directly need in the report but that is highly requested by some users.

And at some points, these hidden pages might be pages that have been directed from a navigation screen or it might be a completely unique situation to your company. Long story short, there are some pages and you do not want their name to appear or to be accessed directly by the users while browsing through the report! So what if you want to subscribe users to these pages that you do not want to be accessed directly in the report?

Power BI does not offer this as a default feature, meaning we cannot subscribe users to the hidden page. While researching the details of this, I found out that this is because of the design. After doing a few experiments on how to do this, we figured out how to subscribe to the hidden page in Power BI reports! If you please, let’s see how we can do it now:

1- Upload the said page to the portal without hiding it.

Gizli sayfa görünüyor2-Define the necessary subscriptions to the page.

Gizli sayfaya abonelik
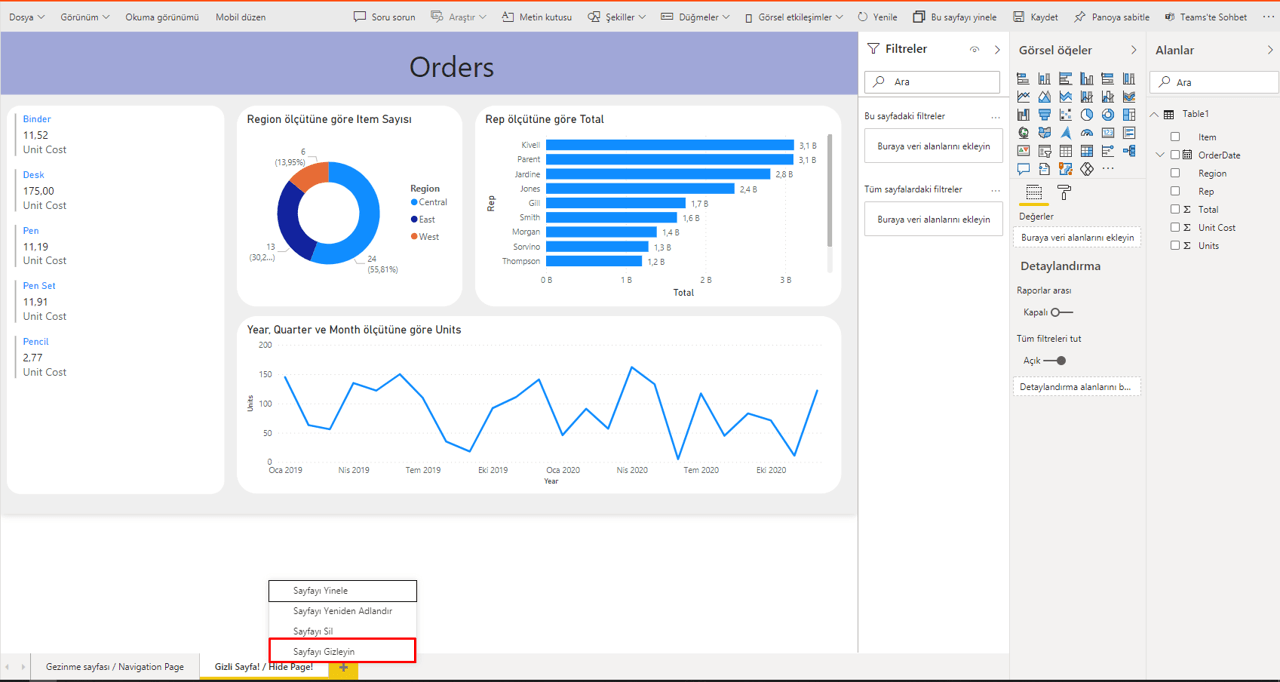
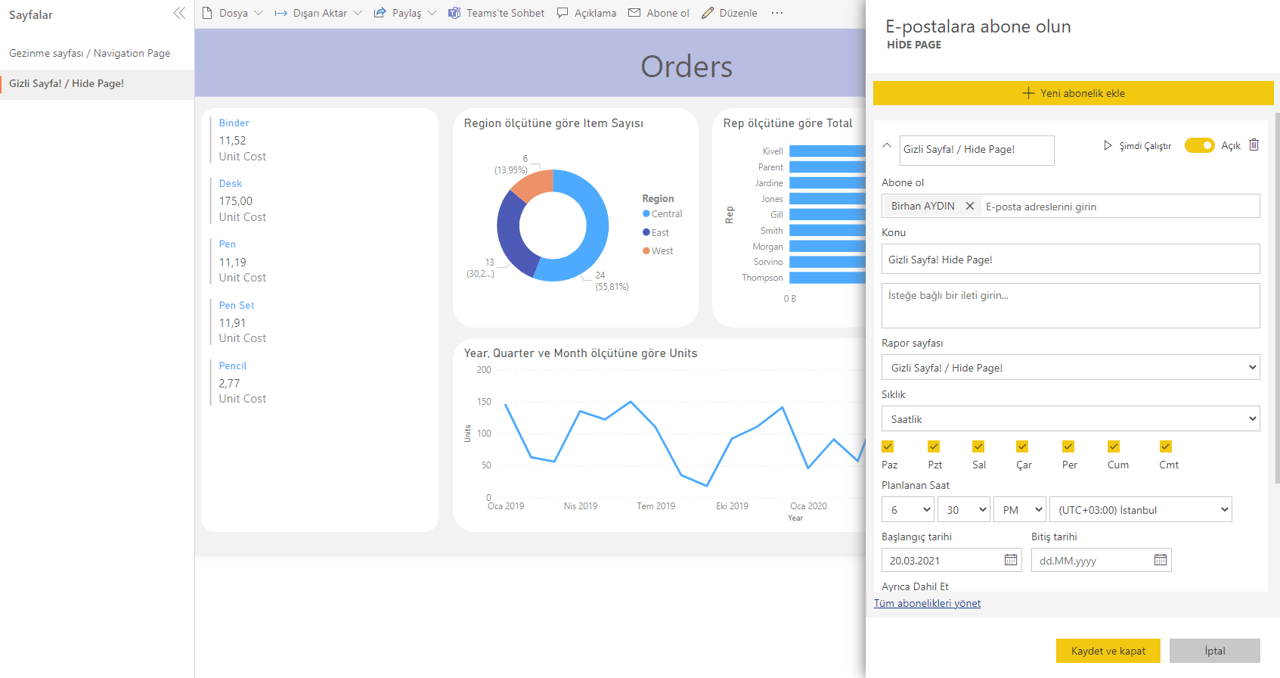
3- Click on “Edit Report” and hide the page.

Sayfayı gizleyin

Go back to the review mode and that’s it!

Now, let’s wait for out mail to come at the hour we have defined. Here it is!

mail

It is quite simple to do, but there is a something that you need to pay attention to. Never turn on the subscription feature for the hidden page! When you turn it on, you will see that the report page field will be blank and this subscription will no longer work and you will need to repeat the steps above all over again. If you want to edit the subscription, first make the hidden page visible, then edit the subscription.

We can explain the reason of this situation like this: We had said that the report pages didn’t completely get lost in the back, and that were just not shown in the design on the front. So, actually, the information of the page is kept this way on the subscription page. However, when we turn the subscription back on, the values in this field start to work according to the current situation and explode when you cannot find the page! If you do not do such a thing, you can use this smoothly without any problems.

See you in the next article,

Good game well played!


Power Apps and Power Automate 2020 License Updates

Power Platform

We have been waiting for the work flow product we knew as Ms Flow to get the Power title like Power BI and Power Apps for a long time. It recently joined the Power Platform family with the name of Power Automate (Flow) as expected.

Power Apps and Power Automate (Flow) is a team that increases efficiency and speeds up the work right from the beginning. While end users are working on their Power Apps mobile apps, Power Automate quietly sustains the work flow and verification process in the background.

You can click here for the articles about Power Automate.

Can I use Power Platform for free?

If you have any type of Office365 license, yes!

If you have one of the Office365 licenses below, you can use the Power Platform products for free.

2020 Licensing Updates for Power Apps and Power Automate

The increase of Premium connectors and features was foreshadowing the licensing changes that would happen in Flow.

With the Flow joining the Power family, Power Apps & Power Automate came to the top of the agenda.

If you don’t have Office 365

With the licensing method based on layered quote becoming definite, the prices are still valid since December 1, 2019.

You can use Power Apps and Power Automate as Add-on with monthly payment.

Licensing is separated into two ways: based on the number of users or based on the number of applications you will use.

1st Payment Model

To use 2 mobile apps as Company/Person

It is priced as 56 TLs (in Turkey) per user and the costs increase as the application number increases.


2nd Payment Model

To use limitless number of mobile apps as Company/Person

It is priced as 224,20 TLs (in Turkey) per user and there are no extra costs.

Take a look at here for details.


Take a look at here for the document about licensing.

Page Redirect Actions

The Navigate function is used to switch between screens in PowerApps mobile applications.

How do you switch between pages?

By touching/clicking the items on the screen (with the user trigger)
Or automatically after a certain period of time (with a timer).

Usually the OnSelect property is used for all the actions that wanted to be executed the moment we “click”.

As an example, let’s take a look at how we switch to the next page when we click the next button on the page.

The page redirection action for the next button:

Navigate (target page, transition effect) will be written into the OnSelect property of this item.

You of course don’t have to write the Navigate formula to OnSelect all the time. We mentioned that different items have different properties. In this sense, properties like OnCheck, OnVisible, OnChange are used when necessary as well.

The OnCheck property can be used for a check box if you want it to work “the moment it is marked”.

New Products on Power Platform

Power Virtual Agents

Power Virtual Agents, the system where you can create your own ChatBot!

With Power Virtual Agents, you can create a learning chatbot structure.

A system where you decide the questions and answers. The way it works lets you start the flow with Power Automate and is very prone to be developed.


You can create custom workflows with Power Automate within the Power Virtual Agent, or work in an integrated manner with the products and services with the help of hundreds of conductors by creating complex scenarios with Microsoft Bot Framework.

Evaluate Performance
You can track the bot’s performance and always make improvements by using the AI and data-based analysis on the dashboard.

Click here for detailed information.

Manage Items Centrally by Using Components

You might feel the need to manage the items on the screen from a center while developing a Power Apps application. When the properties of a certain item change, the features like the color, size, place can be managed for the related items on all screens.

There are two existing methods for central management.

  1. Method 1: Managing by using the item properties on the formula bar.
    Since the actions are executed through formulas, it is the most stable method.
  2. Method 2: Components (Experimental)
    Since this method is experimental, it doesn’t work in a stable way. Compared to the formula method, it is way easier to use.
    The items on the screen can be standardized with components. 
    In this article, we will be analyzing how to manage items centrally with Components.

Using Components

To use the component feature: go File–> Settings –> Advanced Settings–> Write Components into the search bar on right to find the feature and then activate it.

Managing Items Centrally with Components

Once the components are activated, go back to the application screen. Two menus as Screens/Components are displayed.

We go to the components screen to design the template we want to use. The components are designed as a normal screen. When you use multiple components, naming the components will be important.

After the component is complete go to Screens and when you are in the page where the component will be added; locate the page by choosing Insert–>Custom–>Component1.


The component that has been created is added to the screen as one single item. For this reason, a component can be thought as a background image.
In this sense, while designing the symbol or items a component contains or after it is added to the screen, it doesn’t accept general formulas (like the functions of main page, next, save buttons).

Using Formulas in Components

We need to execute an extra action to give commands to the items on a component. For example, when we want to write the Navigate function into the Previous button on the image; we have to add a Label to the screen. You can complete process by writing the Navigate function into the OnSelect property of this Label.