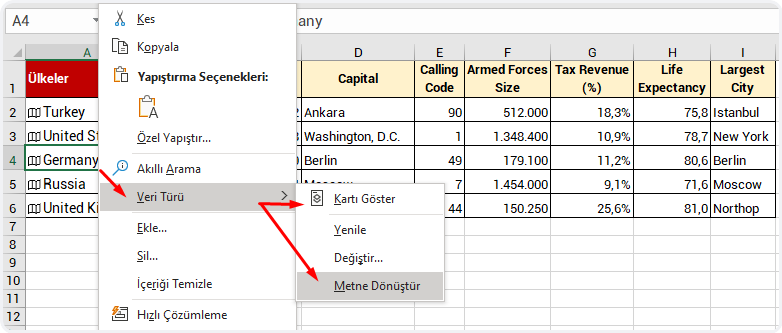
THE XLOOKUP FUNCTION
Last you on August 29, two new important functions were announced: XLOOKUP and XMATCH. In this article, we will be talking about what the XLOOKUP function is, when and how to use it. When you start using this function, you will just not be able to let it go.
I want to mention a few things about VLOOKUP first: as you know, the VLOOKUP function was indispensable for many users, even those who didn’t know wanted to learn it. And even in the 7 Most Used Excel Functions presentation Microsoft prepared, the first function is VLOOKUP.
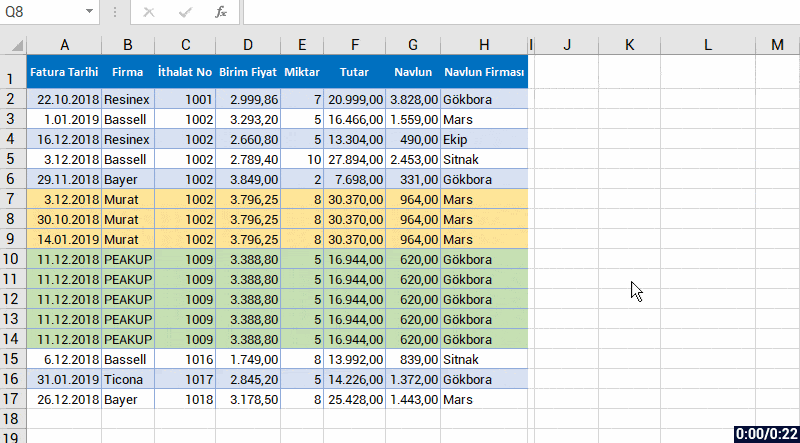
As dispensable as it is for some users, it was useless for some others. Because VLOOKUP required some conditions to run and the function returned us the first match it found. On top of that, it decreased Excel’s performance since it could cause unnecessary calculation in the stated table range. It is the function for those who have unique data, but in a table with duplicate data -i.e. recurring data- it wasn’t very useful since it didn’t give us all the records. Of course, there are some methods to list all the records, but you either had to solve the issue by using auxiliary columns or list all the records with the Array Formula.
LONG LIVE THE DYNAMIC FUNCTIONS!
Fortunately, in September 25, 2018 the new dynamic array functions were announced and we got to breathe a sigh of relief. After waiting for such a long time, now the new function will be able to return a whole array instead of returning just one single result.
Instead of writing an Array Formula that was known as “MULTIPLE VLOOKUP” by everyone, we can list all the records of a data with the FILTER function easily. *We will be talking about the details in its own article. (Here are the article links of Microsoft, you can take a look.)
With the release of the XLOOKUP function, old functions like VLOOKUP and HLOOKUP are not needed anymore. And also, as they get into more detail and design what they can do, it seems like we will not need these functions:
VLOOKUP > HLOOKUP > INDEX > MATCH > OFFSET > IFERROR(VLOOKUP).. what else do you want?!👏🏻
Just one formula can:
- Look up both horizontally and vertically,
- Bring the first or last record, find the data considering the wildcard characters,
- Bring the data we want on the left without a condition like the lookup_value has to be in the first column of the table_array in the VLOOKUP function,
- Bring approximate vales in certain range like the TRUE option in the range_lookup argument,
- Allow you to say write this if no data is found without the need to use the IFERROR formula,
- Find the most approximate lowest or highest value if there is no exact match.
- And it offers all these in a way more faster way than before.
Enough with all the details, let’s see what this function does. 👍🏻
THE XLOOKUP FUNCTION SYNTAX
=XLOOKUP(lookup_value, lookup_array, return_array, [if_not_found], [match_mode], [search_mode])
There are 6 arguments in this function.
The first 3 are required, the last 3 are optional.
Now let’s take a look at what these arguments mean, i.e. what the function wants from us and what we will give it.
|
Argument
|
Description |
| lookup_value
Required |
The lookup value |
| lookup_array
Required |
The array or range to search |
| return_array
Required |
The array or range to return |
| [if_not_found]
Optional |
Where a valid match is not found, return the [if_not_found] text you supply.
If a valid match is not found, and [if_not_found] is missing, #N/A will be returned. |
| [match_mode]
Optional |
Specify the match type:
0 – Exact match. If none found, return #N/A. This is the default.
-1 – Exact match. If none found, return the next smaller item.
1 – Exact match. If none found, return the next larger item.
2 – A wildcard match where *, ?, and ~ have special meaning. |
| [search_mode]
Optional |
Specify the search mode to use:
1 – Perform a search starting at the first item. This is the default.
-1 – Perform a reverse search starting at the last item.
2 – Perform a binary search that relies on lookup_array being sorted in ascending order. If not sorted, invalid results will be returned.
-2 – Perform a binary search that relies on lookup_array being sorted in descending order. If not sorted, invalid results will be returned. |
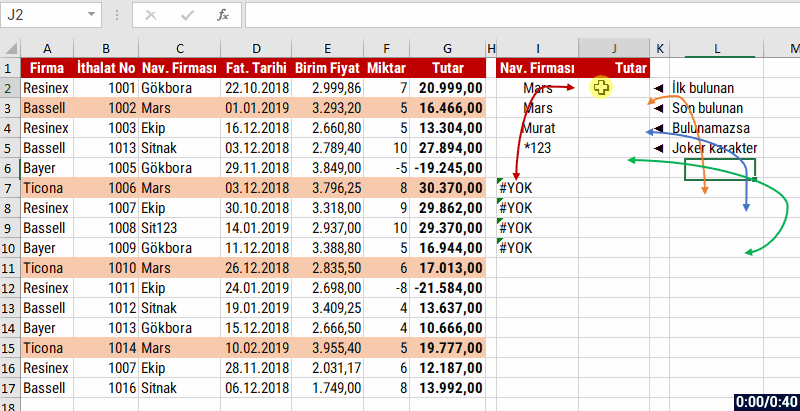
In the few examples below, you can see what you need to write when there is the first record and last record is not found of the looked up data and how to use it when looking up with wildcard characters.
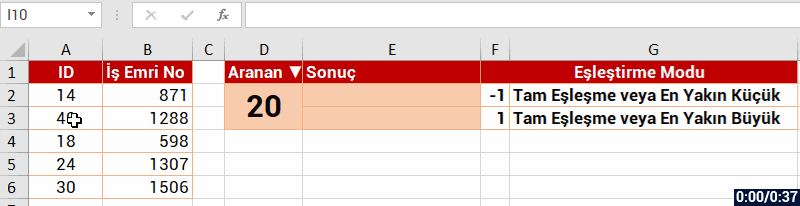
Let’s have an example of the Match Mode argument with exact match or highest and lowest options.
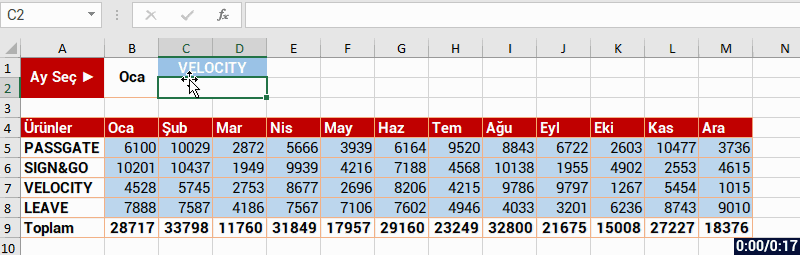
So far we got the data from the column we wanted by looking up in the column just like in VLOOKUP. Now, let’s use this function like HLOOKUP.
Now, let’s have a 2 dimension look up. Let’s match based on both the Product name and Month, and find the data in the intersecting cell. Users who know how to use the INDEX and MATCH functions usually do the matching we are about to the with the INDEX + MATCH + MATCH formulas. Now, let’s see how it is done with XLOOKUP.

Lastly, let’s compare the VLOOKUP and XLOOKUP function while finding the same data. At first, you will see that you get the same result, but when we add or delete a column, the VLOOKUP function will give us an incorrect result. But the result will not change in the XLOOKUP function. The reason is this: Since we write the column number that we want to get manually in VLOOKUP, the col_index_num stays stable but the column of the data changes and it returns an incorrect result. And in XLOOKUP, it doesn’t matter how many columns you add or delete, since we stated the column we want, that column changes dynamically and returns the correct result without producing any errors.
You can see the result in this example.

I hope this was helpful.. 👍🏻
You can share this post and help many others get informed as well. Keep in mind that information gets more valuable when it is shared.


 Add Form Elements


