Don’t Miss Out Mails with High Importance

It can be hard to follow up e-mails because of workload or you might overlook them. You can try creating rules on Outlook in order not to miss out your e-mails.

You can achieve optimum mailbox usage by creating a variety of rules based on your daily work routine and how you get your job done. This way, you can categorize your mails and separate your workload into different sections and respond your mails faster.

Outlook Rules

With rules, you can use your mails separately based on importance, subject, contacts or a lot of different scenarios on Outlook.

Receive Notifications for the Mails with High Importance

Wouldn’t it be nice to hear alert sounds and see a notification window on the screen when you receive an important mail?

Önem Derecesi Yüksek Maıller için Uyarı Sesleri Alma

In this article, we will create alert sounds and notification window for the mails marked as Important.

Play a Sound When Your Receive an Important Mail

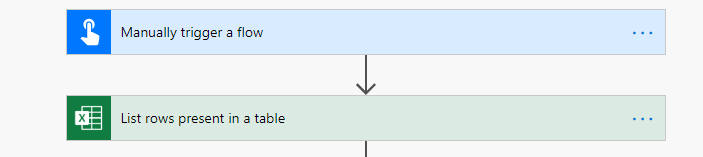
We will execute the action on the File–>Manage Rules and Alerts window.

*With this rule, if the mail you receive is marked as High Importance, an alert sound will be played and notification window will be displayed for this mail.

Action Steps

You can start by choosing New Rule–> Play a sound when I get messages from someone. You can change all the necessary criteria for the rule with the Next button on a common screen all the time anyways. So, selecting the template is not that important.  So, you can choose Apply rule on messages I receive under the Start from a blank rule title.

Önemli Maıl Geldiğinde Ses Kaydı Çalma

Click next.

Step 1: unmark from people or public group.
Mark marked as important.

Step 2: Choose the Importance level by clicking the word “importance”. Click next.

Önem derecesi

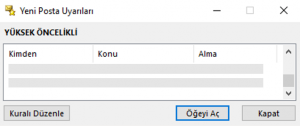
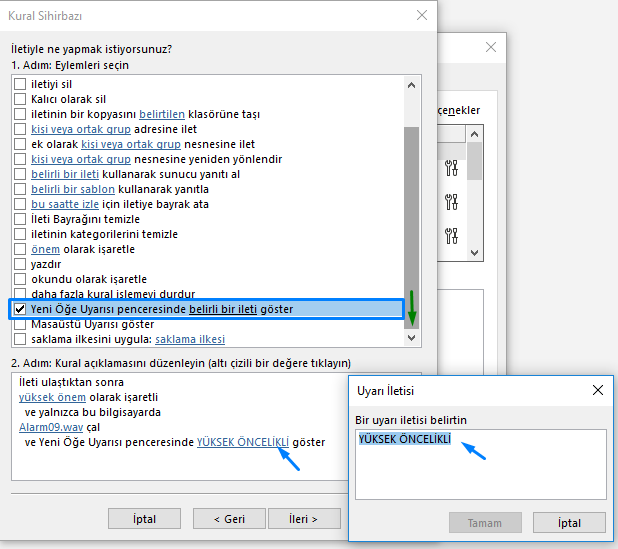
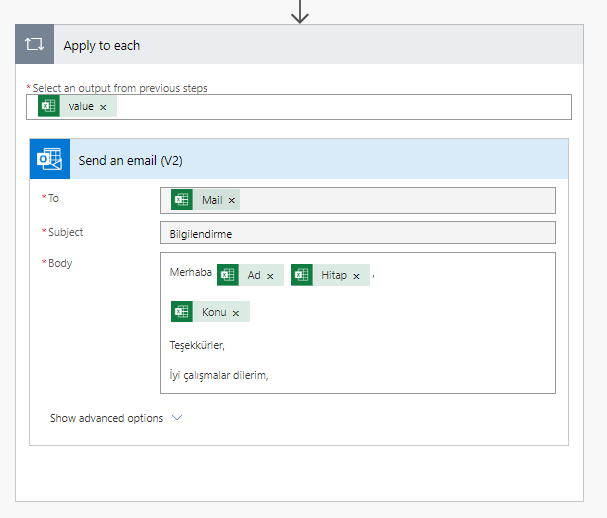
In the new screen, you will see the Step 1: play sound option.

Step 2: Click play sound and choose the sound you want for the mails.

istenen sesi seçme

Scroll down and choose the Display a specific message in the new item alert window option.

Step 2: Write the message for the alert and move to the next screen.

Yeni Öğe Uyarısı penceresinde belirli bir ileti göster

Click next and get to the last screen.

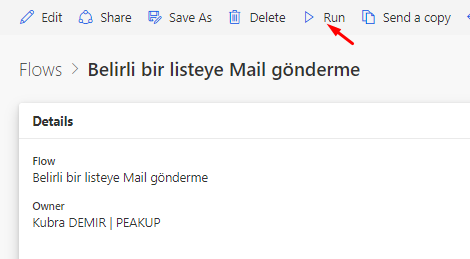
Step 1: Specify a name for the rule.
Step 2: Select Run this rule now on messages already in “Inbox” and control the past data that meet this rule.

Close the rule window with the End button.

Gelen Kutusunda çalıştırma

Click the Apply button on the Rules and Alerts window to save the changes. If no new rules will be created, save and close the window.

Kurallar ve Uyarılar penceresi

You can take a look at here for the mail rules.

Send Mass E-mails with Power Automate

You can send the mails with custom subject and content in which you address people specially in cases like congratulating, events, special day celebrations. This is something that especially the HR needs.

This way, you don’t deal with sending mails one by one. You only need to indicate the mail list and details.

Create a Table

Open en Excel in OneDrive. Add a Table from the Insert tab.

Write Mail, Name Surname and mail details into the columns of this table like below.

Each row of this table will be sent as separate e-mails by the flow.

Flow Process with Power Automate

Start a new blank flow.

After the data in the table is filled, flow will be run by being triggered individually. For this reason, start the flow with Manually trigger a flow.

In the next step, add Excel for Business (List rows present in a table) to be able to add the data in the Excel table. Add the table you’ve just created into this item.

In the next step, add Outlook (Send an e-mail).

In this step, the columns of the Excel table is added to the related fields. With you choosing the Excel fields (mail, name, etc.) the Apply to each item will be added to the flow automatically. An event will be created for each row in the Excel file thanks to the Apply to each item.


After filling the related fields, name the flow on top left corner. For example: Send Mails to a Certain List. You can save and close the flow on top right corner.

You can verify the data in the Excel table and run the flow.

You can take a look at here for the Power Automate Outlook Connector.

Using Collections

Usually it is necessary to store the data in temporary storage while calculation or processing. Then, the processed data is transmitted to the data source by saving permanently as ultimate data. Temporary records are stored in the variable tables called Collection. In this method, the data is calculated, processed and quickly written to the cache memory on the app screen only.

These tables are created virtually. Tables and columns can be named however wanted. Columns’ data types are automatically shaped based on the data they contain or the data source that will be saved tı later.

The Collect formula is used to create the collection tables. It is written as (table name ; { columns}) like below:

Collect(name_of_table;
{ column1:   textbox1.Text;
column2:   textbox2.Text;
column3:   textbox3.Text    } )

For example, you can write this formula into the OnSelect property of the SAVE button of OnTimerStart/OnTimerEnd property of the timer.

Using Collections

The personnel records will be written on collection in the screen of the image you see. 4 textboxes, 4 labels, button and gallery items have been used in this screen.

Item names are frequently used in formulas. So, the functional items in the screen should be named based on what they do or the data they contain.

Textbox names are: txt_name, txt_surname, txt_mail, txt_department

The formula below has been written into the OnSelect property of the SAVE button for the data entered in textboxes to be written to the Collection table.

*Table and columns can be named as desired.

Collect( Personnel;
{
P_name:    txt_name.Text;
P_surname:    txt_surname.Text;
P_mail:    txt_mail.Text;
P_department:    txt_department.Text   } )

When you click the save button, the data will be transmitted to the collection in seconds.

How to View Collection Data

All collections and their contents can be analyzed on a single screen with the Collections button in the View tab.

Click the gallery item to view the data in lists and choose the related Collection in the screen that opens up.

For the older versions, you can choose in the Data Source field in the Properties Window. Or you can execute the same action why writing the table name into the Items property of the gallery through formula bar.

To reset the textboxes after clicking the save button, the Reset() function is used.

*;; is used in actions that need to be executed successively.

Collect( Personnel;
{
P_name:    txt_name.Text;
P_surname:    txt_surname.Text;
P_mail:    txt_mail.Text;
P_department:    txt_department.Text   } );;

Reset(txt_name);;
Reset(txt_surname);;
Reset(txt_mail);;
Reset(txt_department)


Send Calendar to a Guest List with Power Automate

You can send meeting calendars with customized data like addressing each person, event content and location for all your event invitations through Power Automate.

This way, you don’t have to deal with creating calendars one by one. You only need to indicate the guest list and event details.

Create a Table

Open en Excel in OneDrive. Add a Table from the Insert tab.

Write Mail, Name Surname and mail details into the columns of this table like below.

For each row of this table, e-mails will be sent separately by the flow.

The event date and hour was written as 2020-03-23T13:00:00 in order for it to be in the format Power Automate expects. The time format is 24-hours and the event will be created for the exact hour you determine.

Flow Process with Power Automate

Start a new blank flow.

After the data in the table is filled, flow will be run by being triggered individually. For this reason, start the flow with Manually trigger a flow.

In the next step, add Excel for Business (List rows present in a table) to be able to add the data in the Excel table. Add the table you’ve just created into this item.

In the next step, add Outlook (Send an e-mail).

In this step, the columns of the Excel table is added to the related fields. With you choosing the Excel fields (mail, name, etc.) the Apply to each item will be added to the flow automatically. An event will be created for each row in the Excel file thanks to the Apply to each item.


After filling the related fields, name the flow on top left corner. For example: Send Mails to a Certain List. You can save and close the flow on top right corner.

You can verify the data in the Excel table and run the flow.


You can take a look at this link for the Power Automate Outlook Connector.

Conditional Formatting Lists

You can design lists with a condition with the If Formula in the gallery. It is possible to control a lot of features of the objects like color, look, size and place with these conditions. You can authorize based on person/department , hide/show buttons on the screen and highlight status in tracking processes.

Designing Lists with a Condition

In this example, items indicated with colors depending on the information they contain. While all the items of the “Education” department are indicated with purple, the Sales department is displayed with Grey.

ThisItem word is used to individually evaluate each item in the gallery. This way, it is possible to access the data of a certain row among the items.

While registering, people enter their names and surnames separately. And the & concatenation operator is used to write the name and surname next to each other.

ThisItem.P_name & ” ” & ThisItem.P_surname

Adding a Condition

An empty Label is added to the gallery and placed on the left of the gallery to highlight the items.

If(ThisItem.P_departman=”Education”;Purple; Gray) is written into the Fill property of the Label.

With this syntax, each row in the gallery will be evaluated one by one and the department info will be checked. If the department is Education, it will be displayed with Purple. If it is another department, it will be displayed with Grey.

As well as you can write the color as Purple, Red, Blue; you can also write it through the RGB codes.

When you want to use a special color code, the RGBA() function is used.
This function is written as RGBA(255; 255 ; 255 ; 1) as well. The last parameter of the formula gets a value between 0 and 1 and affects the transparency of the color.

You can click here for the other Power Apps articles.

You can click here for the details of the use of the If function.

Office Insider – What Happened in March?

NEW FEATURES/FIXES


You can find and follow all monthly Office insider new features and fixes (updates) on our blog. 👍🏻  Officer insider gets updates and new features regularly. It is important to follow these Office insider updates and use them in terms of increasing your knowledge. Now let’s take a look at what kind of changes happened in Office insider in the month of March.


March 28, 2020

outlook iconOutlook

Calendar visual refresh

Last year, we brought you a refreshed mail experience, and, this year, it is the calendar’s turn to get a facelift! The updates are fresh but familiar so, as a seasoned Outlook user, you can jump in and be more productive right away.

Learn more.

Takvimde çalışma haftasının resmi.

Notable Fixes

  • This change addresses delays when processing images with malformed or invalid protocol information.
  • This change fixes an issue where the latest changes to draft emails were not being updated.
  • Fixed an issue where right-mouse clicking on a file and using ‘Send to’ would not work.
  • Fixed an issue where if a user had a customized the search path for the Address book, Outlook’s name resolution scope would be limited to the customized path rather than including the Global Address List (GAL).
  • Fixed an issue where within a set of returned search results, sorting the results by Categories would not display the Category colors.


PowerPoint iconPowerPoint

Synchronize changes while you are presenting

For years, PowerPoint didn’t allow changes made to slides by others to be displayed while presenting. This ensured that the presenter was in full control of the content being shared. No one could revise slides, either accidentally or maliciously. It also ensured that all of your computer resources were used for slideshow rendering. A concern that is especially important if you are running on a low-end machine.

However, while some presenters may still desire this original design, we’ve heard from others that they are seeking more flexibility. With an increased focus on collaboration and real-time updates, we’re excited to make available the ability to synchronize changes whenever they are made, even when the presentation is in Slide Show mode.


How it works

You can synchronize changes in two ways: automatically or manually.

Automatically update slide content

1. Select the Keep Slide Updated check box on the Slide Show tab on the ribbon.

PowerPoint

2. Start the presentation by selecting the appropriate button on the Slide Show tab.


Synchronize changes


3. Whenever an update to a slide is made and detected, the content is automatically updated and visible in the slide show being presented.

Manually update slide content

1. Clear the Keep Slide Updated check box on the Slide Show tab on the ribbon.

Synchronize changes


2. Start the presentation by selecting the appropriate button on the Slide Show tab.

3. Whenever an update to a slide is made and detected, an Update Slides button appears at the top of Presenter View.


Synchronize changes


4. Click the Update Slides button to manually synchronize the slide content.

word new iconWord

Notable Fixes

  • Fixed an issue where the functionality to post comments was disabled.
  • This change addresses delays when processing images with malformed or invalid protocol information.
  • This change addresses an issue where the account manager would not dispatch messages resulting in a hang with third party applications.
  • This change fixes an issue where the Table of Contents would get updated with heading styles which were not present in the document.
  • Fixed an issue where digital signatures saved in Word documents would be removed when mailing the documents.


excel new iconExcel

Notable Fixes

  • This change addresses delays when processing images with malformed or invalid protocol information.


msproject new iconProject

Notable fixes

  • Fixed an issue where the ‘ProjectBeforeTaskChange’ Visual Basic Applications (VBA) event did not fire when a user clicked the “Inactivate” button found on the Tasks Ribbon within the Scheduling grouping.
  • If you set predecessor or successor details from within a Form type view, the ProjectBeforeTaskChange Visual Basic Applications (VBA) event didn’t always capture the changes. For example, if you deleted a dependency and clicked OK on the form, the event did not fire. This behavior has been fixed.
  • Fixed an issue where the latest values for the Actual Cost of Work Performed (ACWP) would not be displayed after making a change, such as a date change.
  • Fixed an issue where opening a project using the Most Recently Used (MRU) menu opened the project file with Read/Write access.
  • This change fixes an issue where if you created a manual task with a start date and a time (but no duration), it would be displayed with an incorrect time on the timeline.
  • Fixed an issue where printing a timeline using Hijri calendar would result in a month being skipped or duplicated in the print view.
  • This change addresses an issue where working in Team Planner with GDI objects, could result in the over allocation of GDI objects and create low memory conditions.


March 13, 2020  

word new iconWord, excel new iconExcel,PowerPoint new iconPowerPoint andoutlook new iconOutlook

Sensitivity labels

You can now apply a sensitivity label that your organization has configured to prompt you for custom permissions. Learn more

How to Access

If your organization has set up Sensitivity tags in Microsoft Information Protection and enabled users to assign permissions, you can access them. For example, choose Home> Protect, then select the label you want to apply to the document, workbook, presentation, or email.

İzinlere nasıl erişileceğini gösteren Word belgesinin resmi.

outlook new iconOutlook

Notable Fixes

  • Addresses an issue that caused the “Last Modified”; date on a file to be updated when adding an attachment to a mail or saving an attachment from a mail by dragging and dropping it (as opposed to via a menu).
  • Addresses an issue that caused hitting enter in the expanded find pane to fail to start a search, requiring instead that users click on the search button.
  • Fixed an issue where search shows no information about users when the option to “Show user photographs when available” is disabled.


word new iconWord

Notable Fixes

  • Fixed an issue when typing or editing a comment and using Ctrl+A would result in selecting text in the canvas instead of selecting text just within the comment card.
  • We fixed an issue in which the alignment of words in a document gets scrambled when tried to edit after printing using Quick Print.
  • We fixed an issue when merging two documents into one document.
  • Fixed an issue where marking revisions involving equations could result in a failure when saving the file.


excel new iconExcel

Notable Fixes

  • Fixed a performance issue that users may have experienced when programmatically editing a large range of cells.
  • Fixed a performance issue that occurred when opening csv files with Japanese environments.


msproject new iconProject

Notable Fixes

  • Fixed an issue where summary task dates weren’t always getting calculated correctly.
  • Fixed an issue where the OnUndoOrRedo event doesn’t fire without first running the OpenUndoTransaction method.


access new iconAccess

Notable Fixes

  • Fixed an issue where international versions of Access were displaying English strings in the user interface.


PowerPoint

New Features

Look above.


March 10, 2020

excel new iconExcel,word new iconWord,PowerPoint andoutlook new iconOutlook

Pick the perfect color

We heard you! Converting Hex colors to RGB values is now a thing of the past. For any property where you can define a color, click the appropriate button in the ribbon (such as the Font Color button) and click More Colors. Then, in the Colors dialog box, click the Custom tab and enter the Hex color value in the Hex box, for example, #0F4C81 or 444.

Learn more

Onaltılık bilgiler alanını gösteren renkli kutu.

excel new iconExcel

Automatically use new data types*

When you type a data value that resembles a possible stock or geographic location, Excel offers to convert it to the appropriate connected data type – Stocks or Geography. Give it a try!

Type in several geographic locations (such as “Seattle”, “London”, or “Tel Aviv”) or stock ticker symbols (such as “MSFT”, “ADBE”, or “AAPL”) in separate cells in a column.

When Convert to Geography or Convert to Stocks appears to the right of the selected cell, click on it.

Verileri dönüştür kutusunun bulunduğu Excel çalışma kitabı.

* This feature is only available in English right now.

outlook new iconOutlook

Drag emails to a group you own

As a group owner, you can now move and copy messages and threads by dragging and dropping them from your mailbox to the groups’ mailbox. Once moved, the content is visible to all the group members, and anyone can read the messages and participate in the conversation.

Learn more

Better search results, faster

The Search experience in Outlook just got a facelift! It is now more reliable, intelligent, and faster than ever. Also, any search entry is now being spell checked and, if errors are detected, helpful suggestions are offered to ensure that you get to the results you’re looking for. Finally, notice that the most relevant search results are presented at the top of the results list, making access faster.

Arama öğelerinin vurgulandığı Outlook posta kutusu resmi.

PowerPoint

Diagrams get connector support

Now, the converted lines between objects are connectors anchored to the shapes.

Ink conversion is also easier than ever with just clicking the Convert your ink button Convert your ink button. Select the converted object again to be able to access other conversion alternates, to make sure the conversion fits your needs. Give it a try! Give it a try!

Sağda siyah bağlayıcı dönüştürme kutusuyla boş beyaz kutular.


March 6, 2020  

outlook new iconOutlook

Notable fixes 
  • We fixed an issue that was preventing users from attaching a file to their mail messages when that file was open in another application.
  • We fixed an issue where creating a rule with Outlook Web Access did not persist to the Exchange server and resulted in a conflict.
  • We fixed an issue with Outlook that wouldn’t show the drop-down list in the “From” field when using dark mode.


word new iconWord

Notable fixes 
  • We fixed an issue that made the User Principal Name (UPN) people case-sensitive, e.g., [email protected] would fail to match [email protected], and prevented users from accessing the SharePoint Sites service.
  • We fixed an issue that prevented the Compare feature from working when the document was protected for editing.


PowerPoint

Notable fixes 
  • We fixed an issue that made the User Principal Name (UPN) people case-sensitive, e.g., [email protected] would fail to match [email protected], and prevented users from accessing the SharePoint Sites service.
  • We fixed an issue where the recommended thumbnails flashed when hovering your mouse over the thumbnails. In some cases, this could cause PowerPoint to crash.


excel new iconExcel

Notable fixes 
  • We fixed an issue that made the User Principal Name (UPN) people case-sensitive, e.g., [email protected] would fail to match [email protected], and prevented users from accessing the SharePoint Sites service.


We compiled all the new features and fixes in March in Office insider. Hope to see you in our other articles, bye bye. 🙋🏻‍♂️
You can share this article with your friends and family to help them get information about Office insider updates released in the month of March. 👍🏻 

Manage Formulas by Creating a Formula Screen

You can have an interactive flow or execute visual actions by creating rules with formulas in application screens.

Usually hide, show, freeze, open to edit or change color, location, size actions are done for the determined objects. You can apply all these controls in all application scenarios easily and flexibly.

Depending on the situation in the application scenario, you can connect objects or actions to department, user mail, location, title, marital status or user choice in multiple-choice actions.You can apply all these controls in all application scenarios easily and flexibly.

In this article, we will be talking about managing the conditions in the screen centrally and formula evaluation duration. And most importantly, we will talk about the importance of executing an action after the formula evaluation duration is done.

What is Formula Evaluation?

Formula evaluation is the test done during the result that is created by the written formula. Depending on the performance of the formula, a certain duration is needed.

Why Does Formula Evaluation Takes Too Long?

Depending on the performance of the formula, duration will be longer or shorter. As the conditions in the screen get more complex; main reasons like using nested formulas, waiting for the control of  different objects related to each other to be complete, and executing an action depending on the respond from the data source can make the duration of formula evaluation longer.

For this reason, it is important to make the formula evaluation run as fast as possible. When the respond of a formula that hasn’t been completely evaluated yet is late, the default value can be accepted as a respond and cause wrong actions.

What if a Formula is not Evaluated?

When the respond of a formula that hasn’t been completely evaluated yet is late, the default value can be accepted as a respond and cause wrong actions. Moving on to the next action before the formula evaluation is complete will cause incorrect results. Which means that even the condition you’ve specified is met, since the respond came later it will look like it is not met. When the conditions don’t work as fast as they are supposed to, it is necessary to do actions and review formulas to manage the screens in which formulas run.

How Should the Formulas Be Managed?

  • An evaluation screen should be created for the formulas.
  • Like we always mention, it is very important to pay attention to naming correctly. The Label in which the formula is evaluated should be named based-on what it does and the outcome it creates.
  • The formula should produce 1 and  as a result when it is used with the If function.
  • Since actions like OnSelect, OnVisible,OnScan are instant actions, the formulas that has a long duration should be calculated outside with labels and be run with 1,0 control only.

Text Functions

Power Apps Writing Formulas

PowerApps has its own software language and its special functions. Alongside these functions, it also contains a lot of functions that exist in Excel. These functions are offered in a general frame, they are not separated into categories as function groups like text, date, and statistic. In this article, we will analyze text functions.

It is very practical to code with PowerApps, with the formula language you are used to from Excel.

You can write all formulas on objects. After you choose the related object, you can write on Formula Bar.

*While writing a formula, you can write with commas (,) or semicolons (;) (depending on the browser language), you don’t need to use the equal sign.

Text Functions

There are basic text functions like Concatenate, Left, Right, Mid, Len, Upper, Lower in the Power Apps functions. You can edit or create text expressions with these functions.

Let’s write the formulas below for a textbox in which Text Functions is written. The name of this textbox is txt_sampletext.

The Concatenate function concatenates a mix of individual strings and a single-column table of strings. When you use this function with individual strings, it’s equivalent to using the & operator.

ConcatenateString1 [, String2, …] )

Concatenate(txt_sampletext.Text;  txt_sampletext.Text;  txt_sampletext.Text)


Left function returns the beginning characters of a string.

Left( StringNumberOfCharacters )

Left(txt_sampletext.Text;1)


Mid function returns the middle characters of a string.

Mid( StringStartingPosition [, NumberOfCharacters ] )

Mid(txt_sampletext.Text;3;1)


Right returns the ending characters of a string.

Right( StringNumberOfCharacters )

Right(txt_sampletext.Text;1)


Len function returns the length of a string of text.

Len( String )

Len(txt_sampletext.Text)


Lower function converts any uppercase letters to lowercase.

Lower(txt_sampletext.Text)


Upper function converts any lowercase letters to uppercase.

Upper(txt_sampletext.Text)


Proper function converts the first letter in each word to uppercase if it’s lowercase and converts any other uppercase letters to lowercase.

Proper(txt_sampletext.Text)


The Trim function removes all spaces from a string of text except for single spaces between words.

Trim(txt_sampletext.Text)


The TrimEnds function removes all spaces from the start and end of a string of text but leaves spaces between words intact.

TrimEnds(txt_sampletext.Text)


You can access the list of all the other functions here.

Automatic Page Redirect with Timer

Navigate Between Screens

The Navigate function is used to navigate between screens in PowerApps mobile apps. Navigation between screens can be done when the objects are touched/clicked(by the trigger of user) or within a certain period of time(with a timer). In our previous article, we navigated by writing a formula into the OnSelect property of a button. In this article, we will automatically navigate after a while.

Timer

You can use the Timer object for each action that will be executed based on a duration. This way, when the time start or ends, it will be run to be applied on the actions you’ve determined. Timer works here as a trigger (It is a word that we use a lot in our Power Automate articles). It starts for the time to be up and starts the flow.

Timer objects has properties like OnTimerStart, OnTimerEnd, Duration, Repeat, and Reset and actions are executed with these properties. You can take a look at the general features of Timer here.

For example, you can display a text and image that states uploading/saving/wait etc. You can start the page redirect when it’s OnTimerEnd.

When it’s OnTimerStart and OnTimerEnd, you can create a collection. You can create or compare conditions.

Navigate

Let’s make an example where we see a screen with the “Saved successfully” text after saving and when the duration is done we go back to the main page.

Two screens need to be added into the application. Let’s call one of the screens SCR_Mainpage , and SCR_Action_Successful the other.

Timer object will be added to the SCR_Action_Successful page.

Duration property of the Timer objects writes in milliseconds, and this indicates the duration of the times. When you add a timer, standard Duration comes as 60 000 and it indicated 60 seconds. Which means that when the timer start from 1 and end with 60, it will start the actions.

Let’s make the Duration 3000 and get the action done in 3 seconds in order not to wait for too long and to see the results faster.

Duration: 3000

When the specified time of 3 seconds ends, we’ll be redirected to the main page.

OnTimerEnd: Navigate(SCR_Mainpage)

It was set as true in order for the timer to start automatically.

AutoStart: true

After these actions, the timer works actively. If you want, you can hide the time by setting the Visible property as Visible.

Variable Types

Each object or property we use in Power Apps can be used as a variable. For example, we can set the value of a TextBox as TextBox1.Text and this way, it is defined as a variable that has a text value and that can be interfered by the users. All the values like the color of an object, the text, borders can be used. From this point of view, we can see all the objects as variables. You can take a look here to read other article concerning this topic.

Even though every object can be used as a variable, there are real functions designed to be a variable. These functions that are experts in assigning an using variables are analyzed under 3 categories for Power Apps. They are used in more dynamic actions like calculating a value in an increasing or decreasing way, rather than a static Label moving data between pages.

Power Apps Variable Types

1-General Variables:

Set

  • It’s a global/general variable, can be applied from all the screens of the app.
  • It can be created and applied anywhere in the app.
  • It can hold different data types like Numbers, Text string, Boole, Record and Table.
  • Set(variable_name; value)

2-Context Variables:

UpdateContext

  • they can be applied from one screen only.
  • a single value, a record, a table, an object reference, any result from a formula
  • UpdateContext({variable_name : value })

3-Collection: 

Collect & ClearCollect

  • Holds tables that can be created and applied anywhere in the applications.
  • Saved in the local device to be used later.
  • Different data can be enter based on columns or rows in a table.
  • Every time collect is created, writes the data on top of each other.
  • ClearCollect deletes an existing table and recreates it from scratch every time.
  • Collect( table name ;{column1: “value1” ; column2: “value2”; column3: “value3” ;…})
  • Collect( table name ;{column1: “value1” ; column2: “value2”}; {column1: “value1” ; column3: “value3”} ; {…})

You can click here to take a look at the other article concerning the usage of collections.