IoT platform Nova will pioneer contact-free working

PEAKUP aims to pave the way for contact-free work in offices and factories by popularizing the usage of Nova, the IoT platfrom they’ve developed.

PEAKUP has developed a platform to make workers that are back to working continue their work contact-free. It is sated that Nova, 100% local IoT platform that was developed by Turkish engineers in PEAKUP technology labs, enables working contact-free in a lot of areas. This platform that detects if someone’s temperature goes up has a lot of features that enable controlling lights and ac without any contact as well as blocking the entrance of someone who doesn’t need to come to the office.

PEAKUP COO Kadircan Toprakçı stated that Nova is a smart management platform. He highlighted that they have a lot of different control scenarios. And expressed that they believe the platform will especially be important during the coronavirus pandemic to decrease contagion through contact. Toprakçı said that there is a perception as “IoT apps are usually products that SMEs cannot access”. He said they want to popularize this platform among SMEs too with an affordable price. Toprakçı said: “Even if it’s just a studio, how much the machines work and their efficiency is calculated with a simple app. With this platform, the efficiency of operators can be calculated as well.”

“Detects and reports the risks”

Toprakçı mentioned that Nova has other smart features than turning on and off through a mobile app. He continued: “It has automatic control mechanisms like turning the lights on when it is dark inside or turning the ac on when the carbon dioxide level is too high. It warns the overcrowded areas by detecting the number of people per square meter. It has a determining role in putting just the people in the risk group into quarantine rather than shutting down the whole office in case of a risk. Analyzed and reports the people who was contacted by the risky person”. Toprakçı stated that with this platform, you can take someone’s temperature contact-free as well and a person with a risk will not be let in and said: “If someone’s temperature goes up during the day, it will be detected with the heat detector and warning and guidance systems will activate by detecting where that person walked around in the office and who he/she had contact with.”

Toprakçı mentioned that it also enables to measure efficiency with artificial intelligence. He added:” It can detect workers that always take a break together. You can measure the time people spend outside. It can warn when a personnel goes into a restricted area in terms of occupational health and security. When someone’s temperature goes up entrance to the areas that person contacted can be blocked. Even before knowing if that person is sick or not.”

Nova was developed with open innovation

Kadircan Toprakçı said that Nova, that is the product of around a 2 year work, was developed with the open innovation method with their customers and said: “While we were developing, we learned this: For example, waking up chicken during the night is important in terms of efficiency. This platform enables you to wake your chicken up whenever you want with sensors.”

Microsoft Teams , Chats

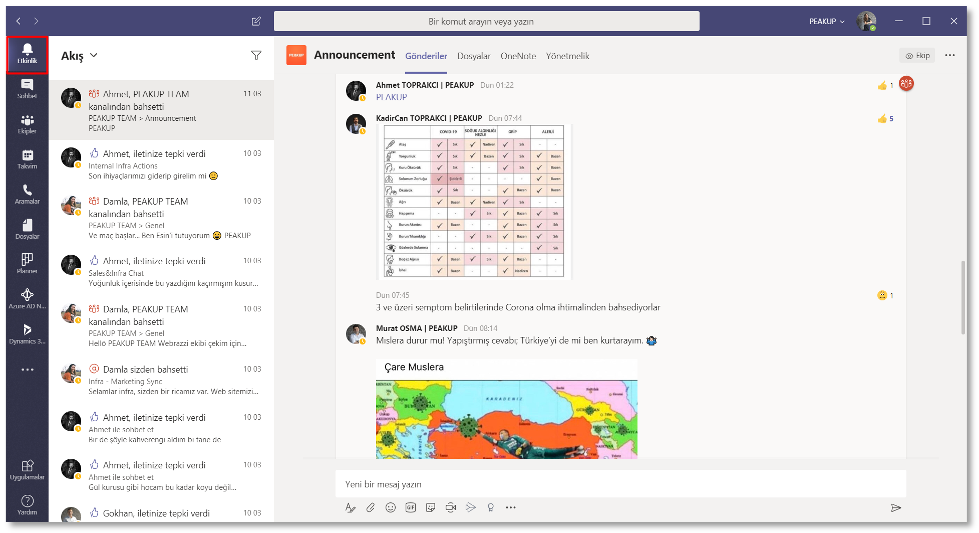
  • Activity

You can see and filter your notifications within the Activity page.


microsoft-teams-etkinlik-activity


Activity page is an area where you receive and filter notification. You will be receiving all the notifications that concern you.

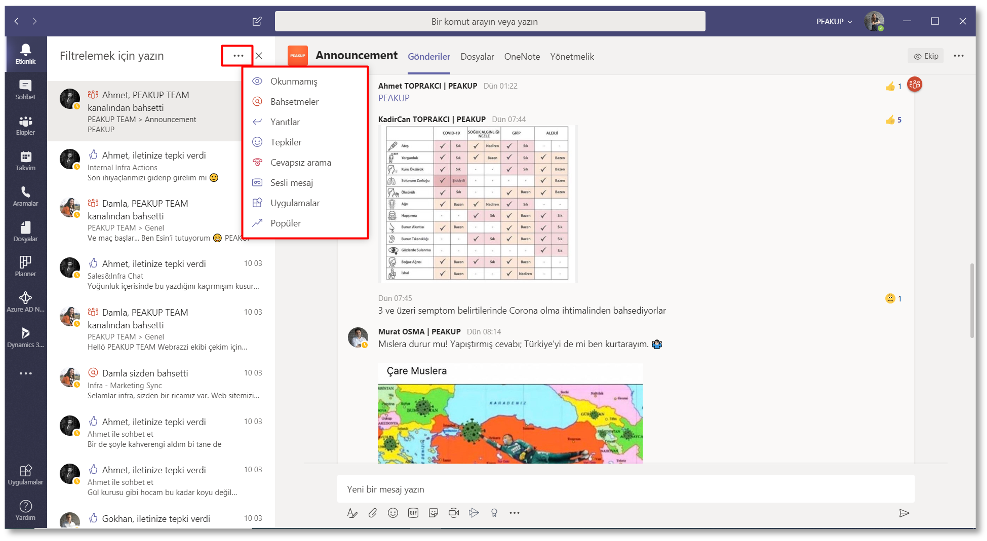
  • Filter Notifications

You can access your notifications like unread messages, liked/replied comments and missed calls.

microsoft-teams-bildirimleri-filtreleme

To filter notifications, click on the filter option and then the ellipsis to see the categories. In all Microsoft applications the ellipsis means “more options” and usually shows us beneficial things. You can narrow your notifications to unread messages, liked/replied comments, missed calls etc.


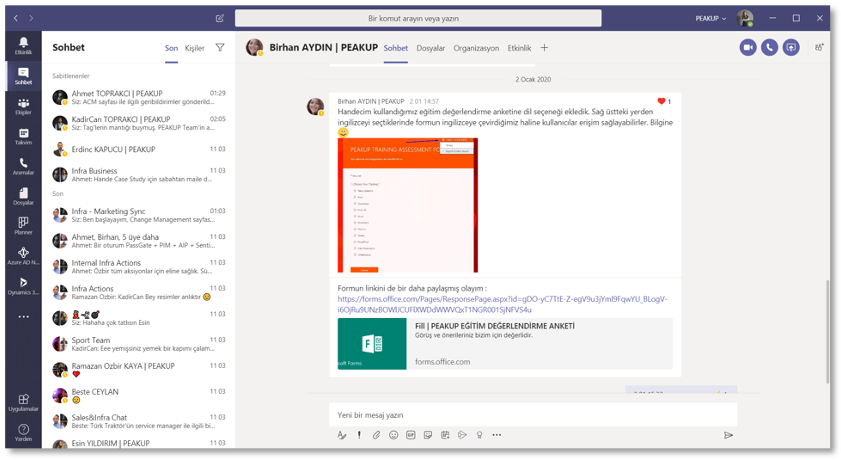
  • Chat – New Chat

  • You can click on the New Chat option and type one or more people’s names to start a new chat.

microsoft-teams-kullanimi-yeni-sohbet-2microsoft-teams-kullanimi-yeni-sohbet

Click the New Chat option that is seen as a pen and paper icon and type 1 or more people’s names to start a new chat. The maximum number of people that you can chat with as a group is 100 here.

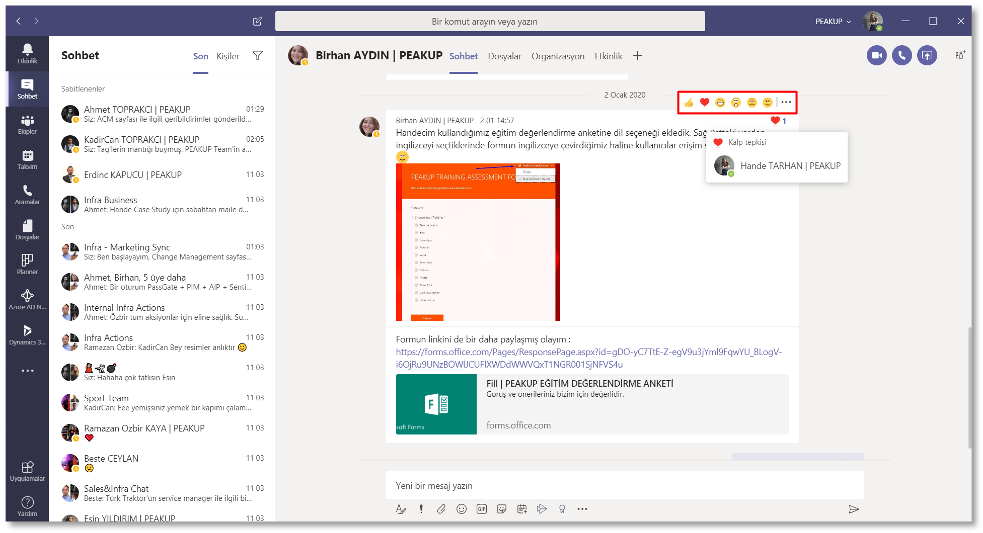
  • Reaction

When you hold a message you can choose different reactions like like/angry.


When you see different reaction that we got used to on social media like like/angry when you hold a message.

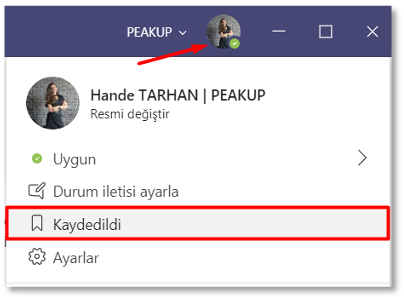
  • Save a Message

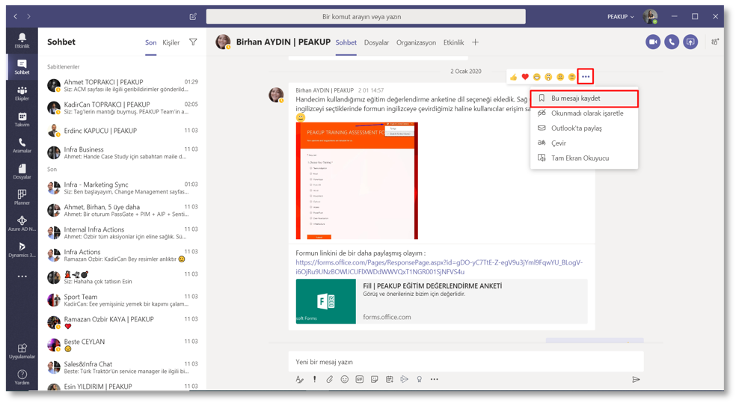
When you click the ellipsis next to the reactions, you can find a message later among Saved with the “Save this message” option.

microsoft-teams-mesaji-kaydetmemicrosoft-teams-mesaji-kaydetme-2

When you click the ellipsis next to the reactions, you can find a message later among Saved with the “Save this message” option. We can make key word-based searches with the search button but saving would be better for links that we don’t remember and screenshots.

  • Files

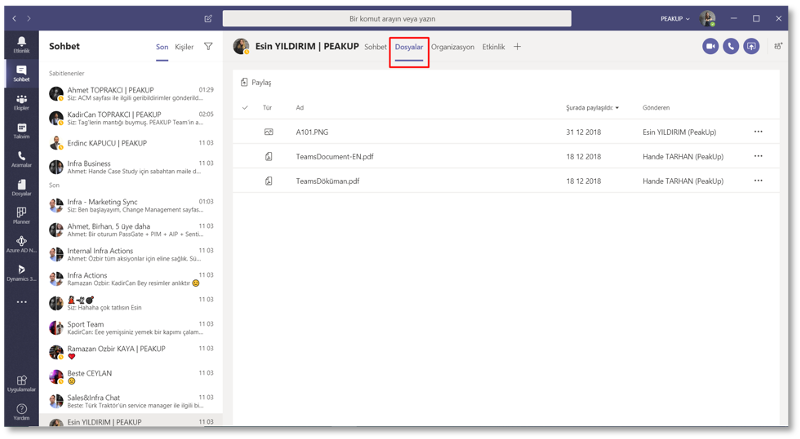
You can access and edit documents like Word, Excel and PDF shared in chats within the “Files” tab.

microsoft-teams-dosyalar-files

You can access and edit documents like Word, Excel and PDF shared in chats within the “Files” tab. People will see the latest version of the file.

  • Organization

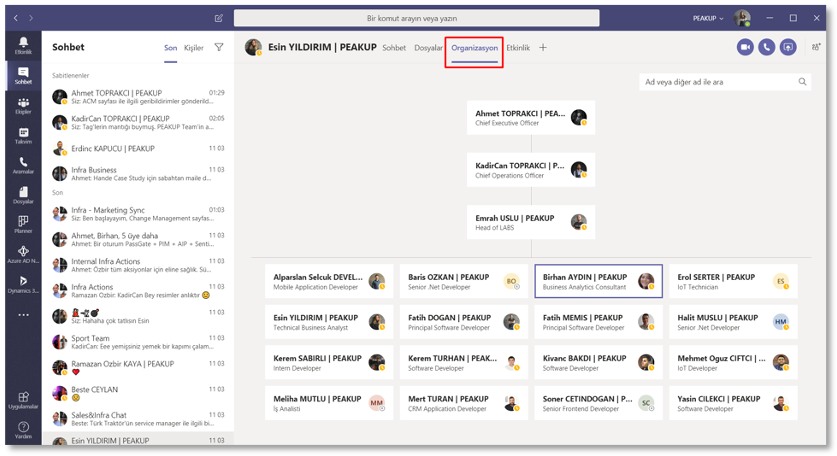
With the organization tab, you can see the place and title of people within the organisation chart with.

It can be helpful with even learning how to address someone alongside finding out their job. The Organization Charts is received from an index called Azure AD. If you cannot see the chart, you need to fill in the related fields. That field can be entered by managers (usually IT admins) only.

  • Buttons at the Bottom of the Chat

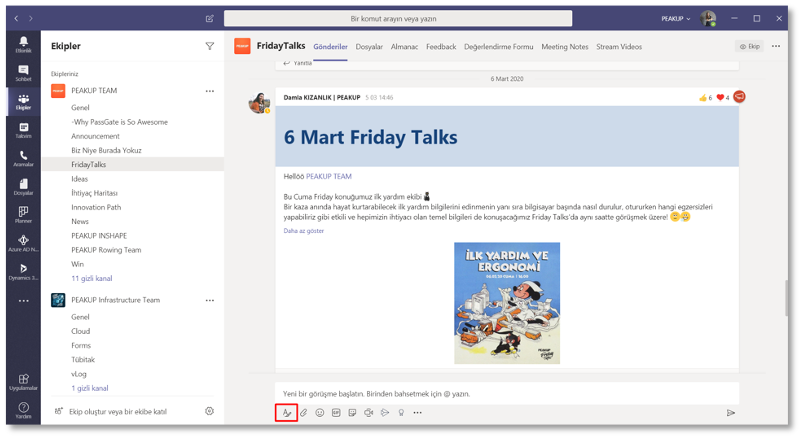
    • You can format what you write with the A (Format) icon.


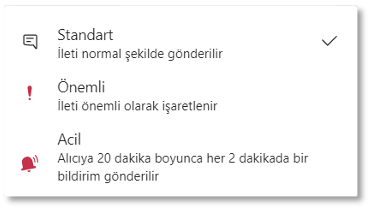
    • You can send important/urgent messages with the exclamation icon. (People who receive an urgent message get notifications for 20 minutes.)


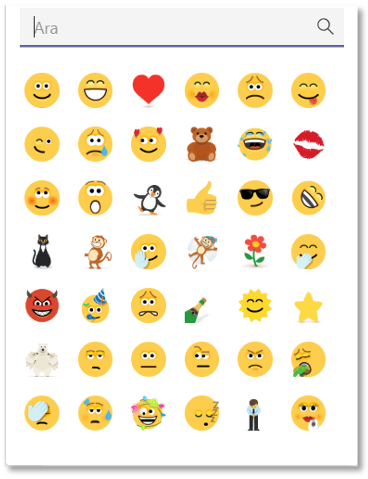
    • You can make your conversation fun with GIFs, stickers and emojis.

    • A (Format) button enables working like you are on Word. For example, when you press enter you move to the next line instead of sending the message. You can add titles to your paragraphs and write in bullets, give links.
    • There are two types of notifications under the exclamation icon. Important messages are used to draw attention. If you mark as urgent, people will get the notification of the message every 2 minutes during 20 minutes. If the person read the message, he/she will not receive any more notification.
    • You can make word-based searches in GIFs and edit the texts on the stickers.


  • Share a File in a Chat

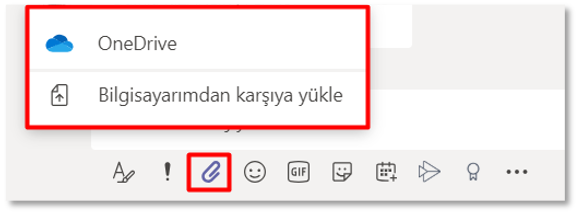
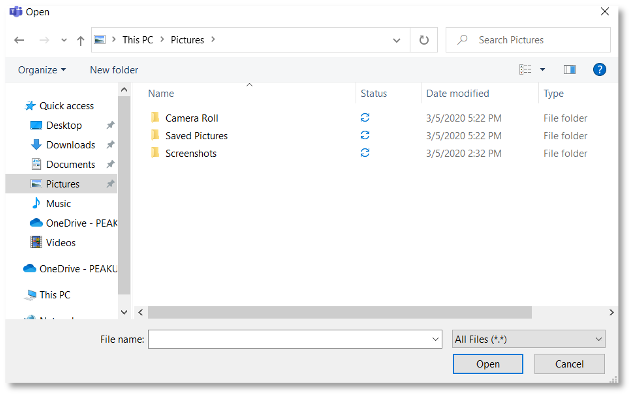
With the Attach icon at the bottom of the chat screen, you can choose between files in your computer or OneDrive and share them.

Files in Chats use your OneDrive, and the teams use your SharePoint. The storage limit in OneDrive per person is 1-5 Tb, and in SharePoint it is 1TB + The Number of Licensed users x 10GB per company. So, you can share files without any problems.

  • Co-authoring

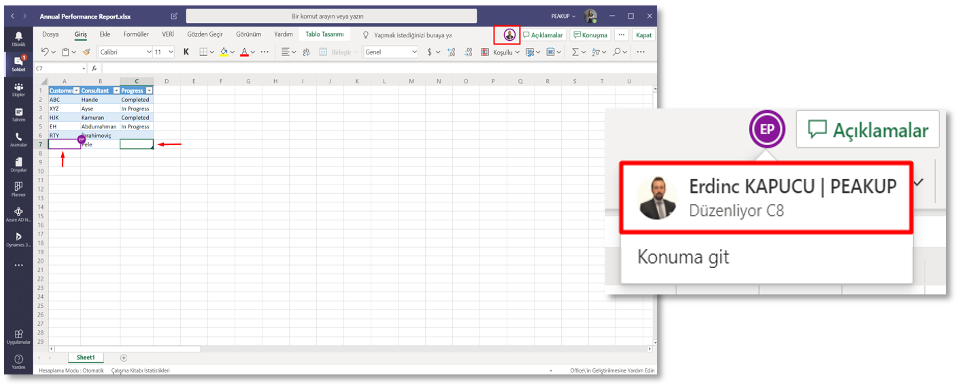
After you share files like Excel, PowerPoint, Word and open them, you can edit these files at the same time . This way you can prevent time loss by having to keep multiple versions of a file.

Versioning nightmares have become a part of our lives, especially for projects. We save new versions of a file and send to each other via e-mail. Now it is time to stop sending files and start “sharing” them. This way we can prevent version pollution with just one version of a file. On top of that, it is possible to access old versions of a file on OneDrive/SharePoint.

  • Chat While Working on a File

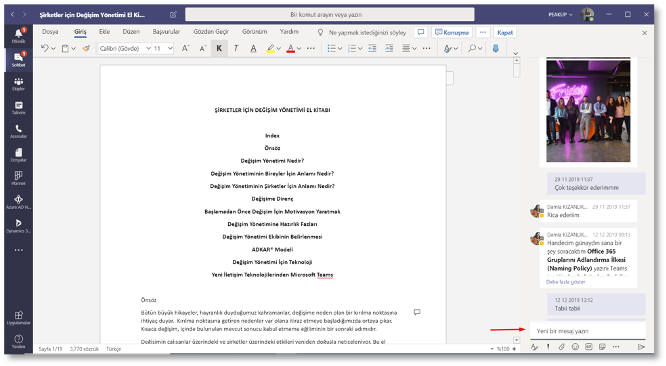
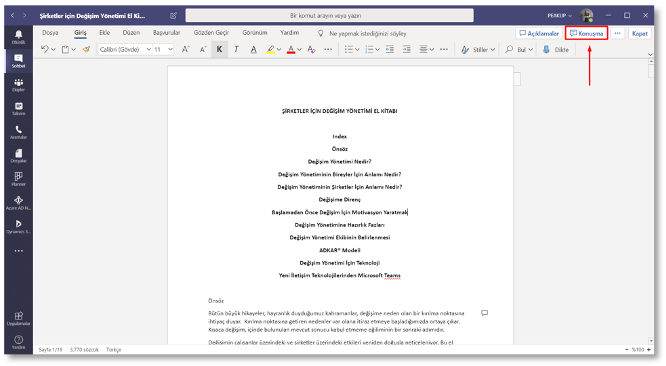
You can click on the “Chat” button to keep chatting while working on a file.

Chat will be opened at the point it was left.


  • Add a New Participant to the Chat

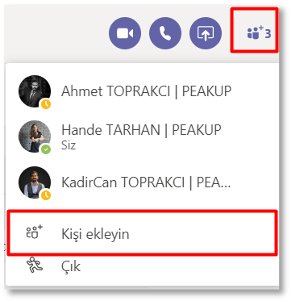
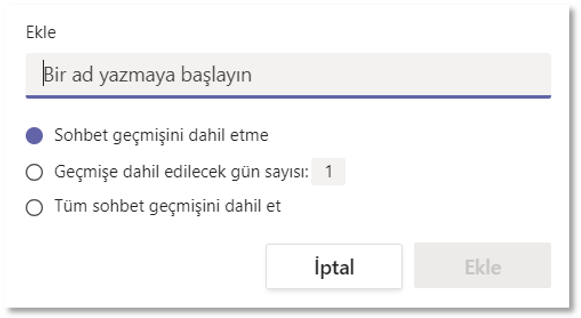
You can see and remove participants from a chat or leave the chat with the “Add participants” button on the top-right.

Sharing the chat history or not when you add a new participant is your decision to make.


There is no admin in a chat group. So, anyone in a group can add and remove participants. When you add a new participant, you can share all the chat history or the last few days or not share at all. When a new participant is added, a warning that say “A new participant has been added and the chat history has been shared” to the group members.

Use Stream As an Education Platform

A video education portal that most of the time education departments need can be managed basically with Stream. Especially in the remote education model, the video trainings are in the foreground. Education processes can be started quickly after uploading videos on Stream. There are a lot of products and services that Office 365 offers. You can use Planner for tracking tasks, Power BI for reporting, Power Apps products for mobile apps and all these products can be put together under the roof of Teams.

Create an Education Platform with Stream

You can add videos under different teams or categories within Stream to create an education platform. It is possible to manage educations online concerning personnel development, technical trainings etc.

In order to evaluate the information obtained from the video education platform, it can work integrated with Forms. You can collect responds from the users by adding Forms polls into the desired videos. You can add a Forms poll to the any minute of the desired video.

Add Forms to a Stream Video

Note: You can open Stream on portal.office.com

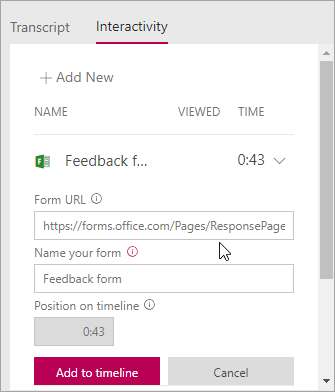
Choose a video within the Videos in the My content menu. Choose +Add New in the Interactivity tab.

Enter the link and name of the prepared Forms into this screen and choose the second you want the poll to come up.

Stream Time Line

Forms Link

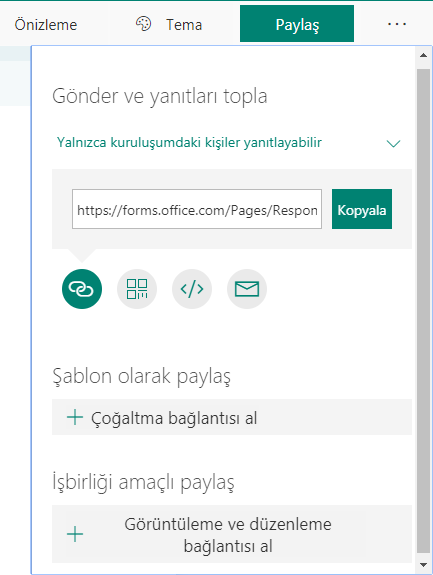
The poll link is found under the Share button in the editing screen.

Forms


You can take a look at the MS Form is Integrated with All Platforms articles to find out about the other products that can be integrated to Forms.

Click here to take a look at the MS Stream introduction page.


MICROSOFT TEAMS , TELECONFERENCE AND MEETINGS

  • Teleconference Buttons 

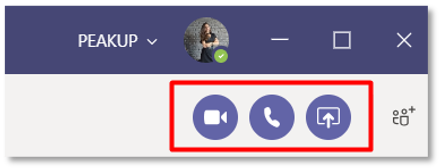
3 buttons on the top right of the chat screen are teleconference buttons. 

  • The first one is the Video Call button and you can have online meetings with your camera on. 
  • With the second one “Audio Call”, you can make online calls without sharing your video. 
  • With the last one “Screen Share”, you can share your computer’s screen and make presentations with the other participants. 
  • Video Call – Online Meeting

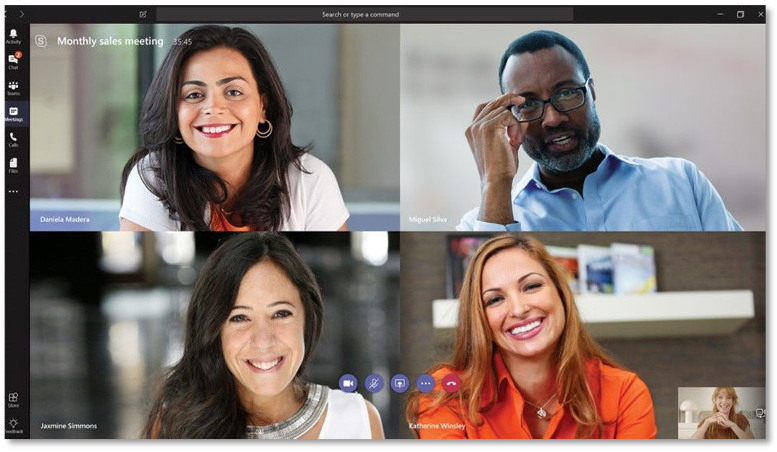
You can have remote meetings without losing anytime during your trips with video calls. Up to 250 people can participate in these meetings. You can join the meeting from your phone, tablet and computer. You can chat and share a file or your screen during the meeting. Up to 250 people can join a meeting but the maximum number of participants we will see on the screen is 4 for now. The artificial intelligence on the background of Teams meeting dynamically changes people on the screen by displaying them when they are actively participating. These are activities like having your camera on or speaking. 

  • Desktop Share

You can make online presentations by sharing your screen during the meeting. Also, you can give control to your colleagues and they can take actions on behalf of you. The feature is used a lot by helpdesks.  

Screen Share

Screen Share Button
Giving Control


-If you want to share all the action while sharing your screen, you go with the Desktop option. If you want to share just one of the apps working on the background, you choose it among the options. For example, if you want to take a look at your notes while making a presentation but don’t want anyone to see those notes, choose PowerPoint only. This way, even if you open another app the participants will keep seeing the presentation. 

-Only 1 person can be granted with control during screen share. 


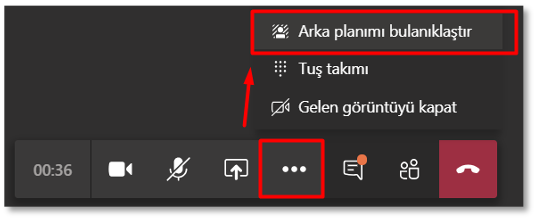
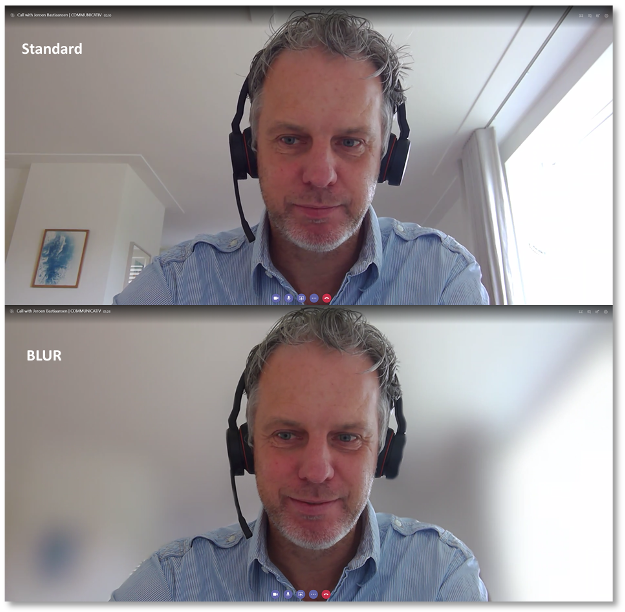
  • Blur My Background 

You can have video meetings free from the environment you work in with the “Blur My Background” option. 


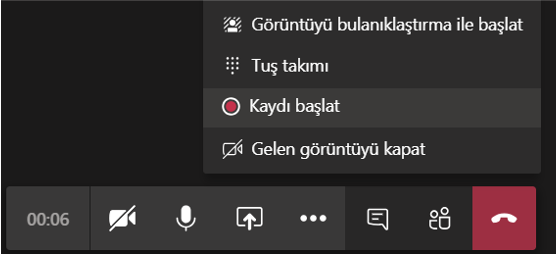
  • Record Meeting

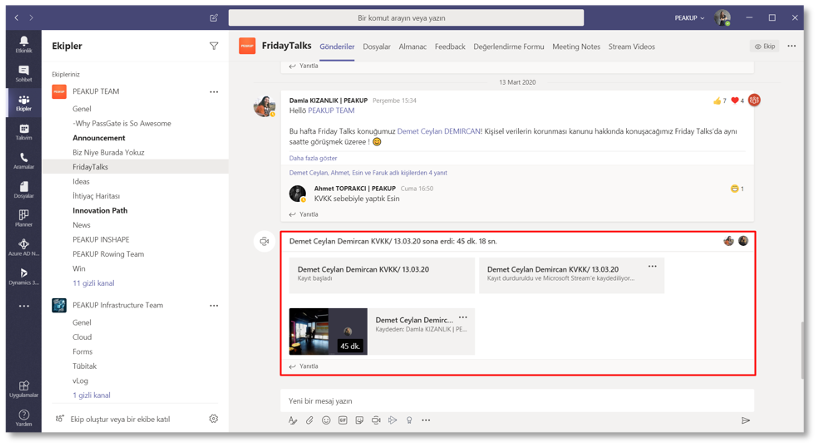
You can record a meeting and watch in later within Teams with the “Start Recording” option within the ellipsis.  These recordings can be used to create an education portal in Teams. 

  •  Teams and Channels

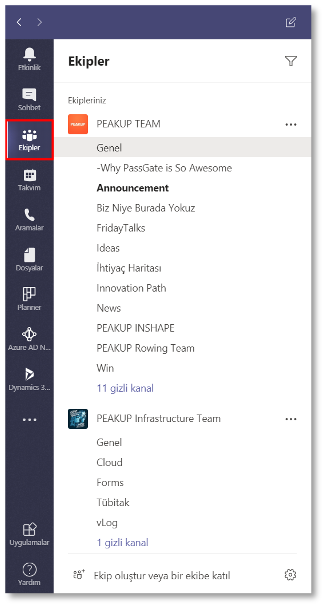
You can collaborate with the branch, departments, project teams; make announcements and make sure that your workers that work in different places know of each other. You can keep chats and documents more organized by splitting your work area into more specific pieces with the Channels under the Teams. 

  • Create a New Team 

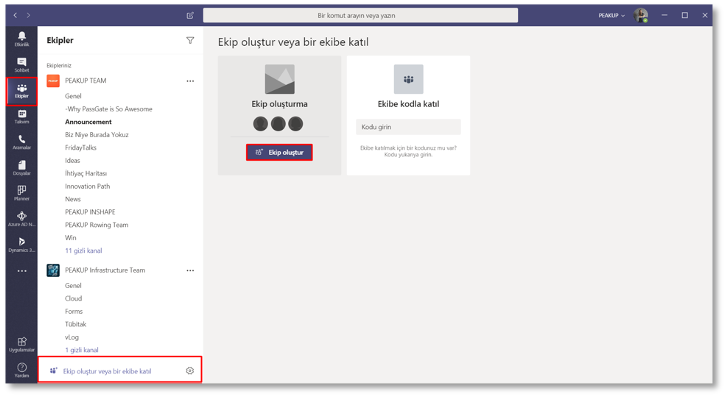
You can create a new team or join an existing team with the team code with the “Join or create a team” option on the bottom of the Teams page. Only team owners can see the team code. If you are a team owner, you can click on ellipsis next to the team’s name, go “Manage Team” / Settings / Team Code and get the team code. 

  • Create a New Channel 

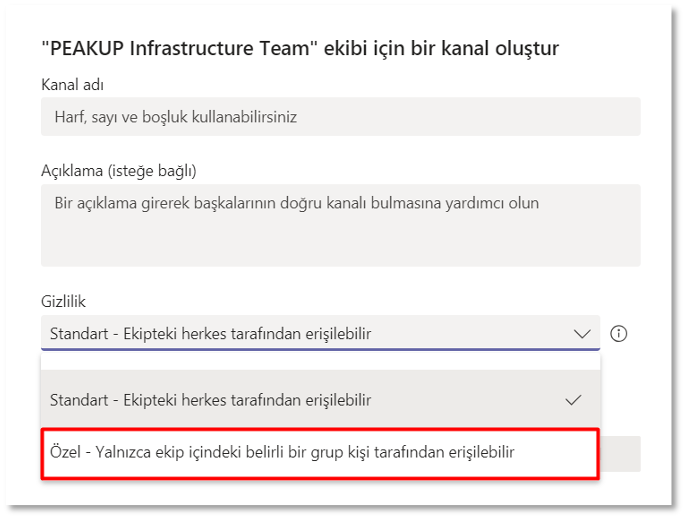
You can create new channels under a team within the ellipsis next to the team name. Standard channels are the channels everyone can access, and the private channels are locked channels that specific people can access. Team owners might not be included in a private channel. In this situation, they can see that the channel exists, but they cannot see what is inside. If the team owner doesn’t want any channels to be created, he/she can restrict this in settings.  

  • Mention

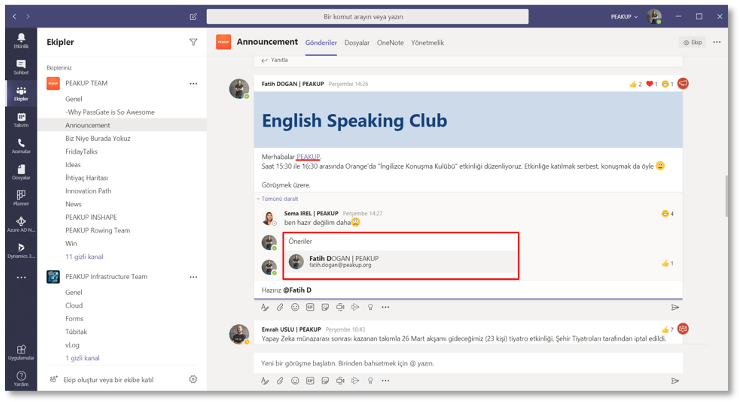
The posts shared in channels can be seen within the channel, but they are not sent as notifications. You can choose people that you want to notify with the @mention people. If you want to send notification to everyone, you can type the team name after @.  This feature is very important to get rid of the cc in mails. Thanks to this feature, the topic you share is received by people, but it doesn’t cause notification pollution. People who get notifications can be thought as people in to. 

  • Post Announcements 

You can make your announcements more obvious with the “Announcement” option under the “A” Format button in a team. This option is

not found in chats, it is under Teams only.

Making it an announcement is not enough to notify everyone, you must use the mention feature for that. 

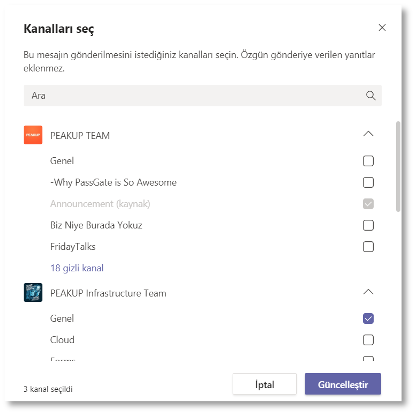
  • Share a Post in Multiple Channels at the Same Time 

You can post your announcement from one center without needing to send it one-by-one with the “Post in multiple channels” option under the “A” Format button in a team. 

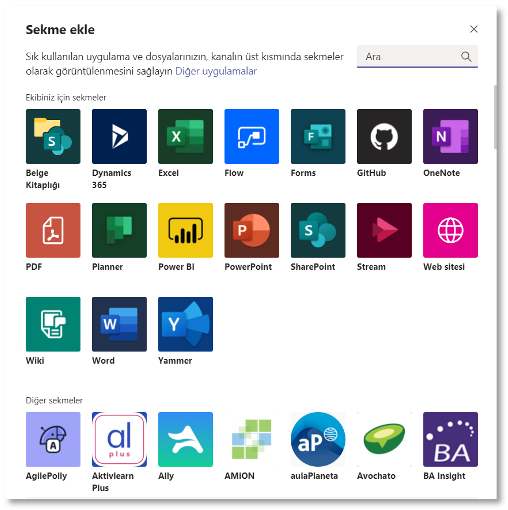
  • Add a Tab 

You can add your 3rd party applications a tab for quick access by clicking the “+” (Add a tab) option next to the tabs that are found on top of a channel. 

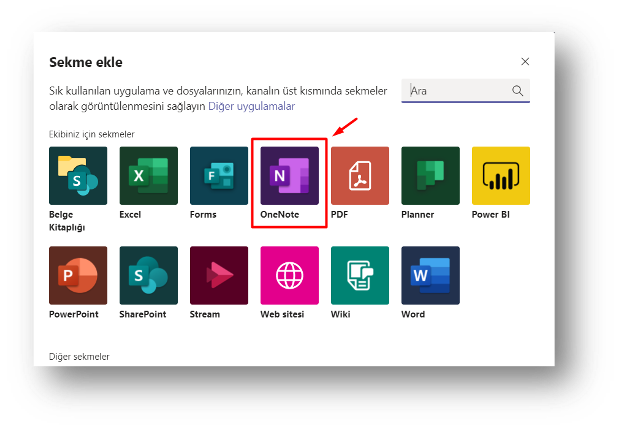
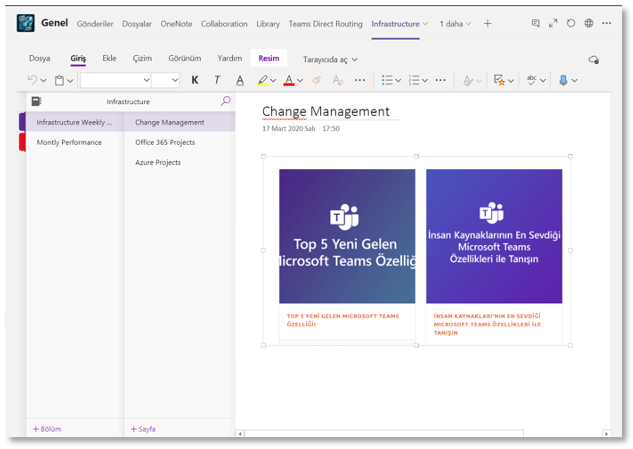
  • OneNote

You can keep your meetings organized by integrating OneNote to your teams. On top of that, you can work simultaneously on these notes! 

  • Forms

You can create a poll with Forms, add it to Teams channels and collect Feedback.  You can digitalize your paperwork by creating recommendation/complaint form, satisfaction pools and also exams that can be graded. When you try to add Form into Teams as a tab, you come across 2 options: -Create a form where you can create questions with your teammates. -Show me forms that I have already created in the Forms app and collect feedback. 


You can access the forms app within portal.office.com. Integrate the polls you have created in this app to Teams and collect feedback. Polls can be collected anonymously or with names. You can get feedback from the company or outside the company. You can find all these options in the Settings section of the Forms app. 


  • Planner

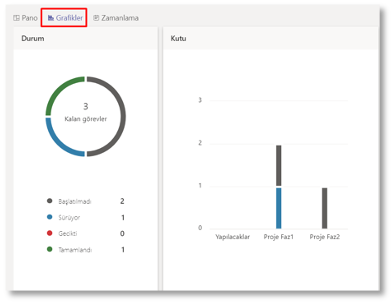
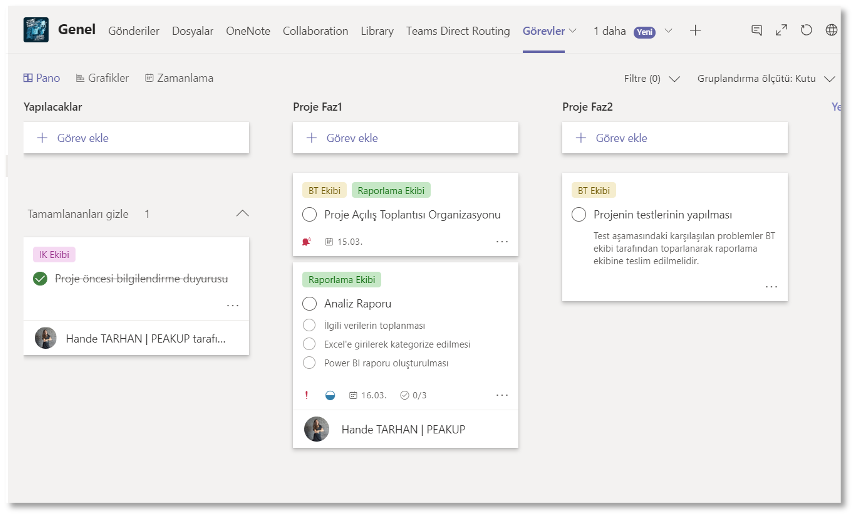
You can assign tasks to people in your team with Planner and determine due date, importance, task status and task steps.


You can also get task tracking report.  


  • Calendar 

Your Calendar page helps you to display your calendar in Teams by working in synchronization with Outlook. The meetings created within Teams will reflect on Outlook. 


  • Organize a New Meeting 

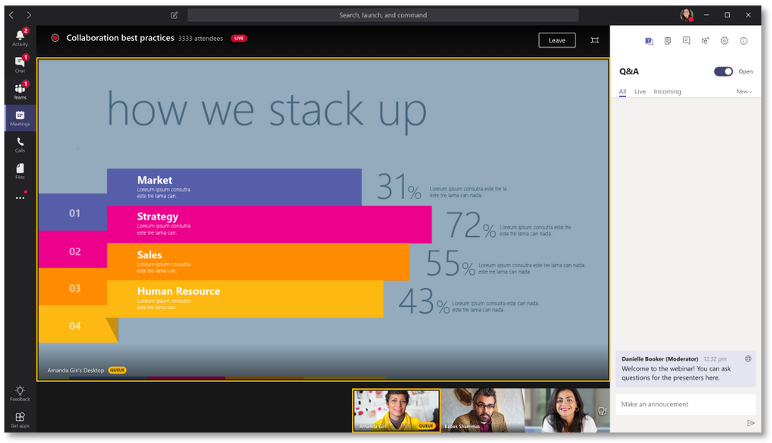
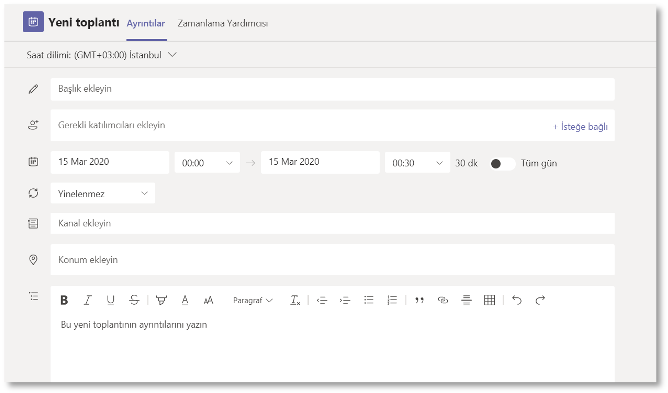
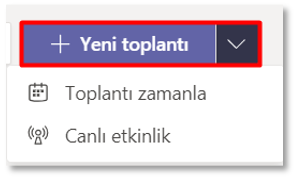
You can quickly organize a meeting with the New Meeting option on top right corner of the calendar page. You can choose “Plan a Meeting” for video calls and “Live Event” for bigger presentations. Meetings can be organized with up to 250 participant and the Live Events can be organized with up to 10.000 participants. Live Events are meeting where only the presenters make a presentation and participants are the audience without video or sound. Live event option can be better for trainings. Muting every single participant can be hard for the presenter. This option is also convenient for the meetings that require a high number of participants. It is possible to have a questions/answers field in the live events. Also, these meetings can be recorded and watched later within Teams. 

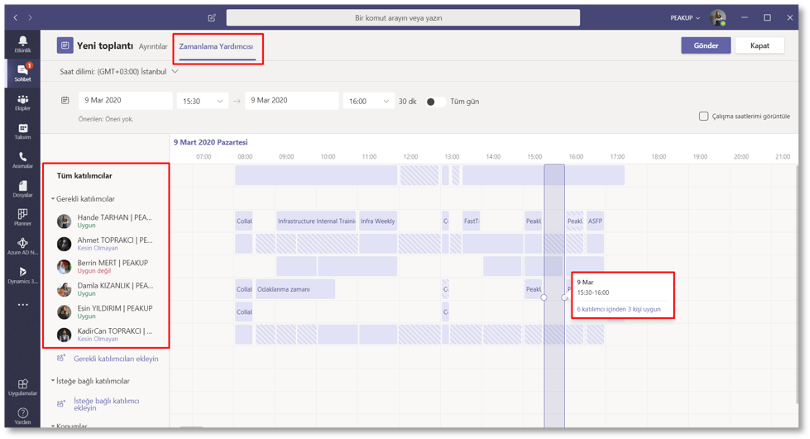
  • Scheduling Assistant 

You can maximize the meeting participation by seeing if the participants are available throughout the day or not with the Scheduling Assistant! 

Sort and Fill Data with Custom Lists

In this article, we will be talking about how to create a custom list in Excel and what we can do with it. We can get faster in entering and analyzing data by creating data tables quickly with custom lists. If you already have a data list, i.e. certain product names, brands, stock names, region names etc.; if you add them to custom lists once, it is possible to list all the data in the list quickly instead of writing them over and over again. You just need to write any data from that list into a cell and drag it down. In addition, you can find articles concerning other features of Excel on our blog.

HOW ARE THE CUSTOM LISTS STORED?

Once you create a custom list, it is added to your computer registry, so that it is available for use in other workbooks. If you use a custom list when sorting data, it is also saved with the workbook, so that it can be used on other computers, including servers where your workbook might be published to Excel Services and you want to rely on the custom list for a sort.

However, if you open the workbook on another computer or server, you do not see the custom list that is stored in the workbook file in the Custom Lists popup window that is available from Excel Options, only from the Order column of the Sort dialog box. The custom list that is stored in the workbook file is also not immediately available for the Fill command.

If you prefer, add the custom list that is stored in the workbook file to the registry of the other computer or server and make it available from the Custom Lists popup window in Excel Options. From the Sort popup window, in the Order column, select Custom Lists to display the Custom Lists popup window, then select the custom list, and then click Add.


HOW ARE CUSTOM LISTS CREATED?

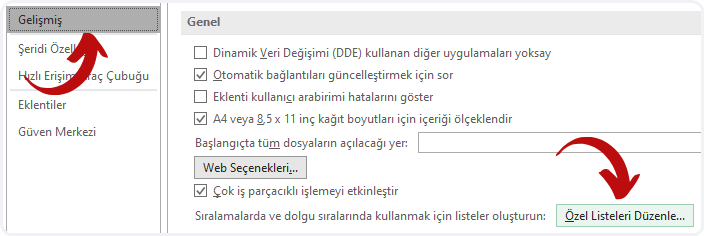
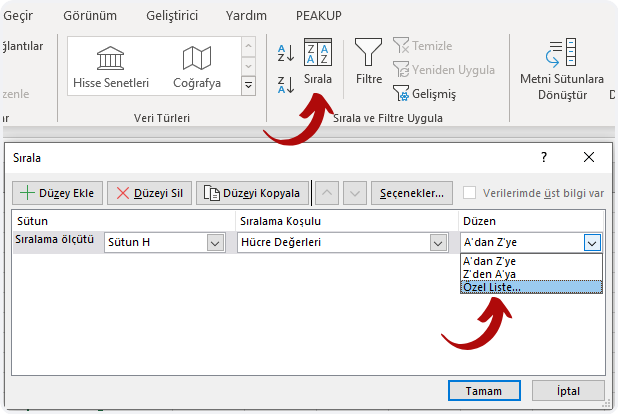
You need to access the existing custom lists box to create a custom list. There are two ways to access that box.

  1. File > Options > Advanced >  Edit Custom Lists

özel listeleri düzenle


2. Data > Sort > Order > Custom Lists

özel listelere ulaşmak


BUILT-IN LISTS

Excel provides day-of-the-week and month-of-the year built-in lists. The names will change depending on the language you use.

Built-in lists

Sun, Mon, Tue, Wed, Thu, Fri, Sat
Sunday, Monday, Tuesday, Wednesday, Thursday, Friday, Saturday

Jan, Feb, Mar, Apr, May, Jun, Jul, Aug, Sep, Oct, Nov, Dec

January, February, March, April, May, June, July, August, September, October, November, December

Note: You cannot edit or delete a built-in list.


For this reason, when we type January into a list and drag it down, a list that goes like February, March, April is created. If these lists didn’t exist, when we dragged the list it would have gone like January, January, January.

yerleşik özel listeler


HOW DO YOU CREATE A CUSTOM LIST MANUALLY?

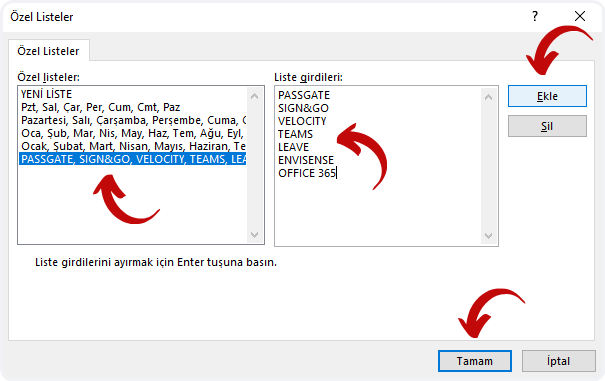
  1. Access the Custom Lists Box with one of they ways we’ve mentioned above.
  2. Enter the data you want into the List entries field.
  3. Click Add.
  4. You will see that it is added in the Custom Lists field.
  5. Finally, click the OK button.

özel liste penceresi


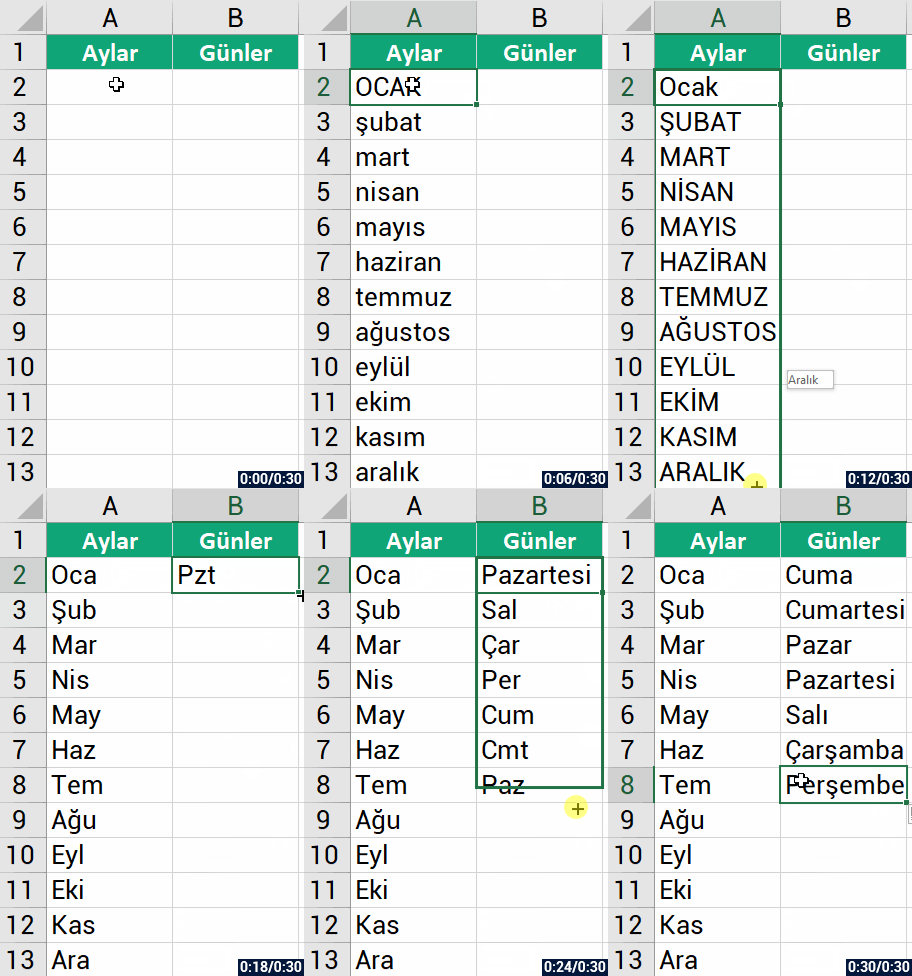
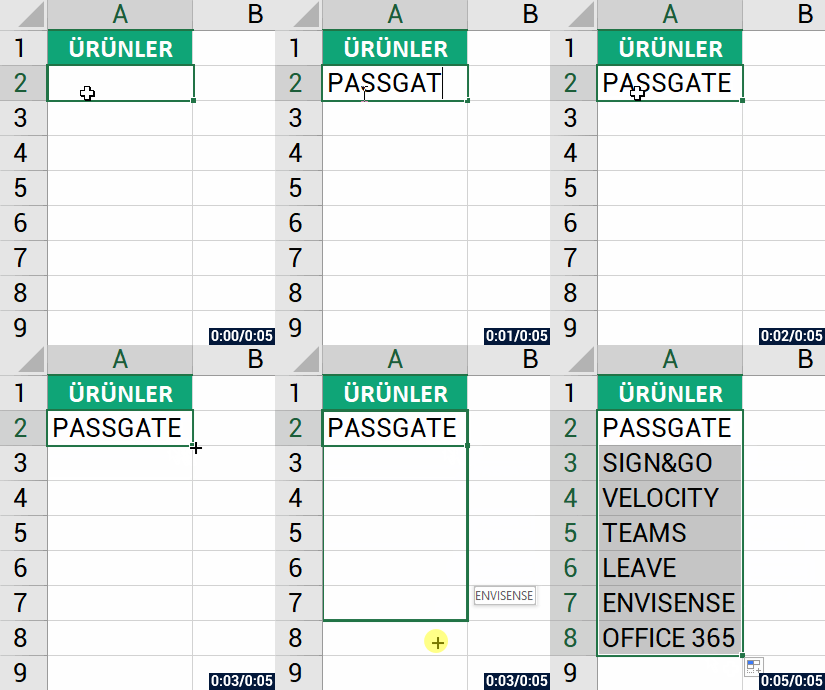
Now you will see that when you write and drag any data that you’ve entered to the List entries field, every single one of them will be listed.

manuel özel liste


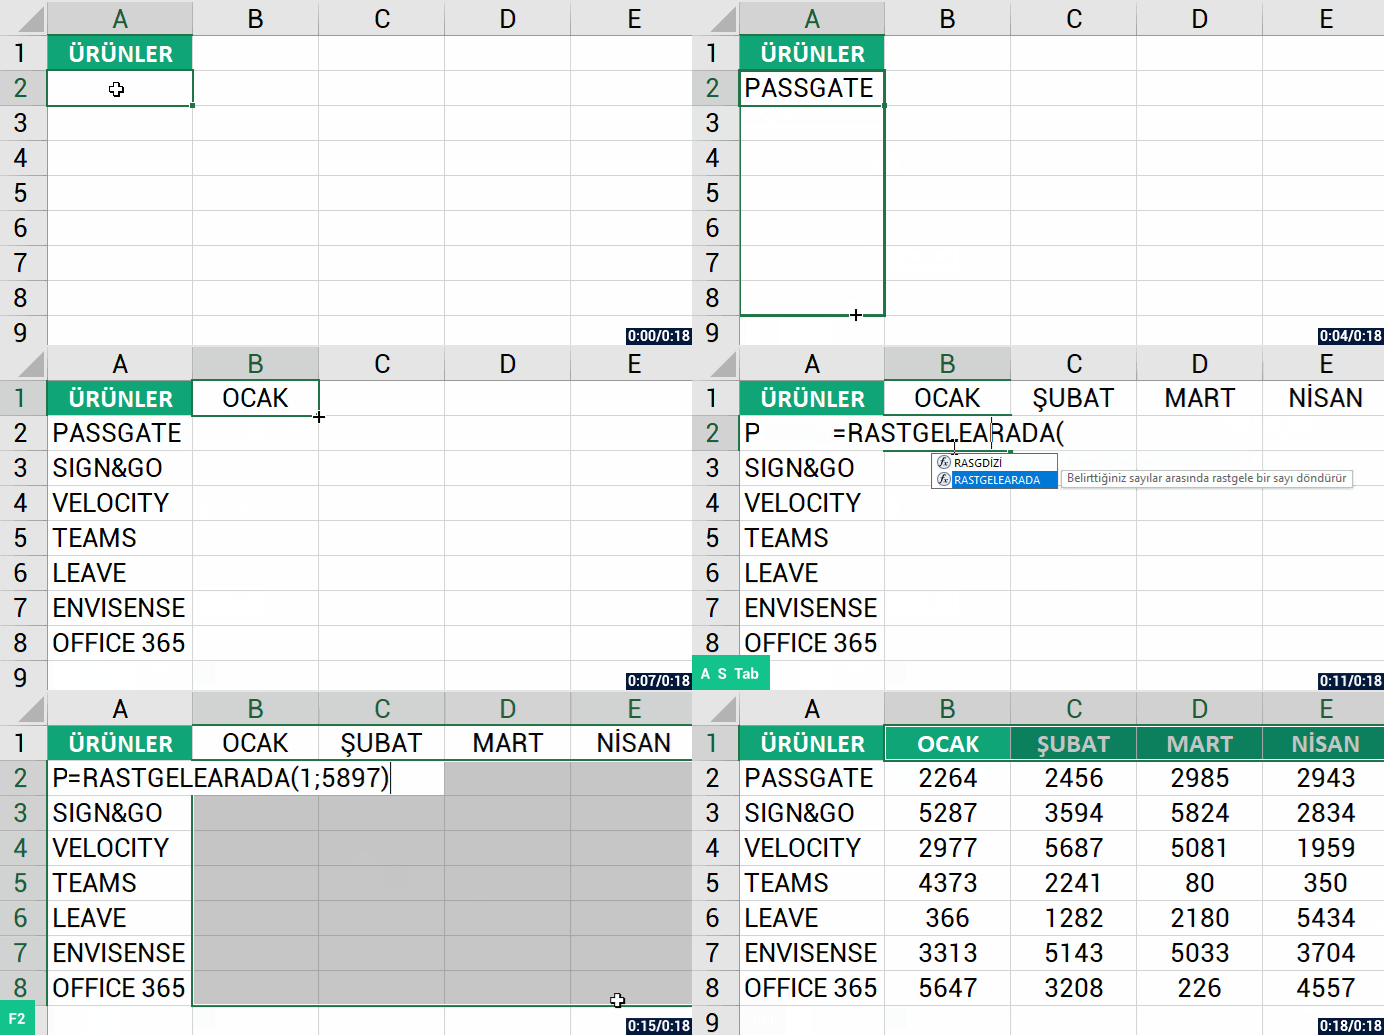
Let’s quickly create a data table that contains of the data we created and also months.


özel listeler hızlı doldur


IMPORT YOUR DATA TO YOUR CUSTOM LISTS

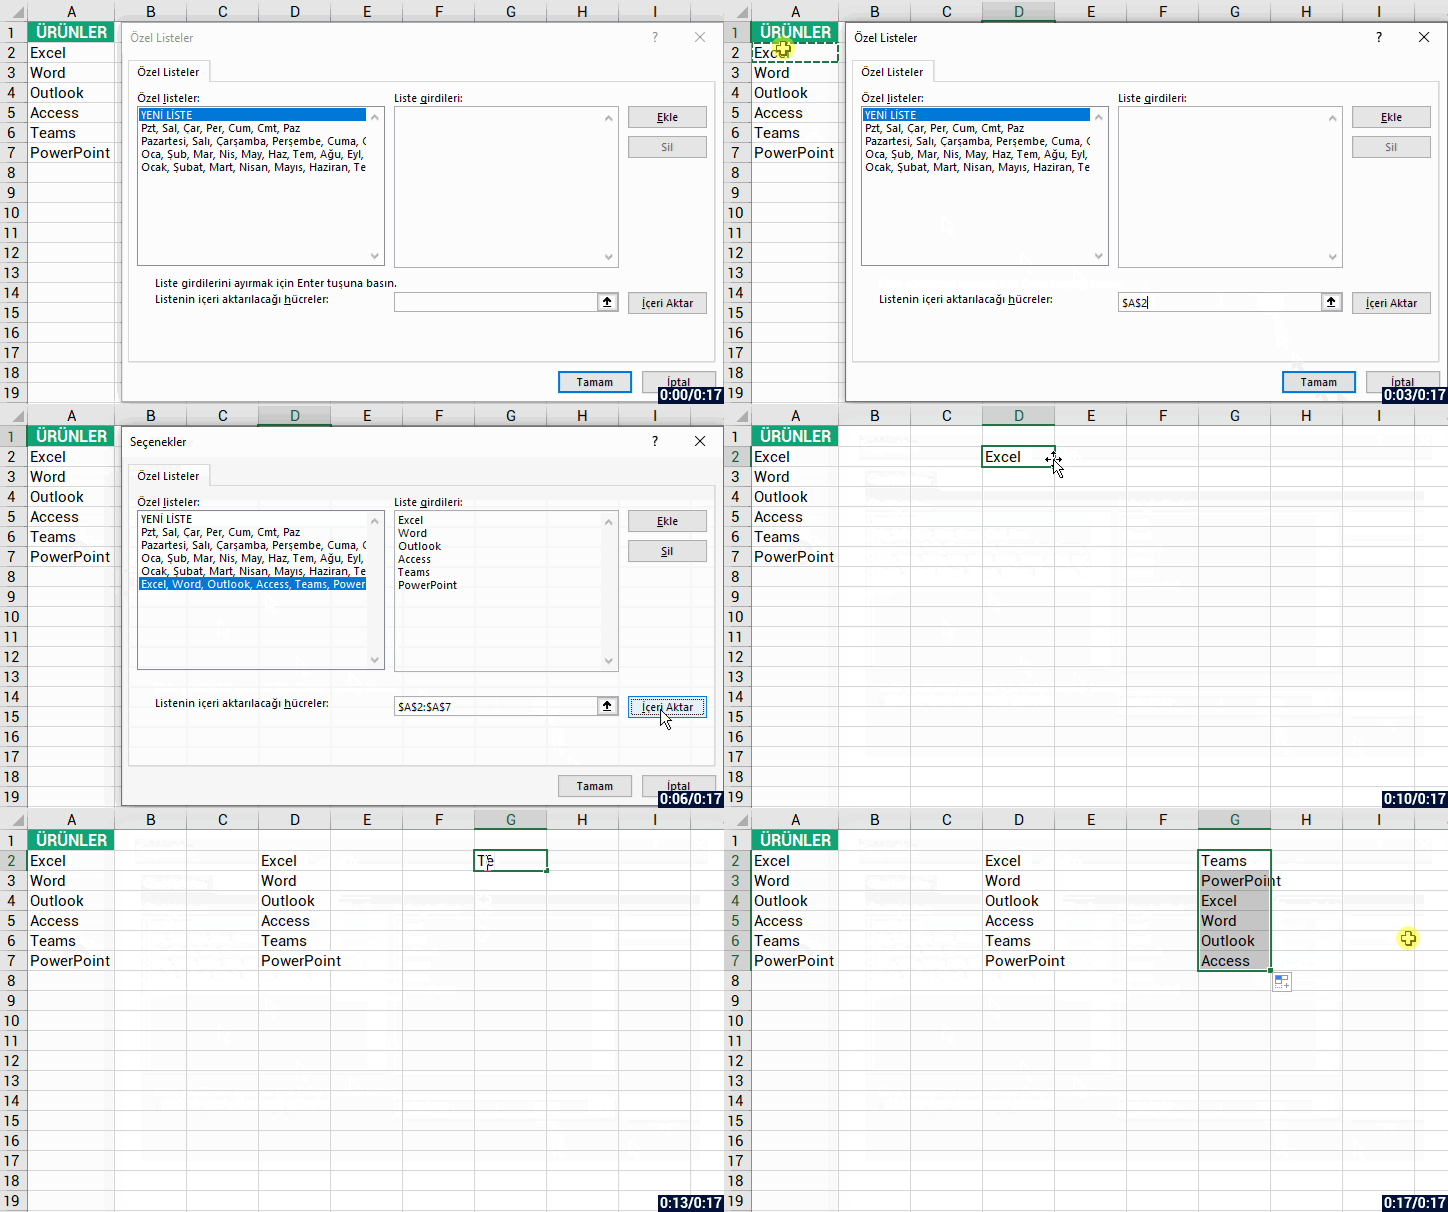
If you have steady and unique data in a range of cells, you can import that date to the customs listens box as a whole and use them in your lists. For that you need to go to the Custom Lists box from File > Options > Advanced > Edit Custom Lists. Afterwards, we will select the cell range and import the content.


toplu listeyi custom listden içeri aktarmak


And the thing about accessing these lists from the Sort window is that you can use them with the Sort feature.

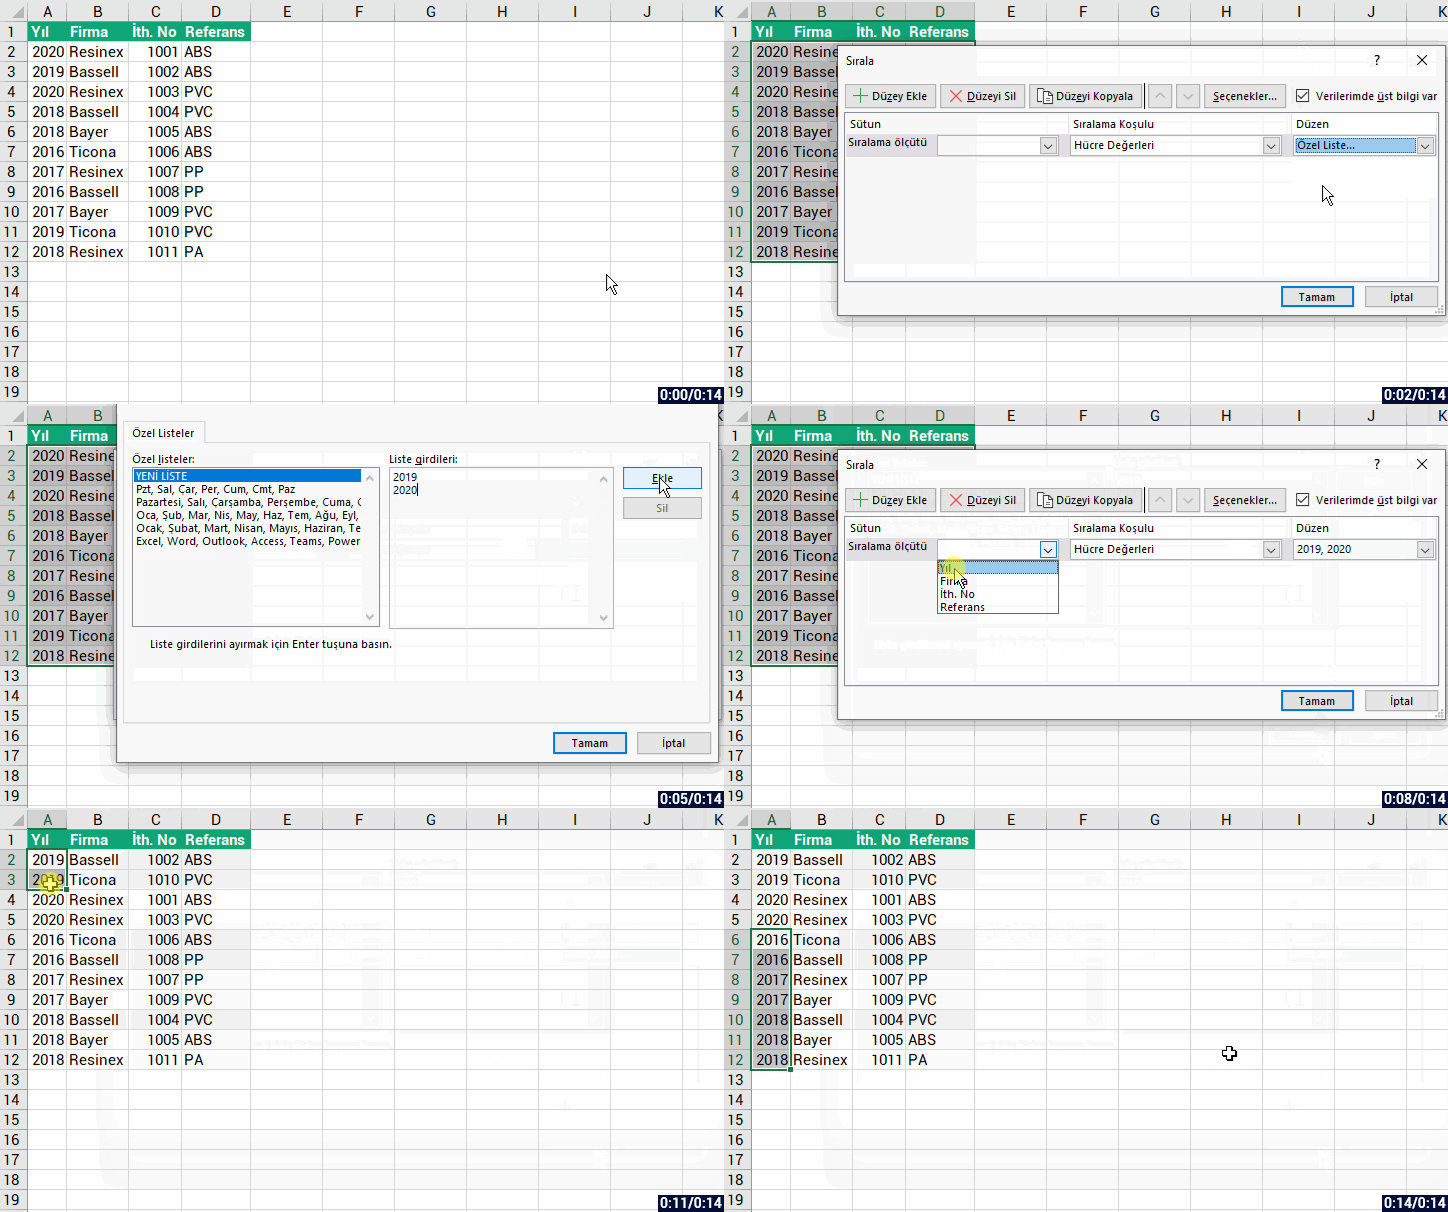
For example; there are multiple lists in a table and you want to sort the list but you want 2019 and 2020 be the primary ones. You can add the 2019 and 2020 data into the Lists box and sort the way below.


custom list sıralama yapmak


You can get detailed information on Office Support.

See you in other articles, bye. 🙋🏻‍♂️
You can share this post with your friends and make sure that they are informed too.👍🏻

Rename a Worksheet

In this article, we will be informing you about how to rename a worksheet. Two changes that help to edit and define worksheets and the data they contain is to rename the worksheet and to change the color of the sheet tab under the work area. You will see the instruction and actions concerning this. You can take a look at our blog to find our articles about the other features.


3 ways to rename a worksheet

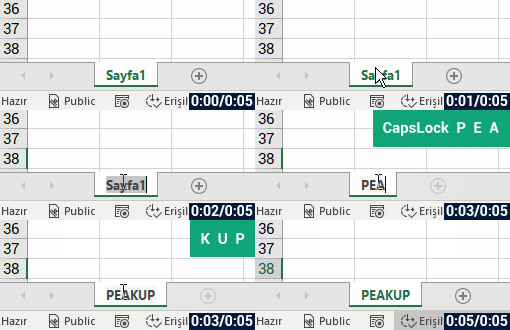
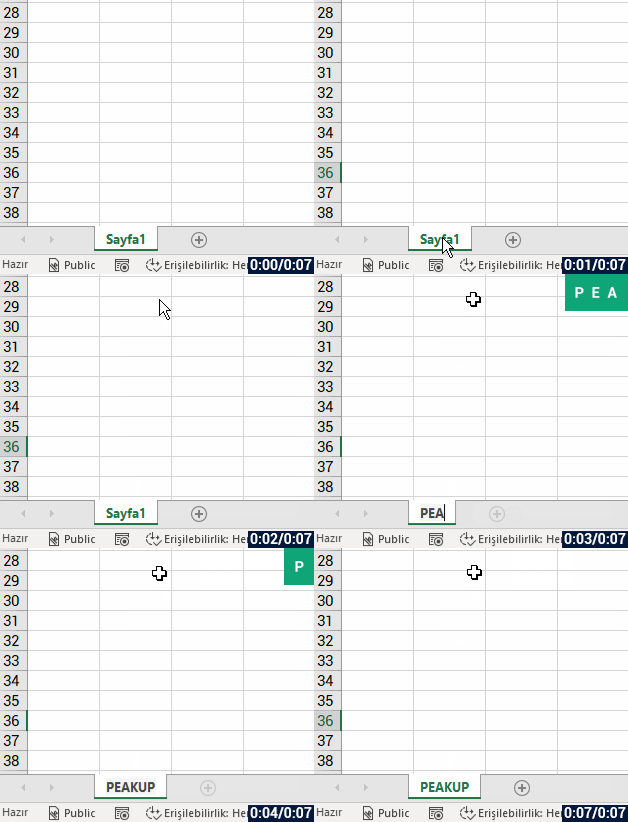
  1. Double-click the sheet tab and type the new name.
  2. Right-click the sheet tab, click Rename, and type the new name.

  3. Use the keyboard shortcut Alt+H > O > R, and type the new name.


1- Double-click the Sheet Tab

excel sayfa adını yeniden adlandırma

This method works in all versions of Windows, Mac, 365 and online Excel.

  1. Double-click on the name of the sheet tab to emphasize the name in the tab.
  2. Type a new name for the worksheet.
  3. Press Enter to complete renaming the worksheet.
  4. The new name should be displayed on the sheet tab.


sağ tık menüsünden sayfa adını değiştirme2- Right-click the Sheet Tab

This method works in all versions of Windows, Mac, 365 and online Excel.

  1. Right-click the sheet tab of the worksheet you want to rename to open the context menu.
  2. Click Rename on the menu list to emphasize the current sheet name.
  3. Type a new name for the worksheet.
  4. Press Enter to complete renaming the worksheet.
  5. The new name should be displayed on the sheet tab.


3- Access the Ribbon Options with your mouse

çalışma sayfalarını adlandırma

This method works in all versions of Windows, Mac, 365 and online Excel.

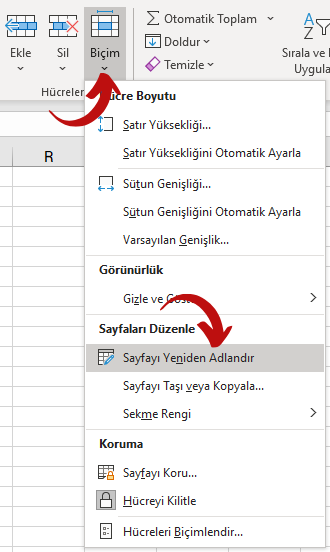
  1. Click the sheet tab of the worksheet to be renamed to make it the active page.
  2. Click the Home tab of the ribbon.
  3. Click Format on the Cells to open the drop-down menu.
  4. Click Rename Sheet to emphasize the sheet tab on bottom of the screen.
  5. Type a new name for the worksheet.
  6. Press Enter to complete renaming the worksheet.


Things to pay attention to while naming a worksheet:

  • Page name cannot be blank.
  • It cannot consist of more than 31 characters.
  • It cannot contain any of these characters: / ? * : [ ] For example, 05/04/2020 cannot be a valid worksheet name but 05-04-2020 can be.
  • It cannot start or end with an apostrophe (‘), but it can be used between texts and numbers in the name.
  • It cannot be named “History“. This is a special dictionary used for special purposes within Excel.


You can click here to get more information.

See you in other posts, bye. 🙋🏻‍♂️
You can share this post with your friends and enable them to get informed as well. 👍🏻

Tag Channels and People in Teams with Power Automate

That mysterious topic everybody curiously searches in google and gets lost between tabs! We will look at how to automatically share posts with tagging channels and people in Microsoft Teams with Power Automate.

This is how our main question was born:

“HR departments shouldn’t spend half of their work day looking for who’s birthday it is and sending them e-mails, we use Teams as a communication platform within our company. Let’s create a system that can automatically create a birthday post. It can notify everyone and celebrate that person’s birthday.”

Power Automate is the name of Microsoft’s product that was known as Flow before. For this reason, when you are searching “power automate”, you can see the name of “Flow” in most of the websites you visit. Power automate is a workflow product that can work integrated with 200-250 products and you can transfer, write, read and create between these products. You can send your unfinished tasks to yourself every morning at 9 am and create flows integrated with a lot of products like creating tasks depending on the results of the poll you’ve sent.

Now, if we go back to our main problem, here is what we need to do:

  • We will create a data source that contains birthdays and e-mail addresses.
  • We will check the data to see if the birthday is today or not.
  • For those who have their birthdays today, we will choose a channel on Microsoft Teams, mention the person and channel; and thus, notify everyone.
  • We need the system to repeat this everyday.

Let’s move step by step. First, go to Power Automate’s website and create a new flow.

1-CHOOSING THE TRIGGER

A trigger is what you need the most to start a flow. The question should be: “When do I want this flow to start running?” We will use “Recurrence” in this flow. After we choose the trigger, we enter information concerning when it will start running. We chose 10 am every morning for this flow.
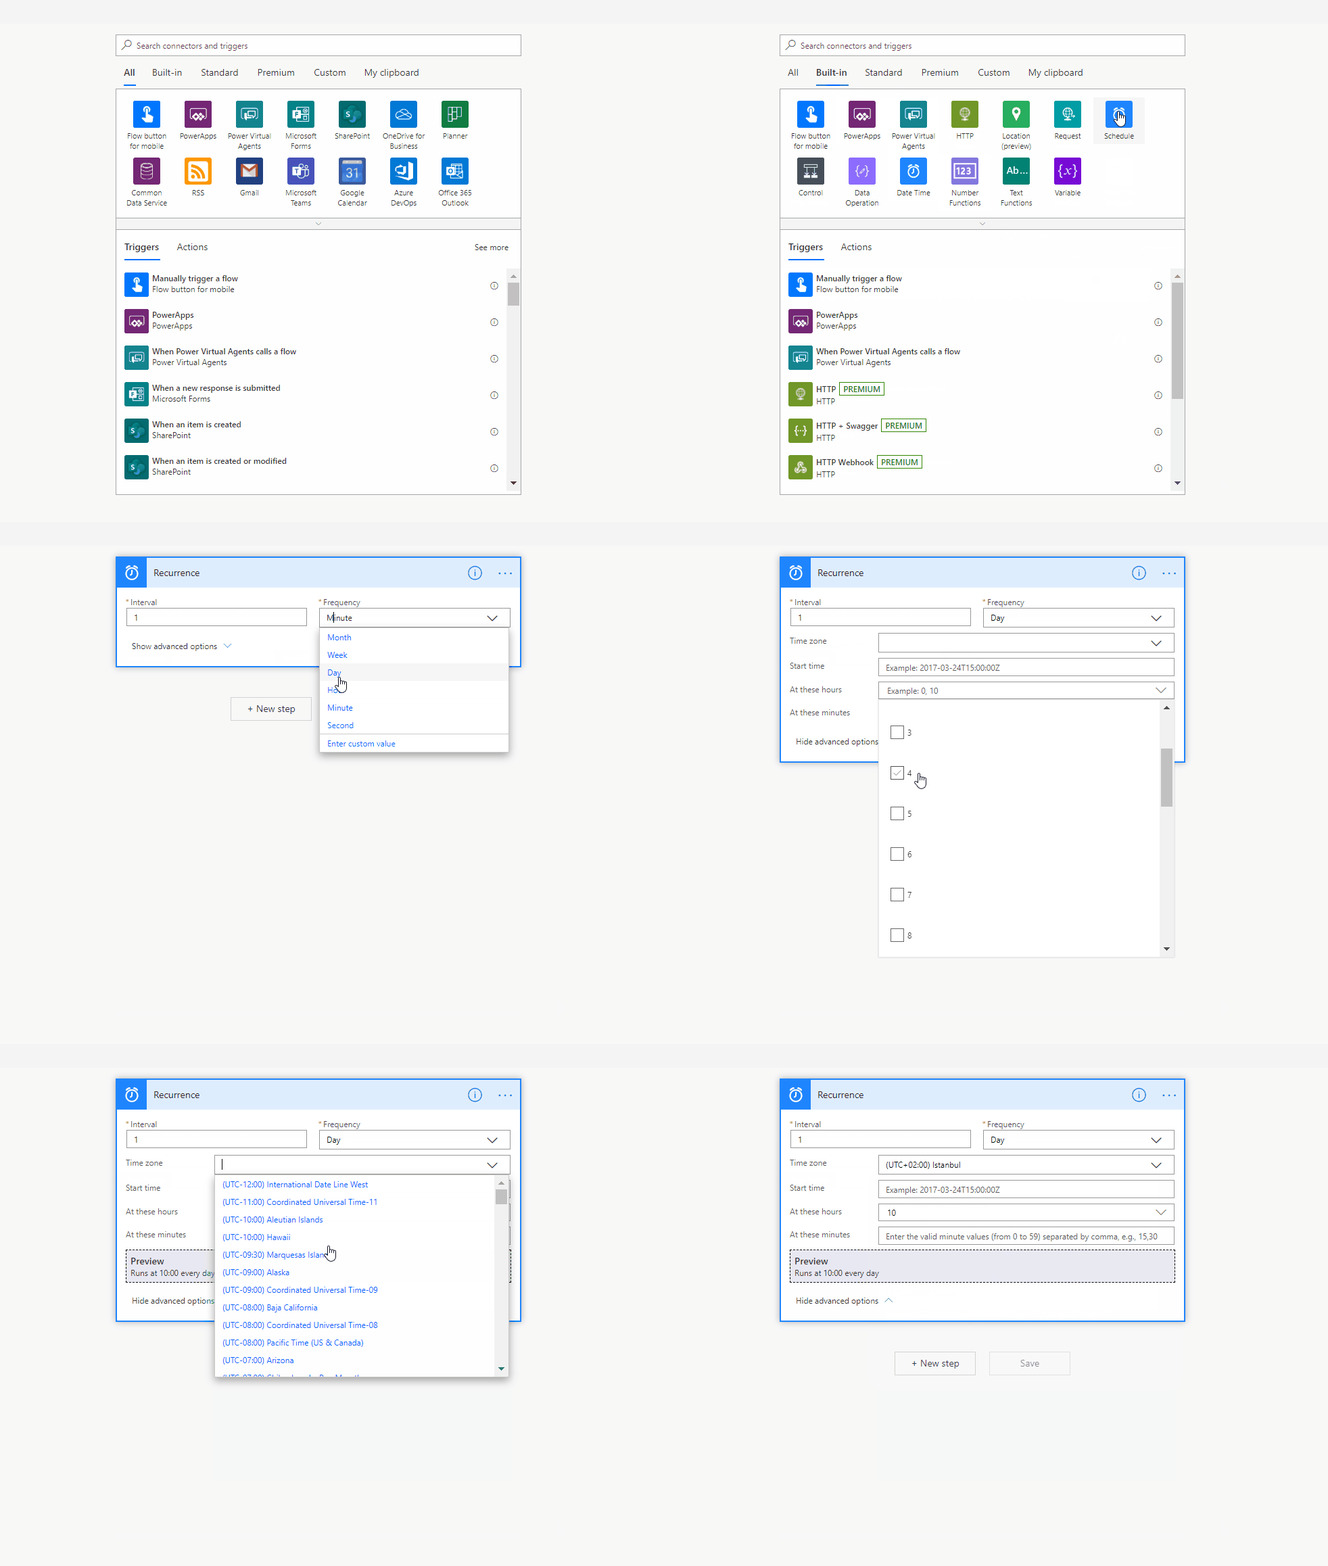
power automate ile teams de mention için yineleme triggeri gif

2- Connection to the data source that contains birthdays and personal information

We will use SQL as data source here. If you want, you can you Excel. I need to mention something very important before we start; when you want to change the data source, you have to create the flow from the beginning. Because we will control and make actions using this source. The action we choose is the “Get rows” action. This way, it will be able to check for all in the table.
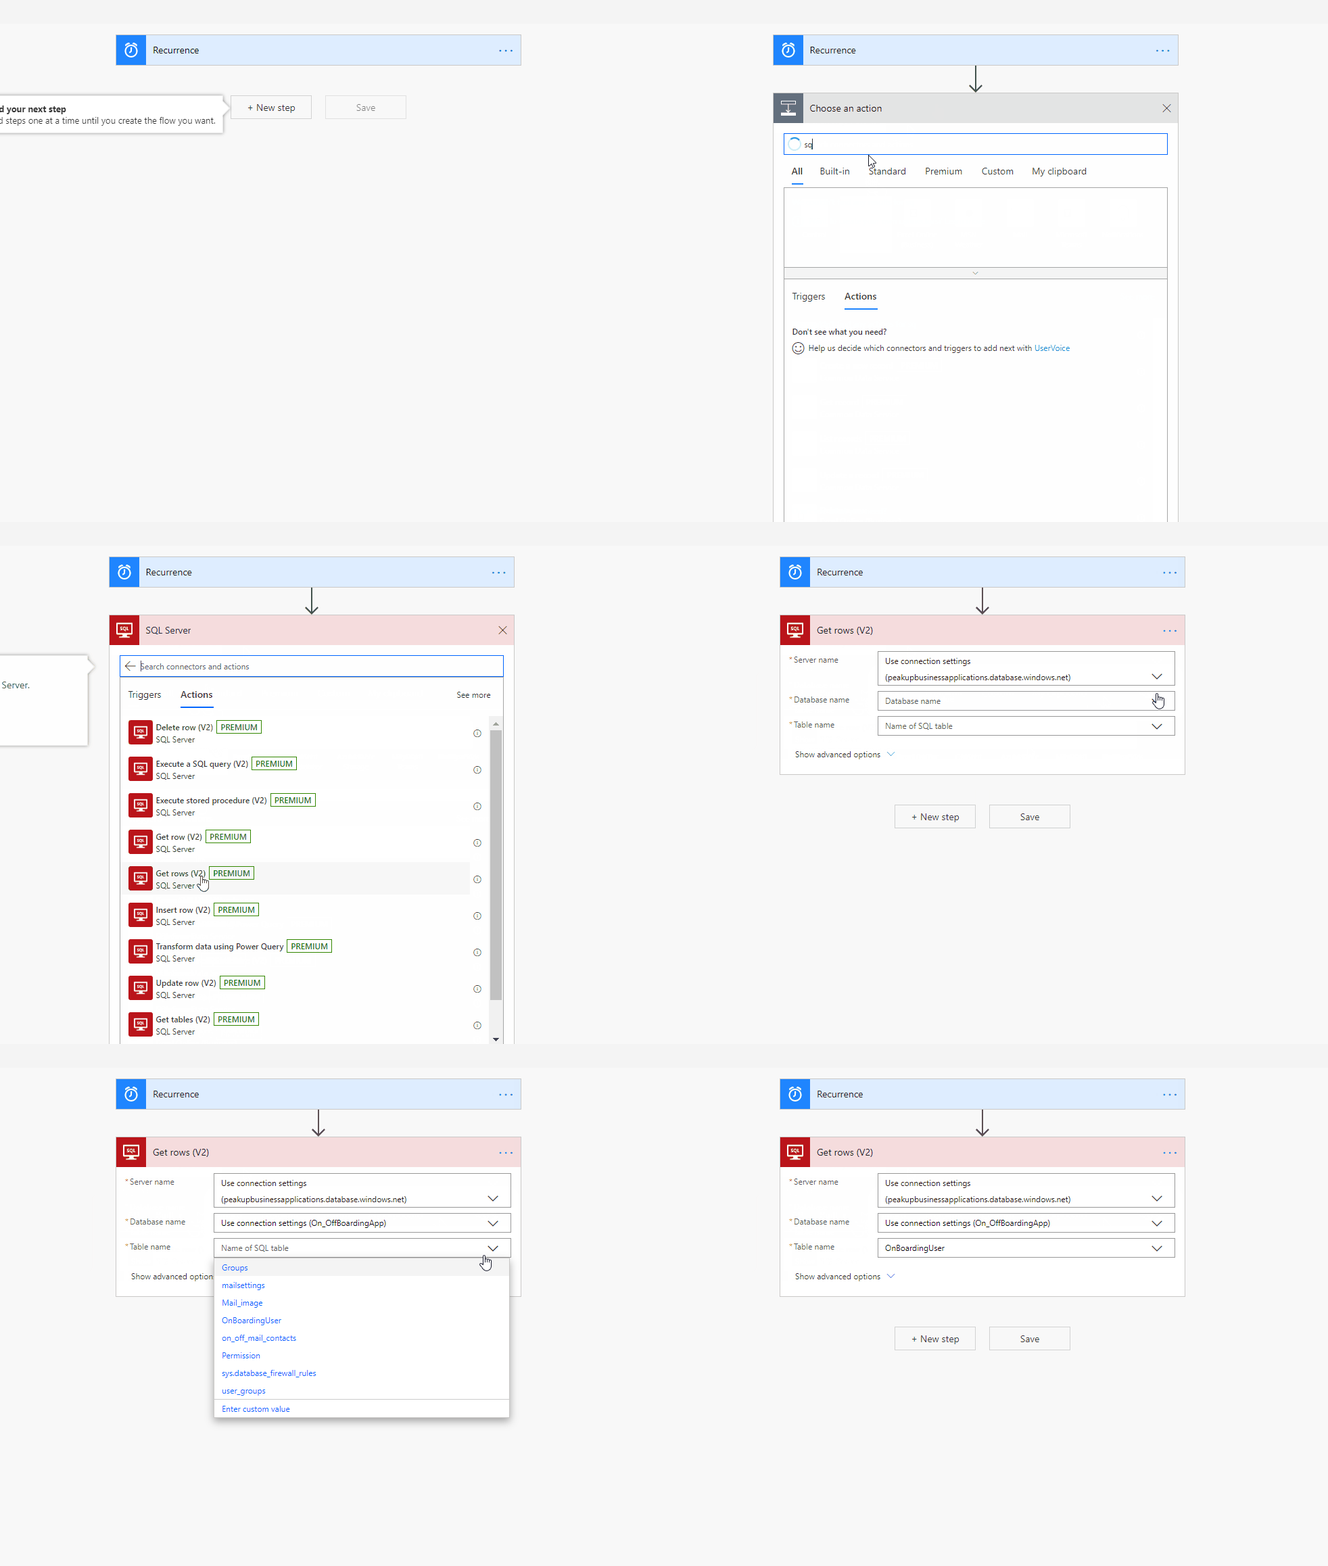
sql bağlantısı

3- The “Is their birthday today?” control

For this control, we choose condition. In this condition there will be two pieces: the first one will check the birthday piece (is it the same day of the month?), the second one will check the month (is it the same month?). Now we will write an expression into the “Choose a value” section.
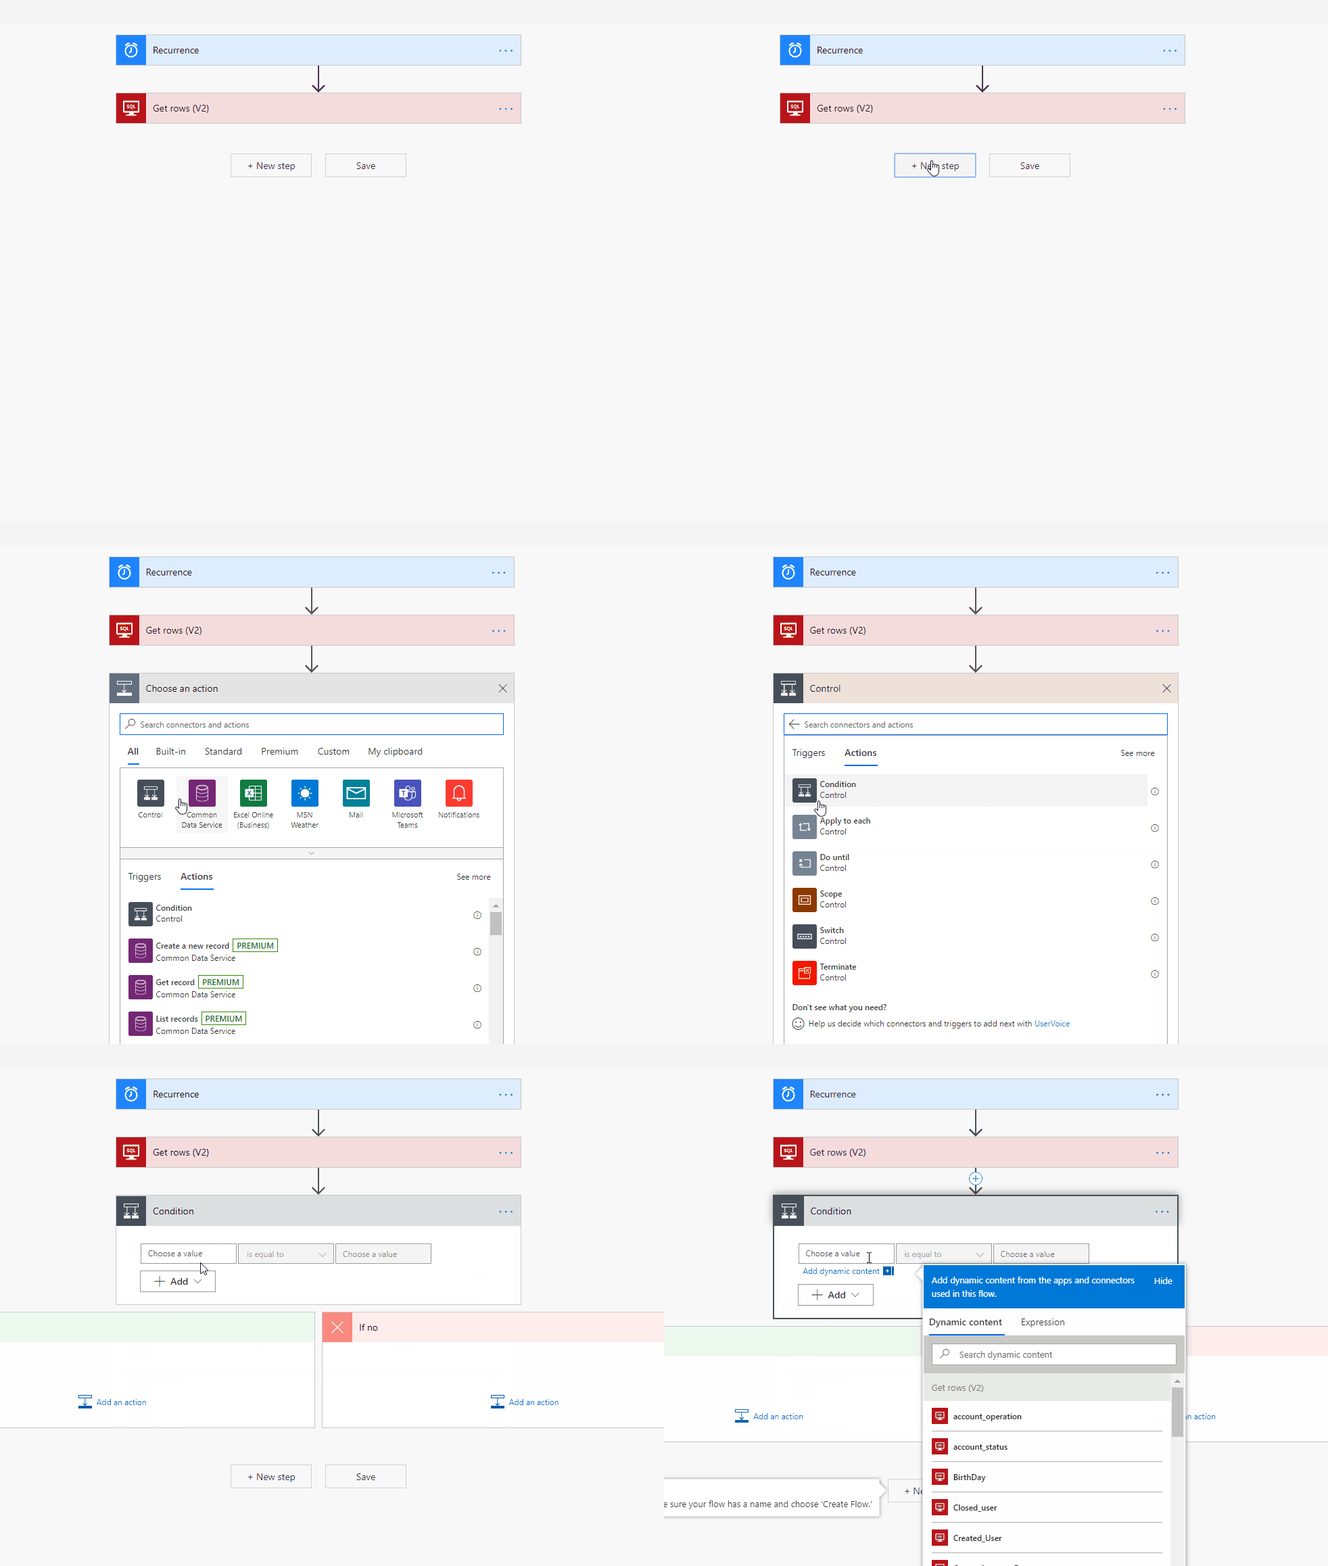
power automate kosul ekleme

I left an image below so that it is not hard for you to follow conditions. You can find the code version of one below as well. We use the formatDateTime function to get the day parts of date expressions on the first row. And we use the utcNow function to see if they match up with today or not. The ‘dd’ and ‘MM’ expressions next to them represent date and month respectively. When you add these expressions it will include it to the “Apply to each” step. The items(‘Apply_to_each’) step in the formulas comes from here. [‘Birthday’] is the name of the row in which the birthdays are stored in our data source.

PS: We have to use the ‘MM’ expression in capital like this or it doesn’t get detected, we didn’t type it incorrectly.

kosullar

formatDateTime(items('Apply_to_each')?['Birthday'],'dd')

4- TAGGING IN TEAMS

And now let’s come to the main topic! After we do the steps below, the important thing is to share the post of the birthday. In this step, first, we need to choose in which group and channel the post will be shared and get the id of the group&channel. After choosing the said group and channel, you can get their ID fields with Power Automate. There are two actions for that: Get Groups, Get Teams Channels. You can find the IDs on their outputs by running these requests.
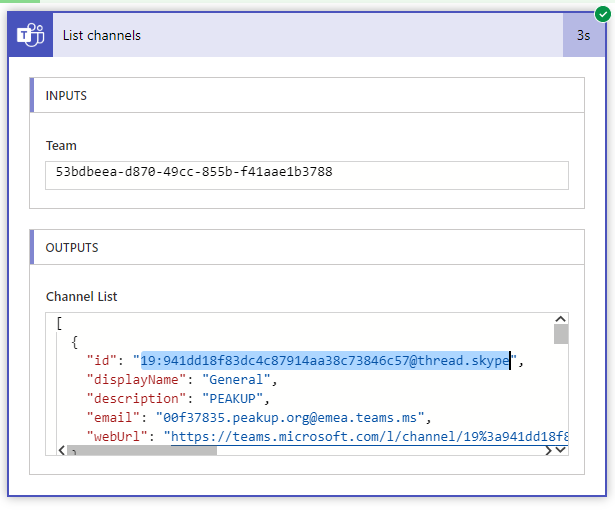
power automate list channel

Write the ids you got into its place in this address:

https://graph.microsoft.com/beta/teams/TEAM_ID/channels/CHANNEL_ID/messages

We will send a request to graph.microsoft.com  in order to use this feature about Teams. Microsoft Graph is a developer platform that connects multiple devices and services to each other.

The action we will use to tag and mention in Teams with Power Automate: HTTP with Azure AD – Invoke an HTTP Request
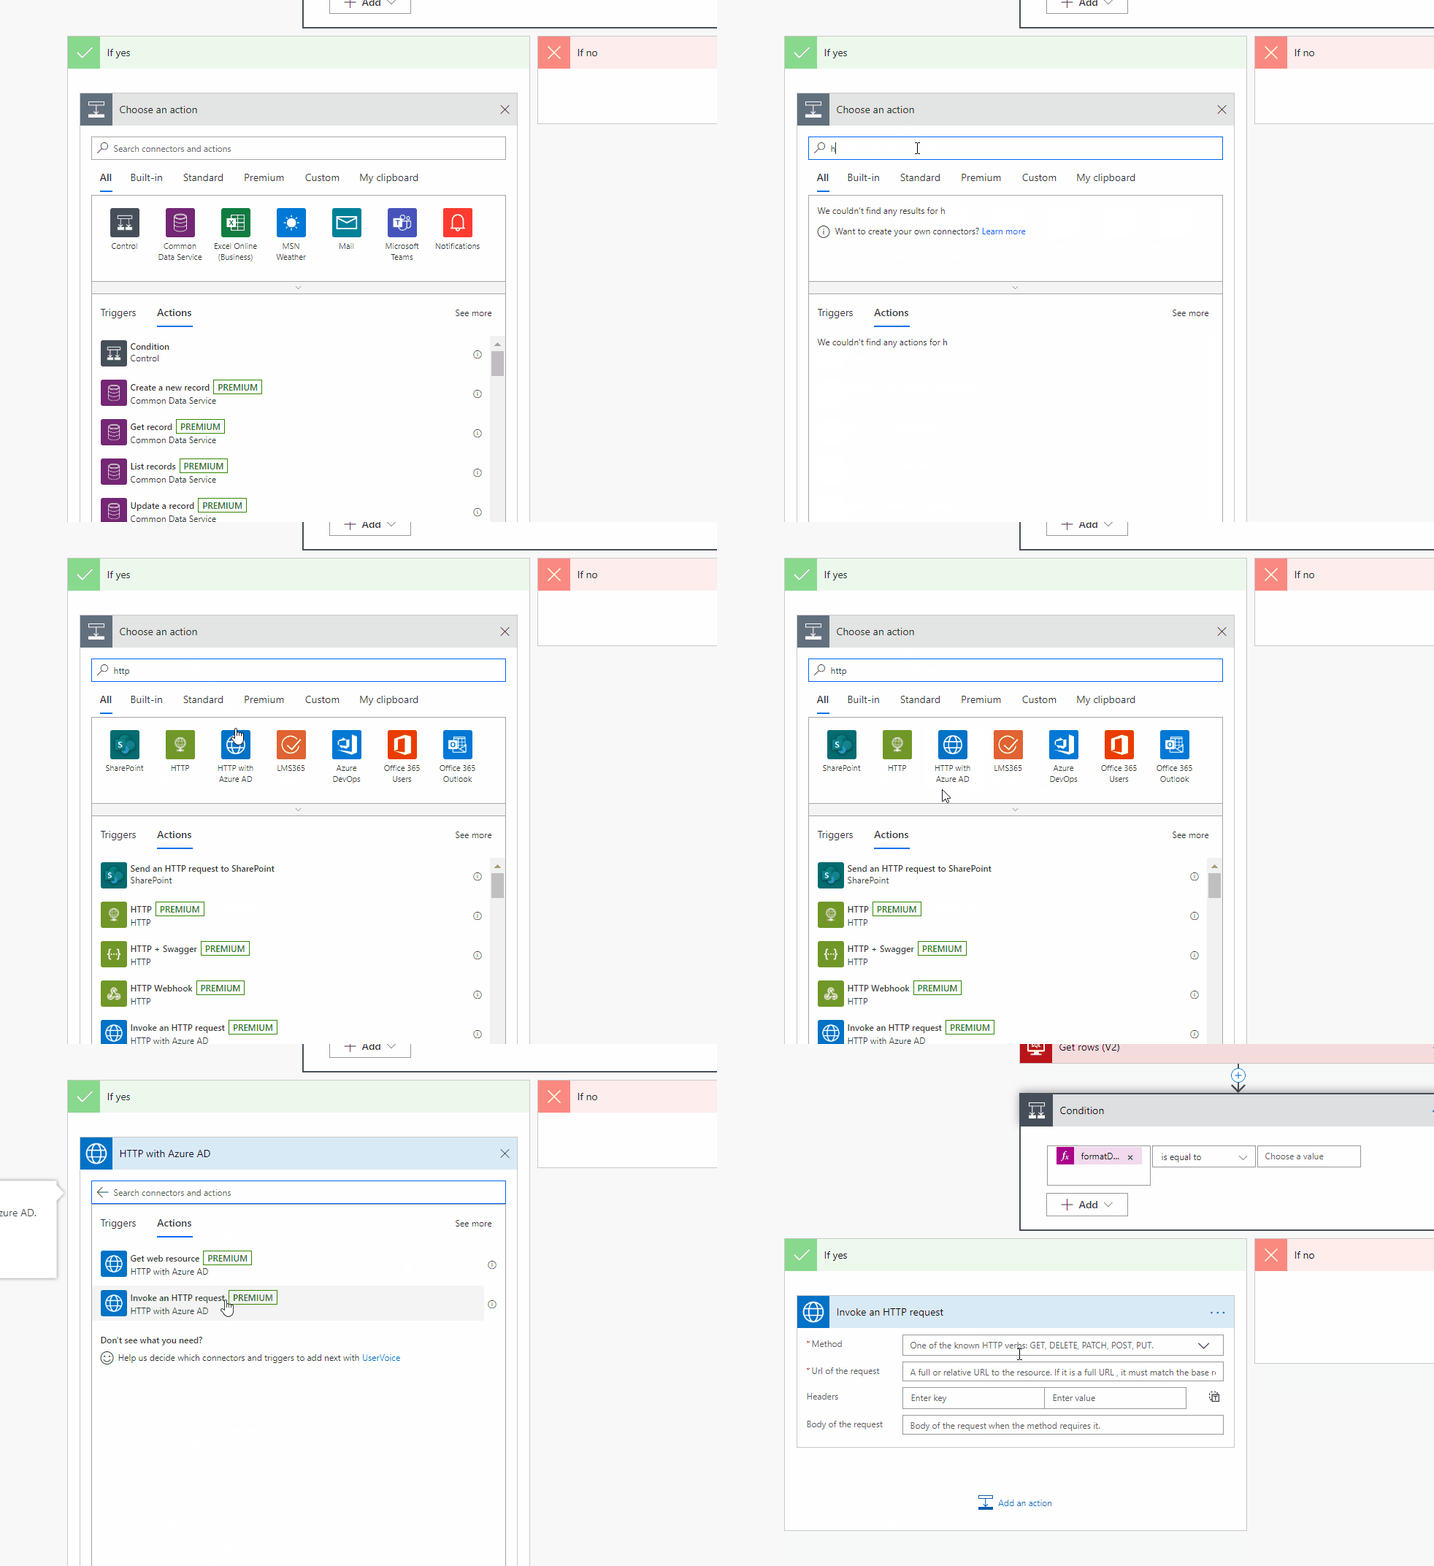
 

power automate invoke http request

If you have never used this action before, you will not come across a screen like the one below; first you will come across a screen where you need to login. You need to copy graph.microsoft.com into two fields in the screen.
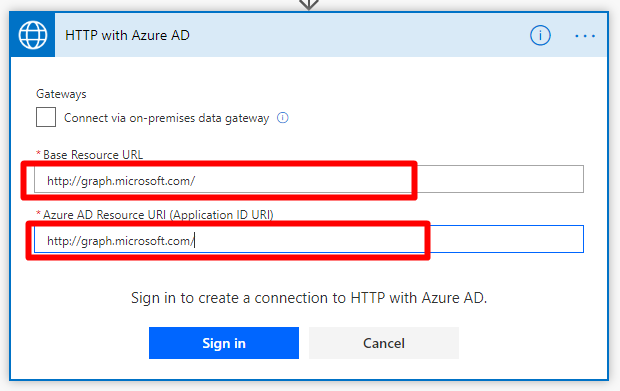
base eresource

After this step, you need to fill in all 4 fields in the screen.

  • First we choose the POST option for the method field since we will be publishing a message.
  • Next, we will write the link we’ve created above that starts with graph and continues with teams_id and channel_id for the Url of Request field.
  • We write Content-Type into the Enter Key field and application/json into the Enter Value field for the Header section.
  • We paste the code block below into the Body of Request field.
{
"body": {
"content": "General Happy Birthday @{items('Apply_to_each_2')?['DisplayName']}
",
"contentType": "html"
},
"mentions": [
{
"id": 0,
"mentionText": "General",
"mentioned": {
"conversation": {
"id":"19:74a9c464ac16462d95bdcb05a6d45947@thread.skype",
"displayName": "Business Applications Trials",
"conversationIdentityType@odata.type": "#Microsoft.Teams.GraphSvc.conversationIdentityType",
"conversationIdentityType": "channel"
}
}
},
{
"id": 1,
"mentionText": "@{items('Apply_to_each_2')?['DisplayName']}",
"mentioned": {
"application": null,
"device": null,
"conversation": null,
"user": {
"id": "@{items('Apply_to_each_2')?['Id']}",
"displayName": "@{items('Apply_to_each')?['DisplayName']}",
"userIdentityType": "aadUser"
}
}
}
]
}


It will look like this after all these steps:


http isteği dolu hali

BODY EXPLANATION

Let’s explain the body section a bit. We enter an HTML content we want to the content. You can add images etc. to that content. Inside in the HTML content, we tag the people we want to tag. We you IDs while doing that. We define the ids inside these tags into the mentioned field at the bottom of the code block. We will both tag the channel -which is tagging the group-, and the person. You can give the ID numbers, it doesn’t matter which number you give. The important thing is that it matches with the mentioned field below.

In the mentioned field, we will determine in which chat this post will appear, i.e. we will tag the channel first. And for us, this is the general channel of our Business Applications Trial group. We write our channels id into the id field in conversation. And enter the “Channel” info into ConversationIdentityType. Another thing is to tag the person. We need that person’s Office 365 id while writing their tag. We can get this id through Power Automate. The action we need to use at this point is Office 365 Users- Search User. We get the user’s id by using their e-mail address.

search user


We write this id into the related id field. Since we will tag the person, userIdentityType comes instead of ConversationIdentityType. We write “addUser” here aannndd save.


That’s it! We are done. The last thing I want to mention is that you can get more detailed information about Teams APIs on Graph from the links below. We also have some other great articles about Power Automate and Teams on our blog, you can check them as well. And also here is the output of this flow.
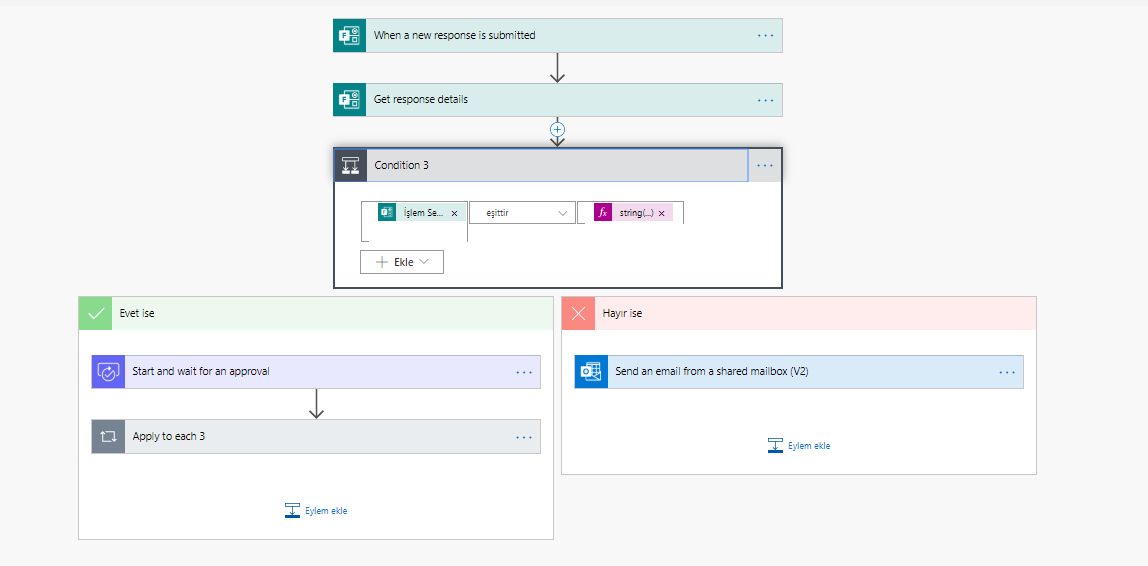
power automate ile teams de mention

https://docs.microsoft.com/en-us/graph/api/channel-post-messages?view=graph-rest-beta&tabs=http

https://docs.microsoft.com/en-us/graph/api/resources/chatmessage?view=graph-rest-beta

https://docs.microsoft.com/en-us/graph/api/resources/chatmessagemention?view=graph-rest-beta

https://docs.microsoft.com/en-us/graph/api/channel-post-messages?view=graph-rest-beta&tabs=http

See you guys, social isolation is important

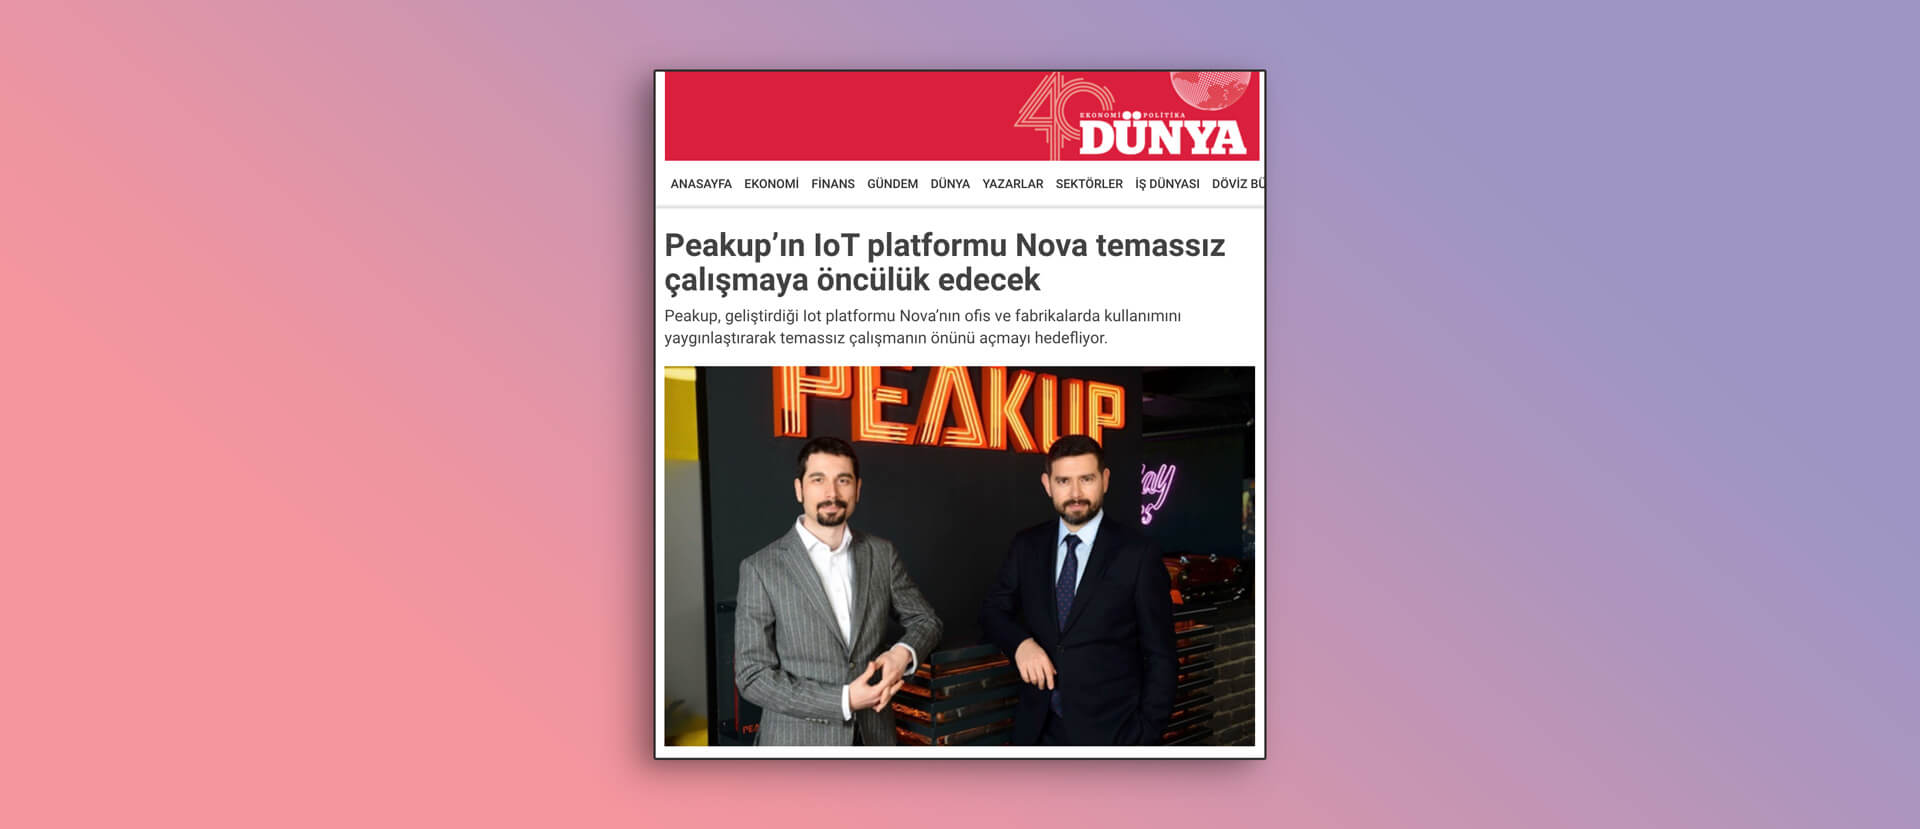
 

A Para TV “Center of Finance” Program

Our CEO Ahmet Toprakçı starred as guest in the “Finansın Merkezi (Center of Finance)” Program of A Para TV presented by Hande Özdemir and talked about the impact of corona virus on work conditions, digitalization processes, companies adapting to digital transformation and working from home. You can click the here to watch the program.

How to Make a Histogram in Excel

In this article, we will be talking about how to make a histogram in Excel. It looks a lot like the other bar charts, but separates your numbers into ranges the way you determine. Compared to the other chart types, histograms facilitate determining categories and frequencies of occurrence alongside different data. Don’t forget that you can take a look at our blog to see our articles about other topics. Let’s start. 👍🏻


HISTOGRAM IN EXCEL

You can find the Histogram Chart within built-in charts in Office 2016 and later version. Also, you can create a histogram in Excel with the Histogram tool. You create it by entering the numbers that represent the frequency range you want to use and the data you want to analyze. Histograms are supported by Office 365, Excel 2019, 2016, 2013, 2010, 2007 and Excel for Mac, but the steps you take depend on the Excel version you use.
Reminder: You need the Analysis ToolPak extension to use the Histogram tool in the previous versions of Excel 2016. This extension is not supported in Excel Online. But, you can display a histogram created in a desktop version of Excel by using Excel Online.


How Do You Create a Histogram Chart in Excel?

Since it is one one the built-in charts in Excel 2016 and later versions, it is pretty easy to use.

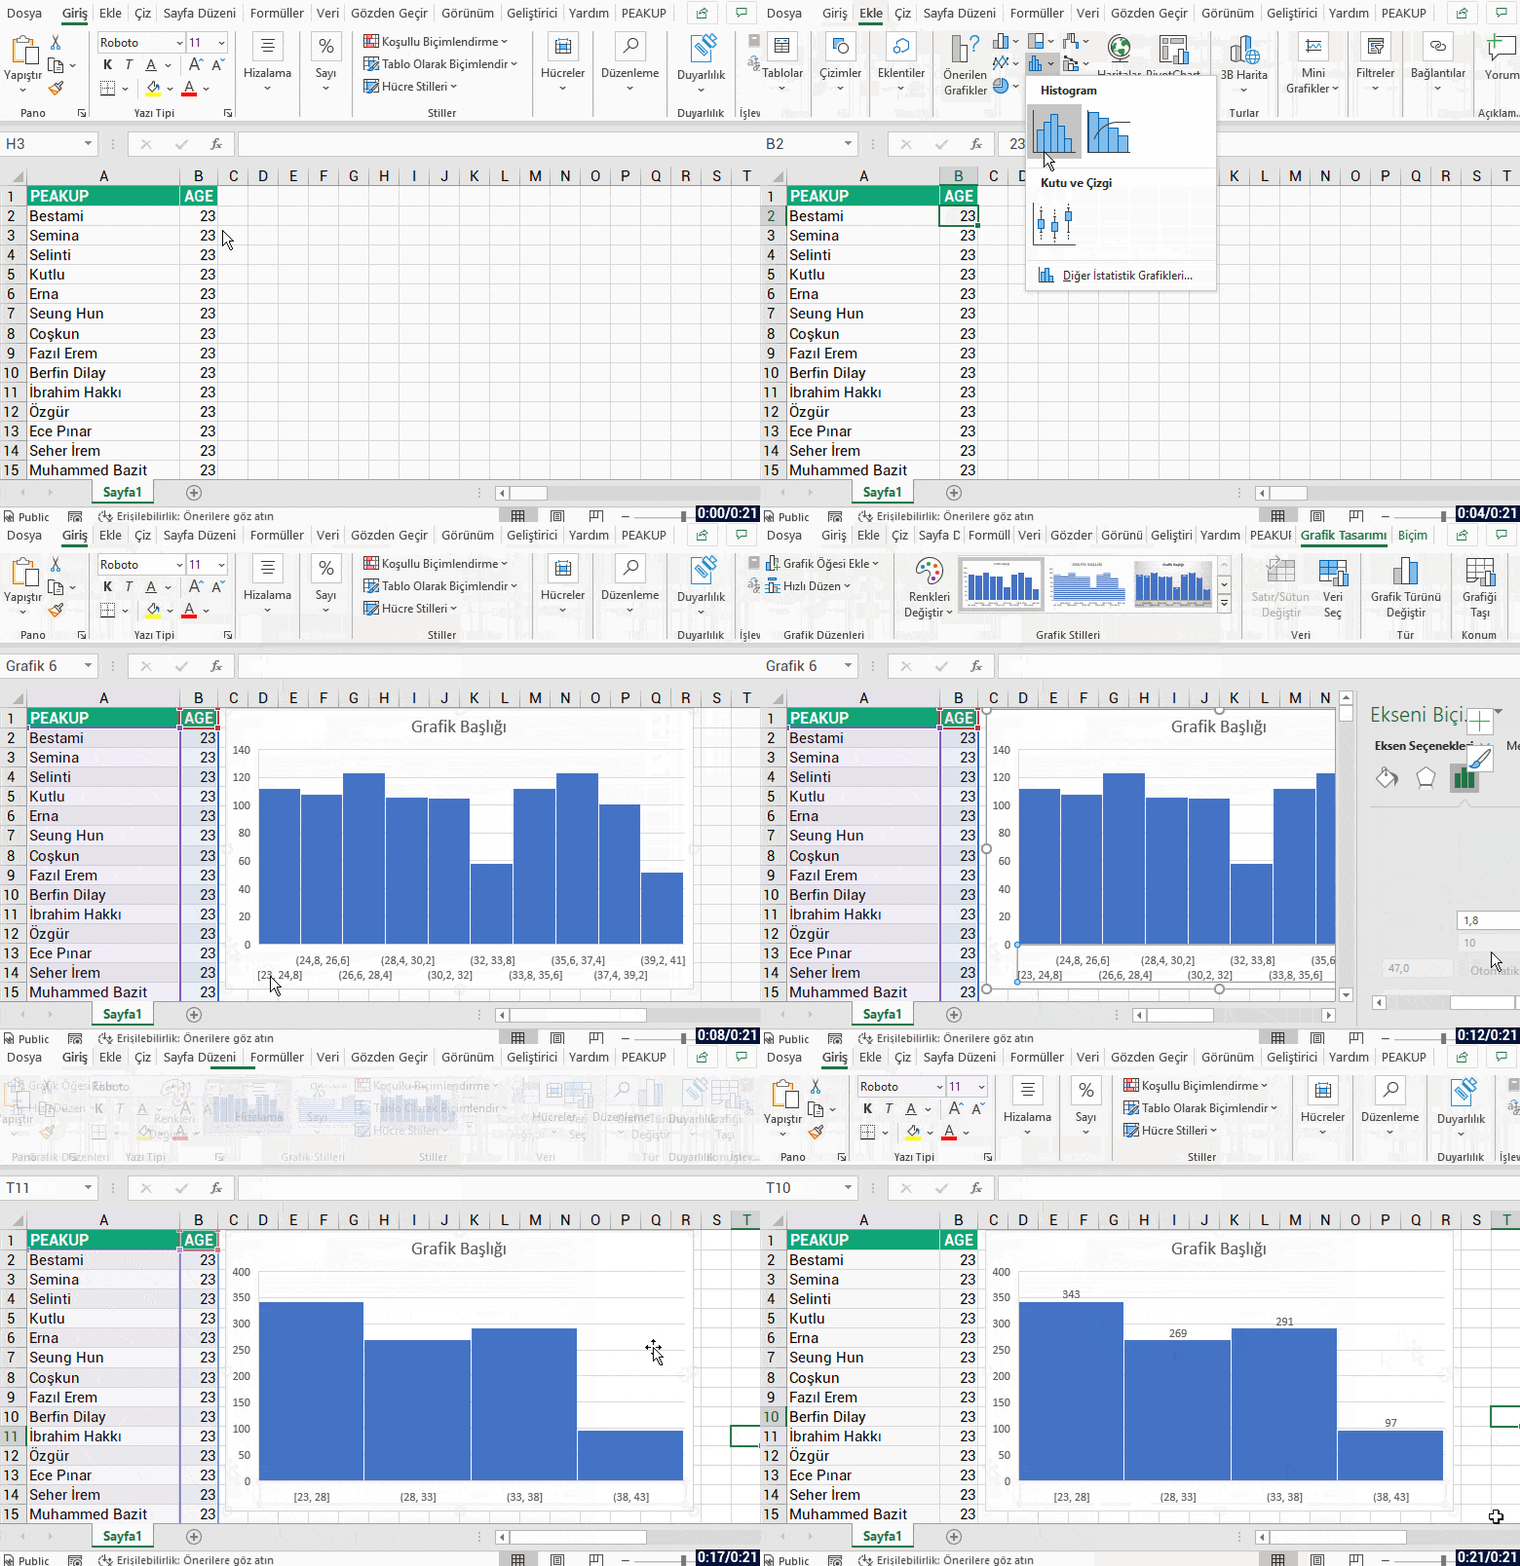
  1. To start, enter the data you want to use in your histogram into a worksheet. For example, enter the names of your employees in your company with 1000 workers into a column, and their ages into another column.
  2. Select any cell on your data table.
  3. Go to the Insert menu.
  4. Choose Insert Statistic Chart in the charts group.
  5.  Choose Histogram chart type.
  6. Double-click on the horizontal axis.
  7. Arrange the bin width as 5.
  8. Add Data labels.
  9. Your chart is ready.

Creating a Histogram chart is as simple as that. If we want to apply the steps above, a Histogram chart like this will come up. (The colors have been edited.)

Excel'de histogram grafik nasıl oluşturulur?


Let me show you how the steps are done with a GIF:

excel'de histogram oluştur


Creating a Histogram in Excel 2013, 2010 or 2007

Like I mentioned above, you need to active the Analysis ToolPak extension to be able to create a histogram chart in versions prior to 2016.

  1. Click the File menu.
  2. Choose Options.
  3. Click on Extensions.
  4. Push the Go button.
  5. Choose the Analysis ToolPak extension.
  6. Click on the OK button.


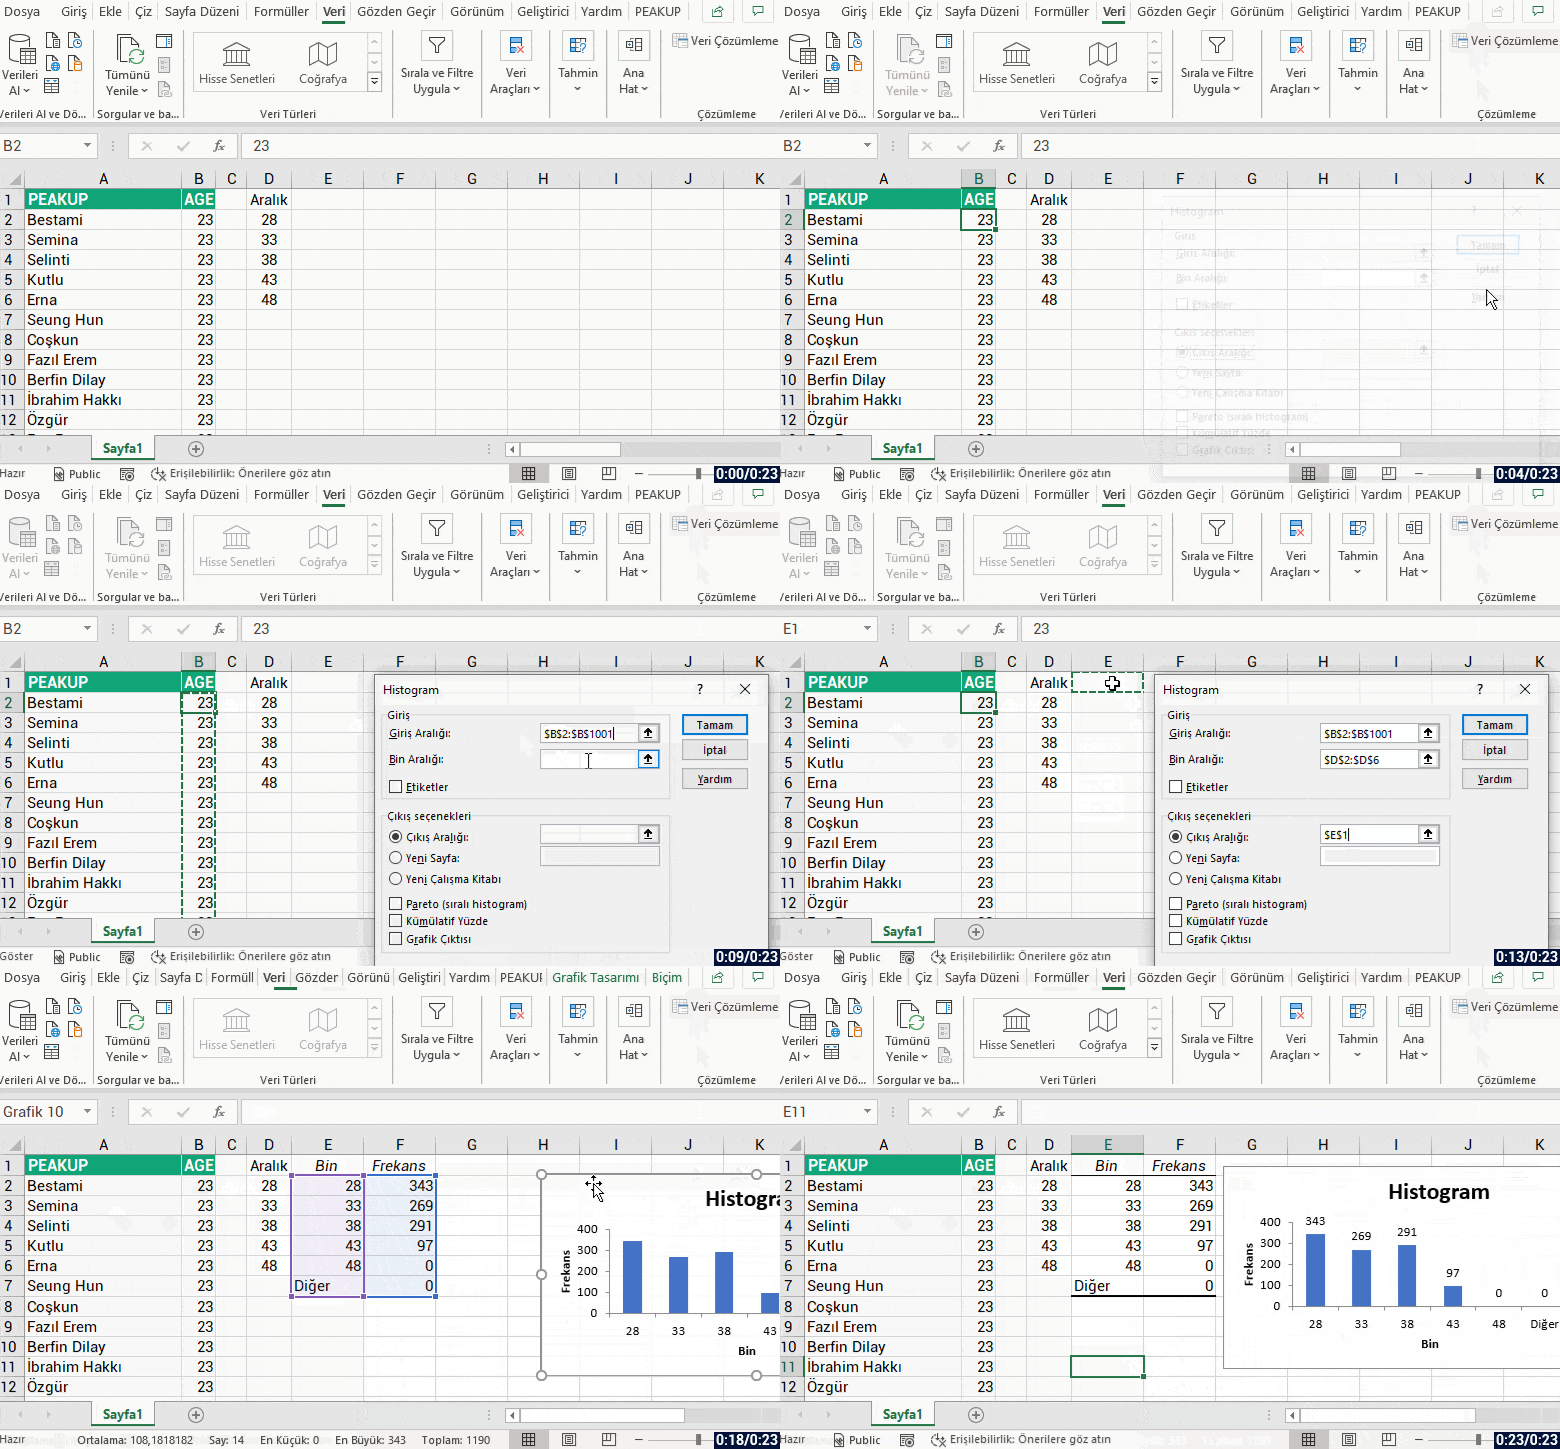
After following these instructions, you will see the Analysis ToolPak extension within the Analysis group on the right of the Data menu. We will show you how to activate it on the GIF below.

Excel'de histogram eklentisi aktif etmek


To get a Histogram from the Analysis tool, let’s write the bin width into a field first. For example; let’s write the bins starting from D2 as 28, 33, 38, 43, 48 to find how many people there are between the ages of 23 and 48 with 5 year gaps in a company with 1000 employees. You can check the GIF below for the next step.


histogram veri çözümleme


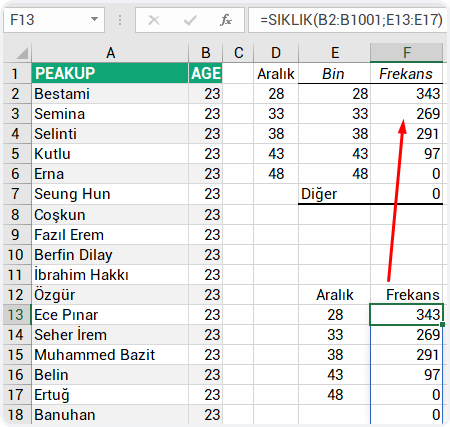
HINT: We can obtain the same Histogram that comes with data analyzes with the FREQUENCY function. We have data, and certain tracking ranges. With the FREQUENCY function, we can easily find the frequency of repetition of all values within the specified range.

sıklık fonksiyonu ile histogram


You can find chart and application samples about everything I’ve mentioned in this Excel file.  👉🏻 excel icon


You can get more information on Microsoft Support.


See your in another article, good bye.🙋🏻‍♂️
You can share this post with your friends and help them get informed as well.👍🏻