
Our CEO Ahmet Toprakçı appeared as a guest in the “Üst Düzey (Top-End)” Program presented by Arzu Maliki and talked about topics like working from home and digital transformation. You can click here to watch the record of the show.

Our CEO Ahmet Toprakçı appeared as a guest in the “Üst Düzey (Top-End)” Program presented by Arzu Maliki and talked about topics like working from home and digital transformation. You can click here to watch the record of the show.

Before we get started with the topic, I want to talk about PivotTables shortly. When we want to report from tables or lists, we usually start by creating a PivotTable. PivotTables helps us to create tables that we can customize without touching the main data at all. PivotTables enables us to execute actions like reporting, calculating, editing tables easily, formatting and filtering easily. And the topic we’ll talk about in this articles is Report Filter Pages.
In the example below, a PivotTable has been created from a list that containes data like Company Name, Personnel Name Surname. The column titles added to filter field in PivotTable Fields become criteria that can be filtered on the table and we filter with this information. In the sample PivotTable below, the City column has been added to the filters field. And the Personnel Name Surname and Company name columns has been added to the rows field. We will be doing city-based reporting through city-based filtering.
We can observe the change of the table one-by-one for each city chosen from the filter. We might not have some any problems while analyzing a few pages, but when we want to do reporting on more pages we usually don’t prefer this method.
For the City criteria in the filter field, reports of each city will be quickly and practically opened with one click with the Report Filter Pages.
For this action, we click on the Options on the left of the Analyze tab in Ribbon after we add Filter to the PivotTable fields, and choose the Show Report Filter Pages from the list that opens. With this action, the City on the filter field is chosen. If there were a few more filtering criteria, we could choose the criteria based-on which we wanted to report.
Afterwards, the filtered versions of information of cities in all personnel makes sales is opened in different pages quickly.
In the page that’s been opened, we can see the City information. Since there are a lot of cities from A to Z, the cities that didn’t fit in are represented with …
Get practical reports with the Report Filter Pages.

PowerApps has its own software language and its special functions. Alongside these functions, it also contains a lot of functions that exist in Excel. These functions are offered in a general frame, they are not separated into categories as function groups like text, date, and statistic. In this article, we will analyze text functions.
It is very practical to code with PowerApps, with the formula language you are used to from Excel.
You can write all formulas on objects. After you choose the related object, you can write on Formula Bar.
*While writing a formula, you can write with commas (,) or semicolons (;) (depending on the browser language), you don’t need to use the equal sign.
There are basic text functions like Concatenate, Left, Right, Mid, Len, Upper, Lower in the Power Apps functions. You can edit or create text expressions with these functions.
Let’s write the formulas below for a textbox in which Text Functions is written. The name of this textbox is txt_sampletext.
The Concatenate function concatenates a mix of individual strings and a single-column table of strings. When you use this function with individual strings, it’s equivalent to using the & operator.
Concatenate( String1 [, String2, …] )
Concatenate(txt_sampletext.Text; txt_sampletext.Text; txt_sampletext.Text)
Left function returns the beginning characters of a string.
Left( String, NumberOfCharacters )
Left(txt_sampletext.Text;1)
Mid function returns the middle characters of a string.
Mid( String, StartingPosition [, NumberOfCharacters ] )
Mid(txt_sampletext.Text;3;1)
Right returns the ending characters of a string.
Right( String, NumberOfCharacters )
Right(txt_sampletext.Text;1)
Len function returns the length of a string of text.
Len( String )
Len(txt_sampletext.Text)
Lower function converts any uppercase letters to lowercase.
Lower(txt_sampletext.Text)
Upper function converts any lowercase letters to uppercase.
Upper(txt_sampletext.Text)
Proper function converts the first letter in each word to uppercase if it’s lowercase and converts any other uppercase letters to lowercase.
Proper(txt_sampletext.Text)
The Trim function removes all spaces from a string of text except for single spaces between words.
Trim(txt_sampletext.Text)
The TrimEnds function removes all spaces from the start and end of a string of text but leaves spaces between words intact.
TrimEnds(txt_sampletext.Text)
You can access the list of all the other functions here.

The Navigate function is used to navigate between screens in PowerApps mobile apps. Navigation between screens can be done when the objects are touched/clicked(by the trigger of user) or within a certain period of time(with a timer). In our previous article, we navigated by writing a formula into the OnSelect property of a button. In this article, we will automatically navigate after a while.
You can use the Timer object for each action that will be executed based on a duration. This way, when the time start or ends, it will be run to be applied on the actions you’ve determined. Timer works here as a trigger (It is a word that we use a lot in our Power Automate articles). It starts for the time to be up and starts the flow.
Timer objects has properties like OnTimerStart, OnTimerEnd, Duration, Repeat, and Reset and actions are executed with these properties. You can take a look at the general features of Timer here.
For example, you can display a text and image that states uploading/saving/wait etc. You can start the page redirect when it’s OnTimerEnd.
When it’s OnTimerStart and OnTimerEnd, you can create a collection. You can create or compare conditions.
Let’s make an example where we see a screen with the “Saved successfully” text after saving and when the duration is done we go back to the main page.
Two screens need to be added into the application. Let’s call one of the screens SCR_Mainpage , and SCR_Action_Successful the other.
Timer object will be added to the SCR_Action_Successful page.
Duration property of the Timer objects writes in milliseconds, and this indicates the duration of the times. When you add a timer, standard Duration comes as 60 000 and it indicated 60 seconds. Which means that when the timer start from 1 and end with 60, it will start the actions.
Let’s make the Duration 3000 and get the action done in 3 seconds in order not to wait for too long and to see the results faster.
Duration: 3000
When the specified time of 3 seconds ends, we’ll be redirected to the main page.
OnTimerEnd: Navigate(SCR_Mainpage)
It was set as true in order for the timer to start automatically.
AutoStart: true
After these actions, the timer works actively. If you want, you can hide the time by setting the Visible property as Visible.

You can directly access your personnel and customers with Ms Sway. You can create and present your journals, announcements or other communication posts with a rich content.
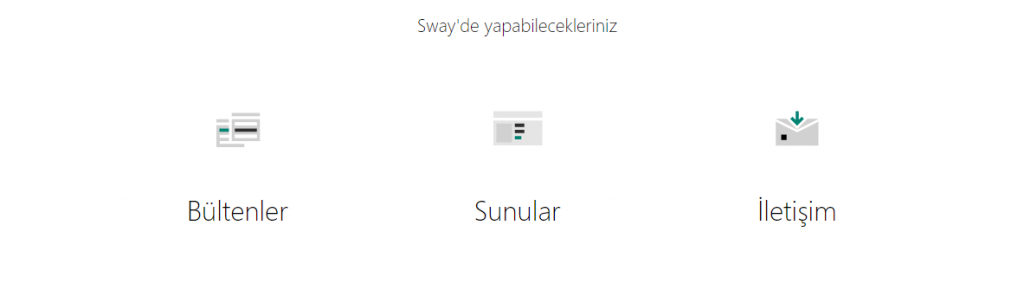
You can use SWAY as a communication channel where communication is in the forefront. Sway can be viewed on all mobile devices like cell phone, and tablets.

You can easily add images, videos and other multimedia objects. You can customize completely and strengthen you communication with rich images. You can use Web site connections within Sway.

On top of that, you can add your pools and tests on MS Forms or Power BI reports into Sway with Embedded code.

With available templates, it is very easy to get started with Sway. You can access the Sway journal where you can see how to do it here.

We can design lists with a condition in the gallery by writing the If formula. With these conditions, it is possible to control a lot of features of objects like color, view, size, position. You can authorize based on person/department, hide/show buttons on the screen and highlight status in case of tracking.
We will be going over how to show different objects for different question types in the gallery. This way, one question in the same group will be replied with the radio button and the other will be replied with rating.
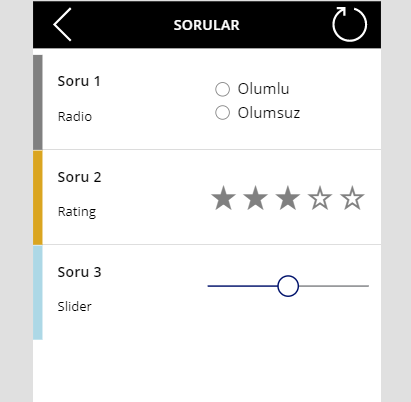
We will create a sample collection for an example with the data above. You need to create the collection by writing the code below into the OnSelect property of a button we will add to the screen.
ClearCollect( Questions;
{
Question: “Question”;
Question_no: “1”;
Question_type: “Radio” }
;
{
Question: “Question”;
Question_no: “2”;
Question_type: “Rating” }
;
{
Question: “Question”;
Question_no: “3”;
Question_type: “Slider” }
)
You need to add the Gallery object to the screen in order to do the action in the example. Questions collection should be connected to this gallery object’s Items.
The responding way of each question in the collection is indicated in the Question_type column. Depending on the responding way of questions, Radio Button, Rating and Slider has been added to the gallery. IF formulas will be written into the Visible property of each object and thus, the related item will be shown depending on the question type and the other ones will be hidden.
Radio Button Visible Code: If(ThisItem.Question_type=”Radio”;true;false)
Rating Visible Code: If(ThisItem.Question_type=”Rating”;true;false)
Slider Visible Code: If(ThisItem.Question_type=”Slider”;true;false)
You can click here to take a look at other Power Apps articles.
You can click here to take a look at the use of IF function.

A random id in all screens is created with the GUID function every moment. ID values are used as a key by the database systems like Common Data Service and SQL Server.
When the function is used on its own, it can include numbers, lower and upper case and hyphen. As you can see, this function returns pretty long outcomes but this function can be managed with some functions.
GUID returns a different value each time the function is calculated. If nothing else changes in the formula, it will have the same value throughout the execution of your app.
GUID is a volatile function when used without an argument. You can write it into a label in order to view or change the outcome of the function. You can convey it to the argument for the outcome to change actively.
A random id can be created while changing the page, opening the app, and saving data or with the timer.
For example, you can convey this function to a certain column by creating a collection.
Collect(Table1; { Guid_Columns: GUID() } )
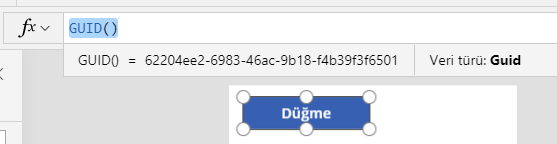
GUID function creates an outcome that includes numbers, lower and uppercase and hyphen. For example, if you want to produce a 5-character outcome, you can use the Mid function.
When you add a label to the screen an set its Text property as Mid(GUID(); 1 ;5), a 5 character GUID is created.
You can use the SET argument when you need to create a new argument id all the time.
Set the OnSelect property of a button you’ll add to the screen as Set(Guid_create ; Mid(GUID(); 1 ;5)) and the Text property of the label you’ve just added as Guid_create. Now each time you click the button, a new value will be created and it will be see in the label.
Click here for the general usage of the GUID() function.
You can access the other Power Apps articles here.

Each object or property we use in Power Apps can be used as a variable. For example, we can set the value of a TextBox as TextBox1.Text and this way, it is defined as a variable that has a text value and that can be interfered by the users. Even though every object can be used as a variable, there are real functions designed to be a variable. These functions that are experts in assigning an using variables are used in more dynamic actions like calculating a value in an increasing or decreasing way, rather than a static Label moving data between pages. Set variable is one of them.
It is a very easy-to-use function. You define the variable name and state the value that will be written in it. And then, the variable name is written in the required field and the data it contains is open to use.
Let’s practice with a counter example by creating a variable.
Add a TextBox and two buttons into the screen and position them like below.
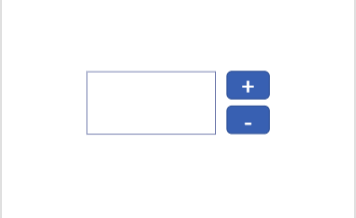
Write + and – on the buttons. Set() functions will be written in the OnSelect property of buttons.
+ button: Set( Counter; Counter+1)
With this formula, the last value of the counter is increased by 1 and the data is transmitted to the counter again.
– button: Set( Counter; Counter-1)
With this formula, the last value of the counter is decreased by 1 and the data is transmitted to the counter again.
Label: Counter
Name of the variable is written in to the Text property of the Label and the value the variable holds is reflected on the screen.

Click here for the general usage of the function.
You can access the other Power Apps articles here.

In this article, we will be talking about Declaring VBA Variables. Variables are essential elements of programming. Using and managing variables are one of the musts while creating a project. I will try my best to tell it as simple as possible. Reminder: You can find other articles about VBA on our blog. 👍🏻
Variables are usually used to store a data and use it when necessary. They are usually separated into two classes. Global variables and Local variables. Global variables can be used by all the functions of the program, but the local variables are used by the functions that have declared them.
It can be called back, reassigned or fixed during the execution of a procedure, function or module.
Declaring a variable will enable you to indicate the names of the variable you’ll use and the data type the variable will contain.
For example, if Result = 10, the variable Result can be declared as Integer Whole Number .
We usually name the variables in a short and easily remembered way. The most frequently used variable names are one character names like i, a, n, x ,y ,z, s so that it is easy to write in the code. If the variable name is a name that you can remember while using in the code, the probability of making a mistake while writing the code decreases.
Now we can move on to the declaring part.
The syntax concerning declaring variables is usually like this.
Dim variable_name [(stringsize)] As type
Public variable_name[(stringsize)] As type
Static variable_name[(stringsize)] As type
Along side this general declaring, the declaring methods below can be used as well.
It is the most known and used VBA Variable Declaring method.
We indicated the syntax Syntax below. Let’s make it clear with a few examples. Let’s say that we will declare a variable named row to use in the rows (cells) in the A column. Since the row numbers are whole numbers, we can used one of the whole number types we’ve indicated in our Data Types article. It would be better to use the variable data type depending on the row number we’ll get controlled or the maximum number that can be in the cell.
As well as we can use as Number or Whole Number, we have 3 basic variable data types: Byte, Integer and Long. If the number we’ll assign to the row variable is 255 or less, then we can use the Byte variable data type. If the number we’ll assign to the row variable is between –32767 and+32768, then we can use the Integer variable data type. If it can be a bigger whole number, then we should use the Long variable data type. If a bigger number than what the variable can contain is sent, that the Overflow error occurs. And if a text data is sent to a variable that was determined as number, Type Mismatch error occurs.
Let’s give a few examples of declaring variables with Dim:
Sub PEAKUP()
    Dim row As Long
    Dim column As Byte
    Dim text As String
    Dim start As Date
    Dim money As Currency
    Dim object As Object
    row = 15
    column = 5
    text = "Excel Turkey Forum"
    start = "24.06.2018"
    money = 300
    Set object= ActiveSheet
End Sub
We can write each variable one by one in different rows like that, but we also can write them side by side like this. We just need to put Dim in the beginning and put a comma between each variable.
Sub PEAKUP()
    Dim row As Long, column As Byte, text As String
    Dim start As Date, money As Currency, object As Object
End Sub
We need to be careful about this here: Some users make a mistake and declare incorrectly.
If you write the code I gave above like this one below, I mean if you start with Dim and think that you’ve declared the first variable and not declare the other variables with the suitable variable data types. Since in the “column”, “text” variable the data type is not stated, Byte and String are not indicated but Variant is -which is undefined data type. Since in the first variable I’ve declared with Dim, you declare the data type in the first variable. So, it doesn’t mean that you declare the next variables as well. You need to state the data type of each variable one by one.
They are also known as Type Indication suffixes.
They are not used much but they help to save in codes.
It is also possible to tell a variable type by adding a special character to the end of the variable name in VBA.
Dim number% 'Integer
Dim longnumber& 'Long
Dim sum! 'Single
Dim subtotal# 'Double
Dim payment@ 'Currency
Dim name$ 'String
Dim longestnumber^ ' 64 bit LongLong
VBA
, as a fast way of declaring data type, lets you add a character in the name of a variable.
This method shouldn’t be used to declare variables and it can be used for retrospective purposes only.
The row below will declare a Double data type and a variable.
Dim dDouble#
But it is better for this row to be declared with the “As” keyword.
Dim dDouble As Double
If you you abbreviations, you don’t have to declare the type.
If you use the % expression, you don’t need to write “As Integer”.
These abbreviations can be helpful to get available information to Variants.
For example: count =10#
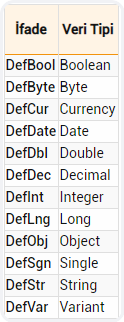
We can declare our variables with different methods like we mentioned, one of these methods is declaring with DEF.
This declaration is usually done free from the procedure at the top of the code window.
We can abbreviate and declare the data type we use as variable like below.
The letter that comes after Def+Type indicated that the variables starting with that letter belong to that type.
Let’s see an example that shows the difference between declaring with Def and Dim.
First, let’s declare our variables like this with Dim.
Sub PEAKUP()
    Dim row As Integer, column As Integer
    Dim text As String, letter As String, word As String
    Dim date As Date, start As Date
    Dim number As Double, price As Double
    row= 10
    column= 5
    text = "PEAKUP"
    letter = "E"
    word = "Book"
    date = "24.06.2018"
    start = "14.12.1980"
    number = 1453.48
    price = 5647.15
End Sub
Now, let’s do the same declaration with Def.
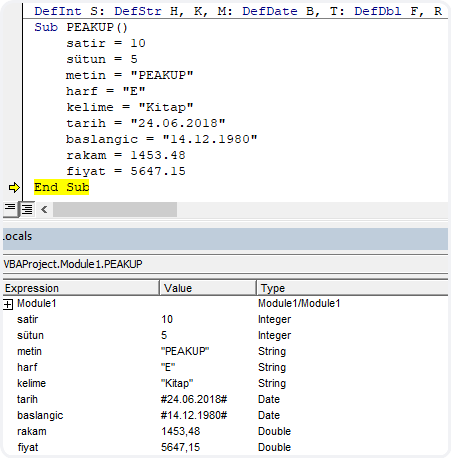
DefInt R
DefStr L, W, T
DefDate S, D
DefDbl P, N
Sub PEAKUP()
    row = 10
    column = 5
    text = "PEAKUP"
    letter = "E"
    word = "Book"
    date = "24.06.2018"
    start = "14.12.1980"
    number = 1453.48
    price = 5647.15
End Sub
As you see, we got to indicate the type by using the initials and declare the variables. At this point, you want the variable declarations not to take too much space and be seen in less rows. As indicated below, you can write the Def rows in a row next to one other with a colon (:).
DefInt R: DefStr L, W, T: DefDate S, D: DefDbl P, N
Sub PEAKUP()
    row = 10
    column = 5
    text = "PEAKUP"
    letter = "E"
    word = "Book"
    date = "24.06.2018"
    start = "14.12.1980"
    number = 1453.48
    price = 5647.15
End Sub
By the way, you can easily follow and evaluate the names, values and types of all variables from Locals Window.
You can take a look at the Microsoft Docs page for more information.
See you in other articles, bye.🙋🏻♂️
You can share this post with your friends and get them informed as well. 👍🏻

Each object or property we use in Power Apps can be used as a variable. For example, we can set the value of a TextBox as TextBox1.Text and this way, it is defined as a variable that has a text value and that can be interfered by the users. All the values like the color of an object, the text, borders can be used. From this point of view, we can see all the objects as variables. You can take a look here to read other article concerning this topic.
Even though every object can be used as a variable, there are real functions designed to be a variable. These functions that are experts in assigning an using variables are analyzed under 3 categories for Power Apps. They are used in more dynamic actions like calculating a value in an increasing or decreasing way, rather than a static Label moving data between pages.
1-General Variables:
Set
2-Context Variables:
UpdateContext
3-Collection:
Collect & ClearCollect
You can click here to take a look at the other article concerning the usage of collections.