CONDITIONAL ACTIONS WITH THE IF DECISION STRUCTURE

In this article I will be talking about a must decision/condition structure in macros. At the end of the article, we’ll have learned what IF Decision structure is and how and when to use it.


WHAT IS THE IF DECISION STRUCTURE?

This

condition structure is the structure that exists is all programming languages and allows the code blocks to run separately when certain conditions are met or not.

Allows you to execute actions depending on the True/False Boolean value that the indicated condition returns. If the condition is said to be True, the statements under the indicated condition(s) are applied. If the condition is said to be False, the statements indicated after the IF structure are applied. In addition, depending on the situation, if we have indicated the Else or ElseIF statements the control of those rows are done as well and when the outcome returns as True, the indicated commands are applied.


WHEN TO USE?

We use this structure when we have a thought/condition that starts with If or if we want to execute a multiple-condition action while coding.  There are a few other Decision/Condition structures other than this one; Select Case, IIF, Choose and Switch structures. Having knowledge of these structure will help you while coding.


HOW TO USE?

First, let’s take a look at its syntax, i.e. how we can write this IF structure on VBA.


SYNTAX

Here is its syntax.
Blue parts cannot be changed.
Red parts can be changed.

If condition(s) Then
‘Your codes
End If

You can think of its logic as “If this number is bigger than 10, do this…

If we have one condition only, you can use the syntax like this too:
If condition(s) Then ‘Your codes
If there is only one condition, you can remove the End If statement and write the condition next to the Then statement.
The conditions between If and Then statements can be multiple depending on the situation.
For example; If the numbers in the cells of the A column are bigger than 10 and not blank. You can use logical operators like And, Or, Xor.

Here is a little code sample for you to understand this part completely

If sayi > 10 And sayi < 20 Then

You can increase the condition to 2-3-4… by using logical operator in a If .. Then statement. Let’s say that we have some numbers in the A2:A10 call range and we want to write “bigger” on the B column of the numbers bigger 10.

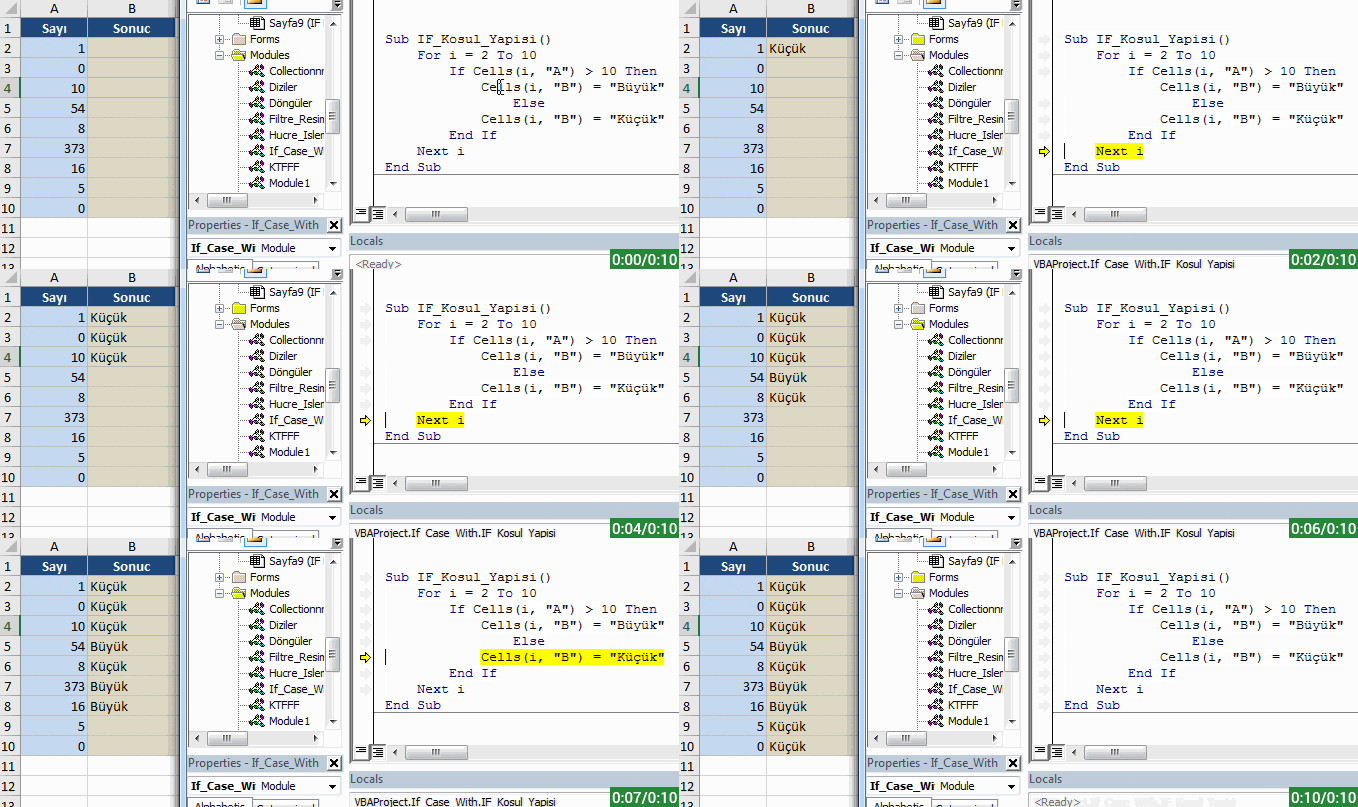
Here is the code we need for this:

Sub IF_Kosul_Yapisi() For i = 2 To 10 If Cells(i, "A") > 10 Then
            Cells(i, "B") = "Büyük"
        End If
    Next i
End Sub

You can see how these codes work in the GIF below.
IF structure


MULTIPLE CONDITIONS AND ELSE

If we have multiple conditions and you logically don’t want to execute actions depending on two situations like If it is like this do this, if not do that; you can write this in a line like this:

If Cells(i, "A") > 10 Then Cells(i, "B") = "Büyük" Else Cells(i, "B") = "Küçük"

and you can also write them one under the other with the Else statement. Then, your syntax will be like this:

If condition(s) Then
‘Your Codes If True
Else
‘Your Codes If False
End If

Some sample codes..

If Cells(i, "A") > 10 Then
    Cells(i, "B") = "Büyük" Else Cells(i, "B") = "Küçük"
End If

The code above writes Bigger to the B column of cells bigger than 10, and Smaller to the smaller ones.
 

ELSEIF

Now, let’s increase out conditions by including the ElseIf statement.
You can think the logic of this syntax as “If it’s like this to this; if not and it’s like that, do that; if not and it’s like the other way, then do that way.” 

Here is the syntax..
If conditions Then
‘your codes
ElseIf conditions Then
‘your codes
ElseIf conditions Then
‘your codes
End If

Let’s have our outcomes written to the Outcome column according to these conditions.

  • If the number is equal to zero, it will say Zero.
  • If the number is equal to 10, it will say Equal.
  • If the number is smaller than 10, it will say Smaller.
  • If the number is bigger than 10, it will say Bigger.

Depending on the conditions we’ve stated, the code we’ll need will be:

Sub Eger_Kosul_Yapısı_2()
    Dim i As Integer
    For i = 2 To Range("A65536").End(3).Row
        If Cells(i, "A") = 0 Then
            Cells(i, "B") = "Sıfır" ElseIf Cells(i, "A") = 10 Then
            Cells(i, "B") = "Eşit" ElseIf Cells(i, "A") < 10 Then
            Cells(i, "B") = "Küçük" ElseIf Cells(i, "A") > 10 Then
            Cells(i, "B") = "Büyük"
        End If
    Next i
End Sub

You can see how these codes work in the GIF below as well.
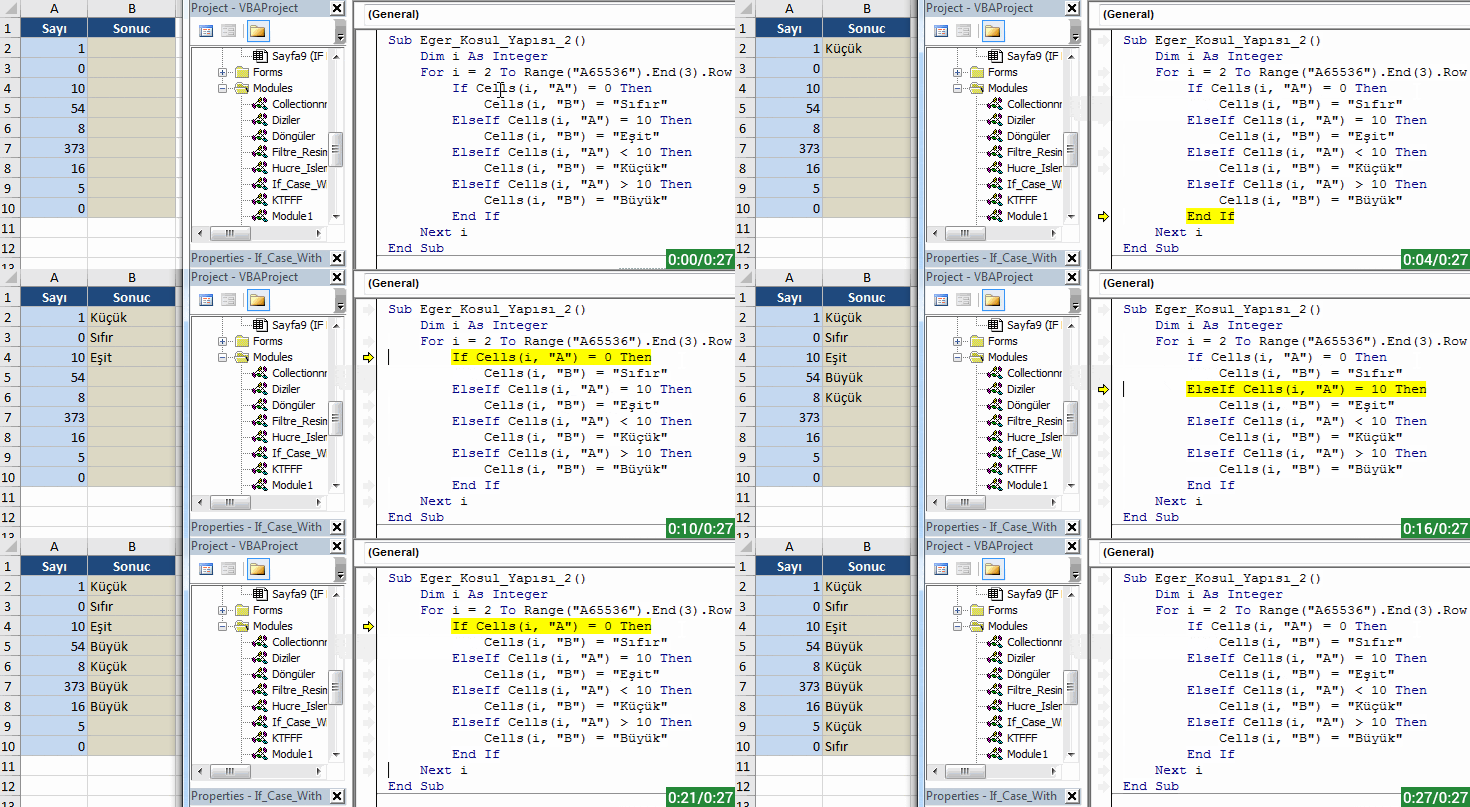
 

ELSEIF and ELSE TOGETHER

Lastly, if none of the conditions above are suitable for our codes, then we can include the Else statement before the End If row and get another outcome written in the cell as well.

Sub Eger_Kosul_Yapısı_3()
    Dim i As Integer
    For i = 2 To Range("A65536").End(3).Row
        If Cells(i, "A") = 0 Then
            Cells(i, "B") = "Sıfır" ElseIf Cells(i, "A") = 10 Then
            Cells(i, "B") = "Eşit" ElseIf Cells(i, "A") < 10 Then
            Cells(i, "B") = "Küçük" Else Cells(i, "B") = "Büyük"
        End If
    Next i
End Sub


You can take a look at the Condition Structures in Visual Basic for more details.


See you in other articles, bye. 🙋🏻‍♂️
You can share this article with your friends and get them informed as well. 👍🏻

SELECT CASE DECISION STRUCTURE

In this article, I wanted to share some information about the Select Case Decision Structure which is one of the Decision (Condition) Structures in Excel & VBA, a.k.a Excel macros. You can find other articles about Excel & VBA on our blog.


WHAT IS THE SELECT CASE DECISION STRUCTURE?

The Select Case Decision Structure

can be used to control comparisons about a data, just like the IF structure.
The values it returns are going to be True or False. When it is True, the code lines under it work. When it is False, if there are other Case conditions, they are controlled.
If there are other Case conditions and they are True, the codes below them are applied.
If there is no other Case conditions or all the Case conditions have returned False, if there are other codes in the procedure, they are applied by getting out the block with End Select.

Even though it is similar to IF (IF Else ElseIf Then) its type is a bit different and if you have multiple conditions, it is way easier to use compared to IF.


Here is the Syntax..

Blue

parts cannot be changed.
Red parts can be changed.
Green parts are comment lines.

Select Case Data to be controlled
‘Your Codes
End Select

If we are going to have multiple conditions, than Case Is or Case statements come into the play. We also have the Case Else statement that allows us to say “do this if the controlled data is outside indicated conditions.”

Select Case Data to be controlled
Case Is Condition
‘Your codes
Case Is Condition
‘Your codes
Case Is Condition
‘Your codes
Case Else
‘Your codes
End Select

If you want, you can write to codes in the same row after the condition part with : (colon). Case Is Condition: Your Codes
If we use a comparison operator (<; <=; =; >; >=) while indicating a condition, Case Is statement is written for the condition. If not, Case statement will be enough. You will see this situation in the examples below.

We used this statement for the Select Case structure above: “If you have multiple conditions, it is way easier to use compared to IF.”
Let’s give an example of this. We will apply the same conditions with both the IF structure and the Select Case structure and see the difference.
Our conditions will be like this: we have a value and we’ll have it checked. If this value is smaller than 1, we will return the outcome with MsgBox. Likewise, if it is between 1 and 5 or 6 and 10 or 11 and 15, we’ll return the outcome with MsgBox. We will prepare this separately with both of the structures.


Let’s start. First, the codes that we will need if we write our codes depending on the conditions above with the IF structure are:

Sub IF_Yapisi_ile_1()
For i = 1 To 10
If Cells(i, 1).Value < 1 Then
MsgBox "Değer 1'den küçüktür."
ElseIf Cells(i, 1).Value >= 1 And Cells(i, 1).Value <= 5 Then
MsgBox "Değer 1 ile 5 arasındadır."
ElseIf Cells(i, 1).Value >= 6 And Cells(i, 1).Value <= 10 Then
MsgBox "Değer 6 ile 10 arasındadır."
ElseIf Cells(i, 1).Value >= 11 And Cells(i, 1).Value <= 15 Then
MsgBox "Değer 11 ile 15 arasındadır."
End If
Next i
End Sub


If we want to write our codes in different IF rows for each condition and simplify it, then we can write it like this:

Sub IF_Yapisi_ile_2()
For i = 1 To 10
If Cells(i, 1).Value < 1 Then MsgBox "Değer 1'den küçüktür."
If Cells(i, 1).Value >= 1 And Cells(i, 1).Value <= 5 Then MsgBox "Değer 1 ile 5 arasındadır."
If Cells(i, 1).Value >= 6 And Cells(i, 1).Value <= 10 Then MsgBox "Değer 6 ile 10 arasındadır."
If Cells(i, 1).Value >= 11 And Cells(i, 1).Value <= 15 Then MsgBox "Değer 11 ile 15 arasındadır."
Next i
End Sub


Now let’s see how we will write the same conditions with the Select Case statement.

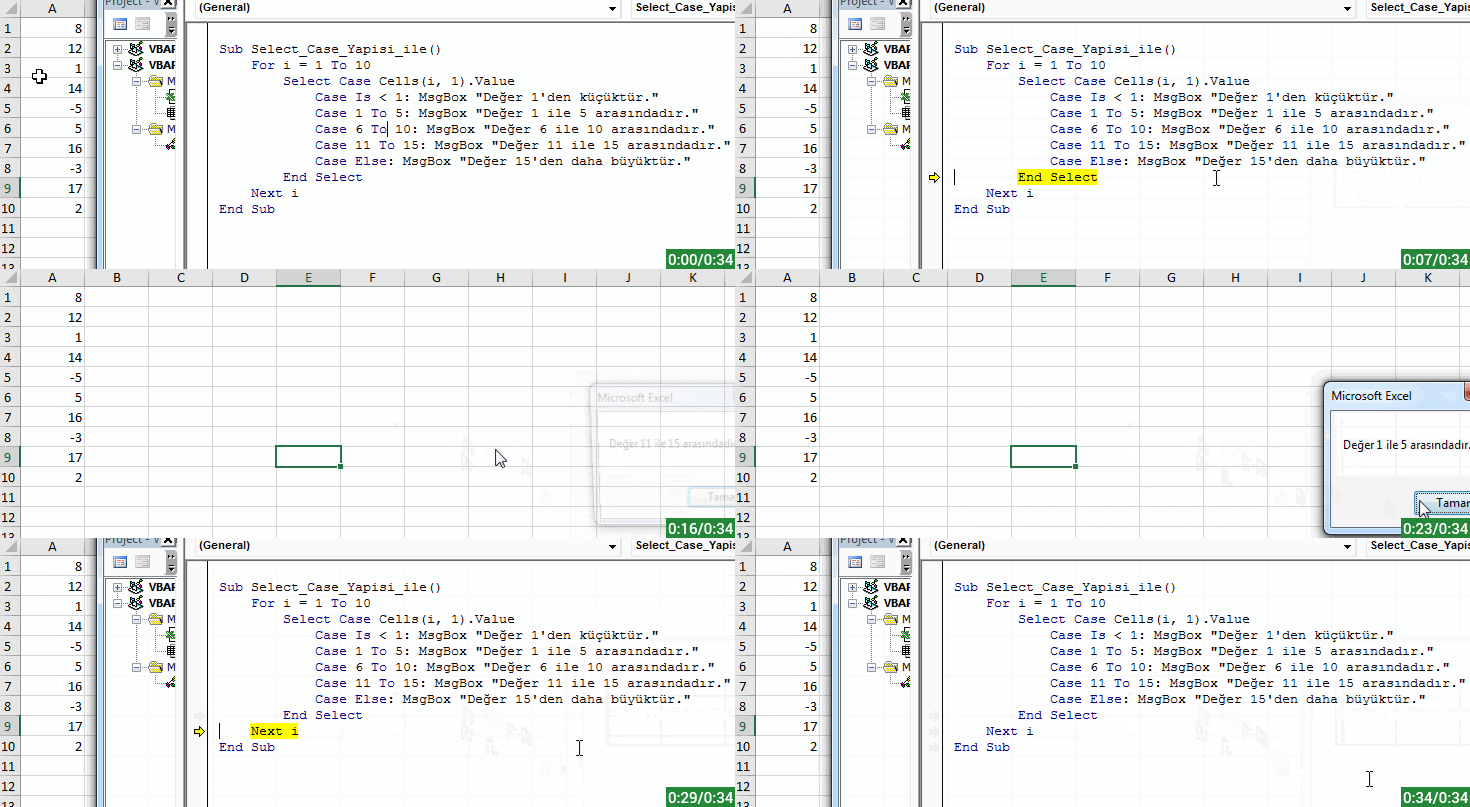
Sub Select_Case_Yapisi_ile()
For i = 1 To 10
Select Case Cells(i, 1).Value
Case Is < 1: MsgBox "Değer 1'den küçüktür."
Case 1 To 5: MsgBox "Değer 1 ile 5 arasındadır."
Case 6 To 10: MsgBox "Değer 6 ile 10 arasındadır."
Case 11 To 15: MsgBox "Değer 11 ile 15 arasındadır."
Case Else: MsgBox "Değer 15'den daha büyüktür."
End Select
Next i
End Sub


We saw that we can execute the action we want with three different codes and we can increase this number, but I hope that you can see the difference between them.
With the IF structure, we had to indicate Cells(i, 1).Value –the cell address that we were going to have controlled and we wrote it many times to indicate the condition between two numbers. But with Select Case, it was enough for us to write the cell address that we were going to have controlled and it was very easy to indicate the condition between two numbers as 1 To 5.

Let’s see the outcome with the Select Case structure in a GIF.

select case karar yapısı vba


CODE SAMPLES

You can apply the Select Case application samples below and test how it works and comprehend its logic better.

Sub Makro1()
Select Case "Murat" = "Emre"
Case True: MsgBox "İfade Doğrudur."
Case False: MsgBox "İfade Yanlıştır."
End Select
End Sub


Sub Makro2()
Dim Değer As Integer
Değer = 2
Select Case Değer
Case 1: MsgBox "Değer 1'dir."
Case 2: MsgBox "Değer 2'dir."
Case 3: MsgBox "Değer 3'tür."
Case Else: MsgBox "Değer Mevcut Değil."
End Select
End Sub


Sub Makro3()
Dim Değer As Integer
Değer = 1
Select Case Değer
Case Is < 1: MsgBox "Değer Küçüktür."
Case Is = 1: MsgBox "Değer Eşittir."
Case Is > 1: MsgBox "Değer Büyüktür."
End Select
End Sub


Sub Makro4()
Dim Metin As String
Metin = "PEAKUP"
Select Case Metin
Case "Excel": MsgBox "Metin Excel'dir"
Case "PEAKUP": MsgBox "Metin PEAKUP'tır."
Case "VBA": MsgBox "Metin VBA'dır."
End Select
End Sub


Sub Makro5()
Dim Değer As Integer
Değer = 14
Select Case Değer
Case Is < 1: MsgBox "Değer 1'den küçüktür."
Case 1, 2, 3, 4, 5: MsgBox "Değer 1 ile 5 arasındadır."
Case 6, 7, 8, 9, 10: MsgBox "Değer 6 ile 10 arasındadır."
Case 11, 12, 13, 14, 15: MsgBox "Değer 11 ile 15 arasındadır."
Case Else: MsgBox "Değer 15'den daha büyüktür."
End Select
End Sub


Sub Makro6()
Dim Değer As Integer
Değer = 20
Select Case Değer
Case Is < 1: MsgBox "Değer 1'den küçüktür."
Case 1 To 9: MsgBox "Değer 1 ile 9 arasındadır."
Case 10 To 19: MsgBox "Değer 10 ile 19 arasındadır."
Case 20 To 29: MsgBox "Değer 20 ile 29 arasındadır."
Case Else: MsgBox "Değer 29'dan büyüktür."
End Select
End Sub


Sub Makro7()
Dim Değer As Long
Değer = 15
Select Case Değer
Case Is < 1: MsgBox "Değer 1'den küçüktür."
Case 1 To 4, 5 To 9: MsgBox "Değer 1 ile 9 arasındadır."
Case 10 To 14, 15 To 19: MsgBox "Değer 10 ile 19 arasındadır."
Case 20 To 24, 25 To 29: MsgBox "Değer 20 ile 29 arasındadır."
Case Else: MsgBox "Değer 29'dan büyüktür."
End Select
End Sub


Sub Makro8()
Dim Tanım As String
Tanım = "C"
Select Case Tanım
Case Is < "E": MsgBox Tanım & " harfi E harfinden önce gelir."
Case Is > "E": MsgBox Tanım & " harfi E harfinden sonra gelir."
End Select
End Sub


Sub Makro9()
Dim Tanım As String
Tanım = "E"
Select Case Tanım
Case "A" To "M": MsgBox Tanım & " harfi A ile M harfleri arasındadır."
Case "N" To "Z": MsgBox Tanım & " harfi N ile Z harfleri arasındadır"
Case Else: MsgBox "Case Else"
End Select
End Sub


You can cat more detailed information about the Select Case statement on Microsoft Docs.


See you in other articles, bye. 🙋🏻‍♂️
You can share this post with your friends and help them get informed as well.👍🏻

Methods of Declaring VBA Variables

In this article, we will be talking about Declaring VBA Variables. Variables are essential elements of programming. Using and managing variables are one of the musts while creating a project. I will try my best to tell it as simple as possible. Reminder: You can find other articles about VBA on our blog. 👍🏻


About Declaring VBA Variables

Variables are usually used to store a data and use it when necessary. They are usually separated into two classes. Global variables and Local variables. Global variables can be used by all the functions of the program, but the local variables are used by the functions that have declared them.

It can be called back, reassigned or fixed during the execution of a procedure, function or module.
Declaring a variable will enable you to indicate the names of the variable you’ll use and the data type the variable will contain.

For example, if Result = 10, the variable Result can be declared as Integer Whole Number .

We usually name the variables in a short and easily remembered way. The most frequently used variable names are one character names like i, a, n, x ,y ,z, s so that it is easy to write in the code. If the variable name is a name that you can remember while using in the code, the probability of making a mistake while writing the code decreases.

Now we can move on to the declaring part.


The syntax concerning declaring variables is usually like this.
Dim variable_name [(stringsize)] As type
Public variable_name[(stringsize)] As type
Static variable_name[(stringsize)] As type


Along side this general declaring, the declaring methods below can be used as well.

  1. Declaring with Dim
  2. Declaring with Data Indicators (Abbreviations)
  3. Declaring with DEF

Declaring with Dim

It is the most known and used VBA Variable Declaring method.

We indicated the syntax Syntax below. Let’s make it clear with a few examples. Let’s say that we will declare a variable named row to use in the rows (cells) in the A column. Since the row numbers are whole numbers, we can used one of the whole number types we’ve indicated in our Data Types article. It would be better to use the variable data type depending on the row number we’ll get controlled or the maximum number that can be in the cell.

As well as we can use as Number or Whole Number, we have 3 basic variable data types: ByteInteger and Long. If the number we’ll assign to the row variable is 255 or less, then we can use the Byte variable data type. If the number we’ll assign to the row variable is between –32767 and+32768, then we can use the Integer variable data type. If it can be a bigger whole number, then we should use the Long variable data type. If a bigger number than what the variable can contain is sent, that the Overflow error occurs. And if a text data is sent to a variable that was determined as number, Type Mismatch error occurs.


Let’s give a few examples of declaring variables with Dim:

Sub PEAKUP()
    Dim row As Long
    Dim column As Byte
    Dim text As String
    Dim start As Date
    Dim money As Currency
    Dim object As Object
    row = 15
    column = 5
    text = "Excel Turkey Forum"
    start = "24.06.2018"
    money = 300
    Set object= ActiveSheet
End Sub

We can write each variable one by one in different rows like that, but we also can write them side by side like this. We just need to put Dim in the beginning and put a comma between each variable.

Sub PEAKUP()
    Dim row As Long, column As Byte, text As String
    Dim start As Date, money As Currency, object As Object
End Sub

We need to be careful about this here: Some users make a mistake and declare incorrectly.

If you write the code I gave above like this one below, I mean if you start with Dim and think that you’ve declared the first variable and not declare the other variables with the suitable variable data types. Since in the “column”, “text” variable the data type is not stated, Byte and String are not indicated but Variant is -which is undefined data type. Since in the first variable I’ve declared with Dim, you declare the data type in the first variable. So, it doesn’t mean that you declare the next variables as well. You need to state the data type of each variable one by one.


Declaring with Data Identifiers (Abbreviations)

Abbreviations 

They are also known as Type Indication suffixes.
They are not used much but they help to save in codes.
It is also possible to tell a variable type by adding a special character to the end of the variable name in VBA.

Dim number% 'Integer
Dim longnumber& 'Long
Dim sum! 'Single
Dim subtotal# 'Double
Dim payment@ 'Currency
Dim name$ 'String
Dim longestnumber^ ' 64 bit LongLong


Data Type Abbreviation Characters

VBA

, as a fast way of declaring data type, lets you add a character in the name of a variable.
This method shouldn’t be used to declare variables and it can be used for retrospective purposes only.
The row below will declare a Double data type and a variable.

Dim dDouble#

But it is better for this row to be declared with the “As” keyword.
Dim dDouble As Double


Data Type Abbreviation/ Suffixes

If you you abbreviations, you don’t have to declare the type.
If you use the % expression, you don’t need to write “As Integer”.
These abbreviations can be helpful to get available information to Variants.

For example: count =10#


Declaring with DEF

We can declare our variables with different methods like we mentioned, one of these methods is declaring with DEF.
This declaration is usually done free from the procedure at the top of the code window.
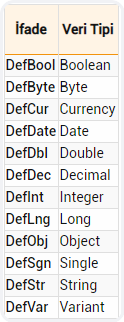
We can abbreviate and declare the data type we use as variable like below.
The letter that comes after Def+Type indicated that the variables starting with that letter belong to that type.

def ile değişken tanımlama tablosu

Let’s see an example that shows the difference between declaring with Def and Dim.

First, let’s declare our variables like this with Dim.

Sub PEAKUP()
    Dim row As Integer, column As Integer
    Dim text As String, letter As String, word As String
    Dim date As Date, start As Date
    Dim number As Double, price As Double
    row= 10
    column= 5
    text = "PEAKUP"
    letter = "E"
    word = "Book"
    date = "24.06.2018"
    start = "14.12.1980"
    number = 1453.48
    price = 5647.15
End Sub

Now, let’s do the same declaration with Def.

DefInt R
DefStr L, W, T
DefDate S, D
DefDbl P, N
Sub PEAKUP()
    row = 10
    column = 5
    text = "PEAKUP"
    letter = "E"
    word = "Book"
    date = "24.06.2018"
    start = "14.12.1980"
    number = 1453.48
    price = 5647.15
End Sub

As you see, we got to indicate the type by using the initials and declare the variables. At this point, you want the variable declarations not to take too much space and be seen in less rows. As indicated below, you can write the Def rows in a row next to one other with a colon (:).

DefInt R: DefStr L, W, T: DefDate S, D: DefDbl P, N
Sub PEAKUP()
    row = 10
    column = 5
    text = "PEAKUP"
    letter = "E"
    word = "Book"
    date = "24.06.2018"
    start = "14.12.1980"
    number = 1453.48
    price = 5647.15
End Sub

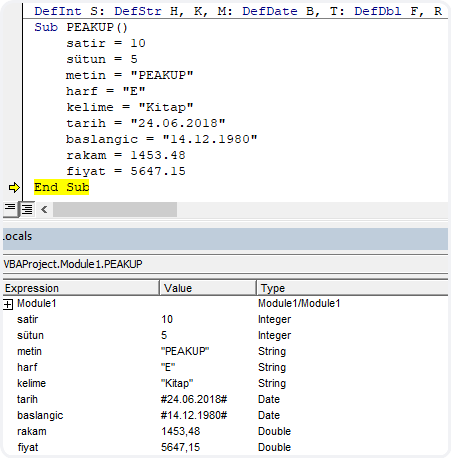
By the way, you can easily follow and evaluate the names, values and types of all variables from Locals Window.

def ile değişken tanılamayı locals windowda görüntüleme


You can take a look at the Microsoft Docs page for more information.

See you in other articles, bye.🙋🏻‍♂️
You can share this post with your friends and get them informed as well. 👍🏻