Manage Items Centrally by Using Components

You might feel the need to manage the items on the screen from a center while developing a Power Apps application. When the properties of a certain item change, the features like the color, size, place can be managed for the related items on all screens.

There are two existing methods for central management.

  1. Method 1: Managing by using the item properties on the formula bar.
    Since the actions are executed through formulas, it is the most stable method.
  2. Method 2: Components (Experimental)
    Since this method is experimental, it doesn’t work in a stable way. Compared to the formula method, it is way easier to use.
    The items on the screen can be standardized with components. 
    In this article, we will be analyzing how to manage items centrally with Components.

Using Components

To use the component feature: go File–> Settings –> Advanced Settings–> Write Components into the search bar on right to find the feature and then activate it.

Managing Items Centrally with Components

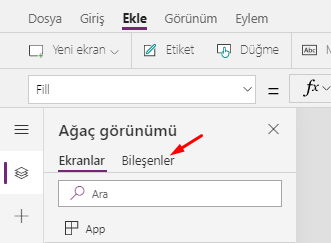
Once the components are activated, go back to the application screen. Two menus as Screens/Components are displayed.

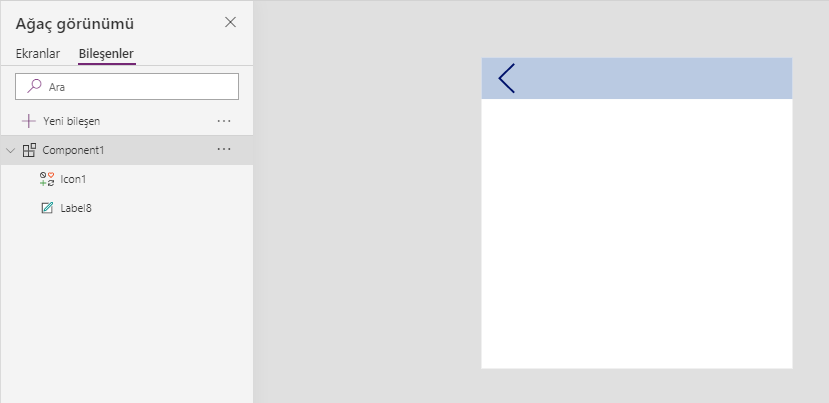
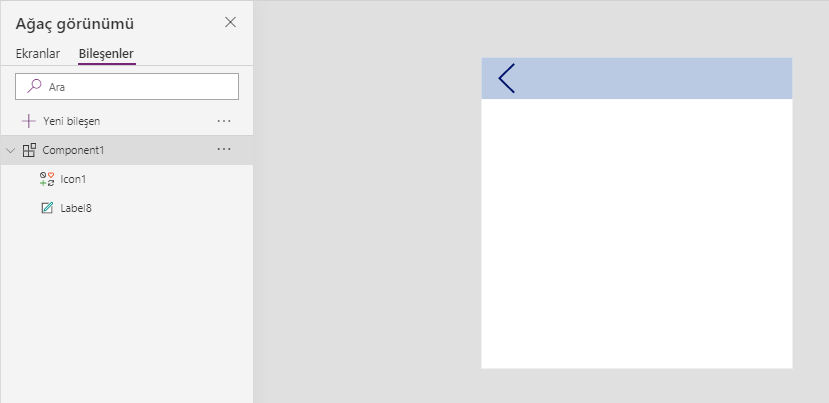
We go to the components screen to design the template we want to use. The components are designed as a normal screen. When you use multiple components, naming the components will be important.

After the component is complete go to Screens and when you are in the page where the component will be added; locate the page by choosing Insert–>Custom–>Component1.


The component that has been created is added to the screen as one single item. For this reason, a component can be thought as a background image.
In this sense, while designing the symbol or items a component contains or after it is added to the screen, it doesn’t accept general formulas (like the functions of main page, next, save buttons).

Using Formulas in Components

We need to execute an extra action to give commands to the items on a component. For example, when we want to write the Navigate function into the Previous button on the image; we have to add a Label to the screen. You can complete process by writing the Navigate function into the OnSelect property of this Label.

Create Dependent Dropdown Lists

You can create dependent dropdown lists on your mobile apps. For example, Countries can be displayed when Continent is selected, regions when Country is selected and cities when regions are selected.

You can create a manual list or get one from a database while creating a Dropdown List.

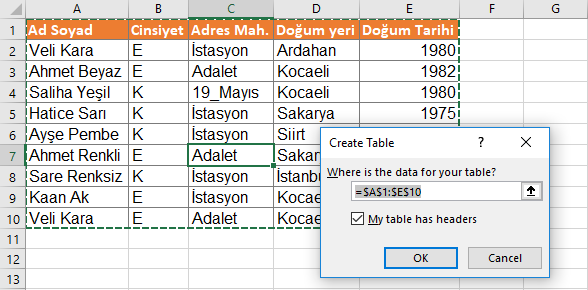
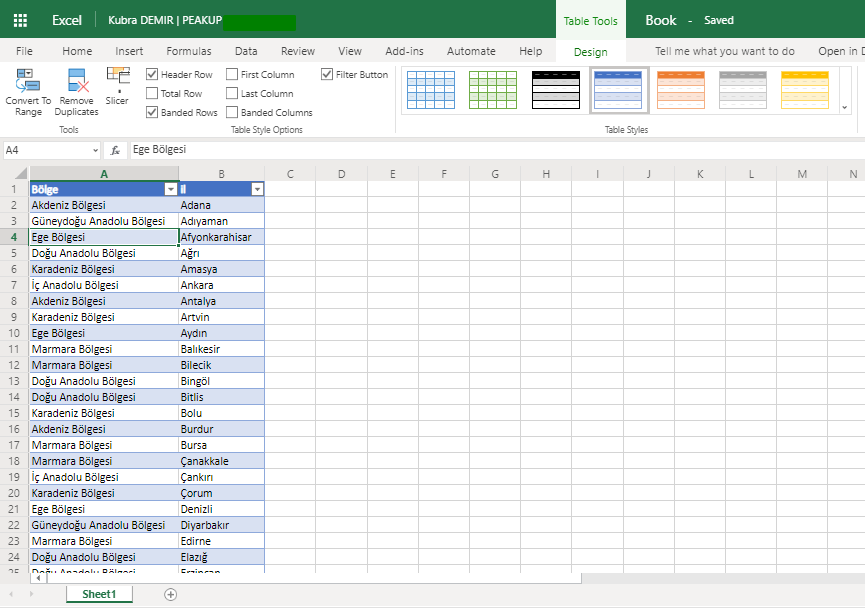
It is necessary to enter data as [“text1” ; “text2” ; “text3” ] within brackets in order to add data manually to the dropdown lists. For example, If the data is on an Excel in OneDrive, the data field should be formatted as Table. The shortcut to create a table in Excel is CTRL+SHIFT+L.

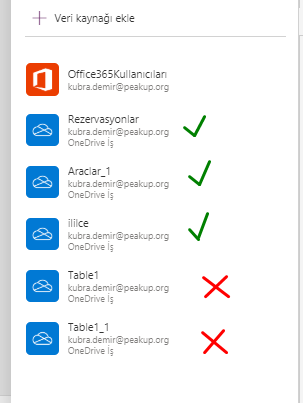
When you turn your data into a table, it is named as Table1. And the data is used with this table name in Power Apps. When there are multiple tables, it is important to name the Excel Table before going into Power Apps to prevent name confusion like Table1, Table5, Table3.

Dropdown Lists

We will execute the action with two dropdown lists.

Dropdown1 named as–> dd_region.
Dropdown2 named as–> dd_city.

The cities in dd_city will change depending on the selected region on dd_region.

Get Data from the Table

Cities are written cross the region names. Since there are multiple cities in a region, the regions are repeated. You need to use the Distinct formula for the region names to be displayed singularly.

You can write Distinct(RegionTable;Region) into the items property of dd_region.

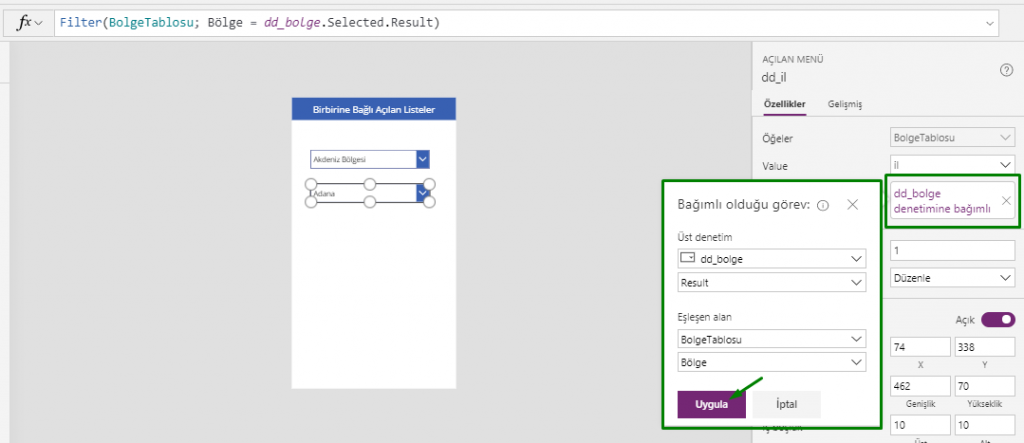
You can use the menu on the right directly for the dd_city item.

The name of the Items table is selected as RegionTable.
The Value column’s name is selected as the city column.

The upper control ins chosen as dd_region, the matched field as RegionTable, Region Column for the dependent control.
This way, the formula below is automatically written.
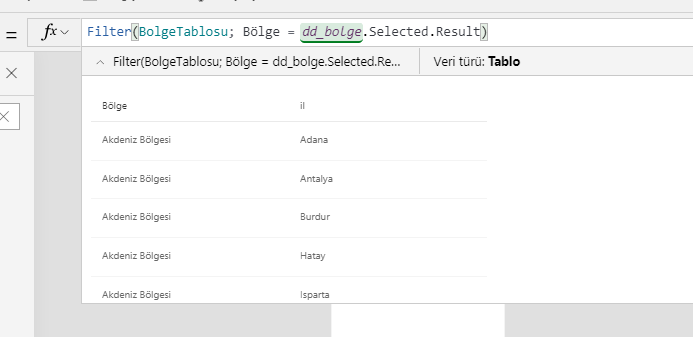
Filter(RegionTable; Region= dd_region.Selected.Result) to the items property of dd_il

Distinct is not necessary in cases of the region names are not repeated and the formula should be revised in this context.
Filter(RegionTable;dd_region.Selected.Region=Region)

The value that formula returns will be displayed on the formula bar.


Using Manual Lists

Since it will be hard to type long data on by one and the formula get longer, it makes sense to use the manual lists for short data.

You can write [“Marmara Region”; “Ege Region”;”Karadeniz Region”] into the items property of dd_region.

You can write:
If(
dd_region.Selected.Value=”Marmara Region”; [ “İstanbul”;”Kocaeli”];
dd_region.Selected.Value=”Ege Region”; [“İzmir”;”Çanakkale”];
dd_region.Selected.Value=”Karadeniz Region”;[“Zonguldak”;”Sinop”;”Trabzon”]
)

to the items property of dd_il. You can use different methods fore dropdown lists just like for other actions. For example, you can prefer to write Switch() instead of IF ().

You can take a look at this link for the details about Dropdown Lists.

Scan Codes Easily with a Mobile Device

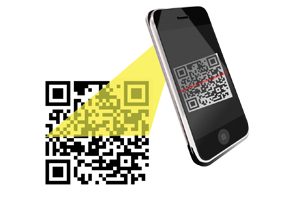
It is possible to scan a barcode, serial number, Imei number, QR Code and many more codes on a SINGLE screen! You can scan all code types with the advanced code scanning function of Power Apps and integrate them to your system.

We can talk about a lot of benefits of transitioning to the code system with a lot of scenarios like counting, tracking and assigning inventories; library management, registering stocks and products, executing actions quickly in store controls.
You can scan codes on your cellphone camera with the mini app you’ll develop using Power Apps.
Scanning Codes

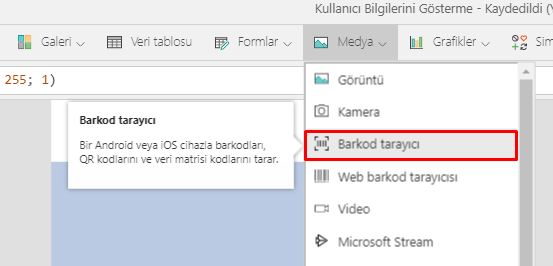
Thanks to this feature, you don’t need to use any extra scan devices. Go Add–> Media–> Barcode scanner on your mobile phone in order to use the code scanning feature. This action only adds a button to your page, the screen that allows you to scan will not be displayed to you in the app.

You can write the Navigate formula into the OnScan property of the scan button (BarcodeScanner1) and direct to the second screen. This way, when a code is scanned you are directed to the second page.

A Label (barcodeData) is used to show the scanned code, Add button (Button1) to enter data and Gallery to display the data on the second screen.

BarcodeScanner1.Value is written into the Text property Label1.

The function that saves data to the cache is written into the OnSelect property of Button1.
Collect( ScannedBarcodes; {barcode: barcodeData.Text} )

ScannedBarcodes is written into the Items property of Gallery1.


You can take a look at this link for the Barcode Scan feature.

Using the Table Format on Power Platform

When you get data from Excel to products like Power Apps and Power BI, you need to use this data in the table format. If there is a table in the Excel from which you’ll get the data,  it can be directly transferred to the system.
Even if the data is in an Excel on OneDrive, the situation is still the same. Data field should be formatted as Table.

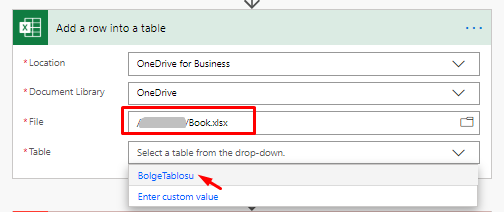
Power Automate (MS Flow) – Excel Connection (OneDrive)

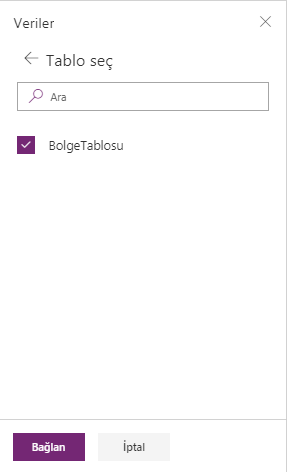
Power Apps – Excel Connection (OneDrive)

Using the Table Format

You can turn the existing data into a table by choosing Table in the Insert tab or in an Excel worksheet or you can start by inserting a new table. (The shortcut for creating a table in Excel is CTRL+L)


When you turn the data into a Table, it will be named as Table1. Every table you add to existing Excel will be named Table2, Table3 etc. When there are multiple tables, names are going to be confusing. In order not to be confused, you should rename all the tables in a meaningful way in Excel.

Defining Names

All table names in Power Apps data sources are displayed the way below and the same names are used in formulas. For this reason, the tables should be named before being connected to the platforms.

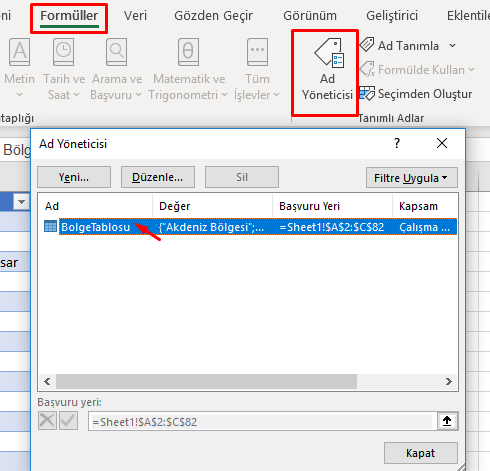
Excel Name Manager

View the existing tables from Formulas –>Name Manager. Click Edit–> Name and define and give a new name. The named table can be used in any platform that you want.

You can take a look at the details of creating and renaming a table.

You can click here to access the other Power Apps articles.

Using Collections

Usually it is necessary to store the data in temporary storage while calculation or processing. Then, the processed data is transmitted to the data source by saving permanently as ultimate data. Temporary records are stored in the variable tables called Collection. In this method, the data is calculated, processed and quickly written to the cache memory on the app screen only.

These tables are created virtually. Tables and columns can be named however wanted. Columns’ data types are automatically shaped based on the data they contain or the data source that will be saved tı later.

The Collect formula is used to create the collection tables. It is written as (table name ; { columns}) like below:

Collect(name_of_table;
{ column1:   textbox1.Text;
column2:   textbox2.Text;
column3:   textbox3.Text    } )

For example, you can write this formula into the OnSelect property of the SAVE button of OnTimerStart/OnTimerEnd property of the timer.

Using Collections

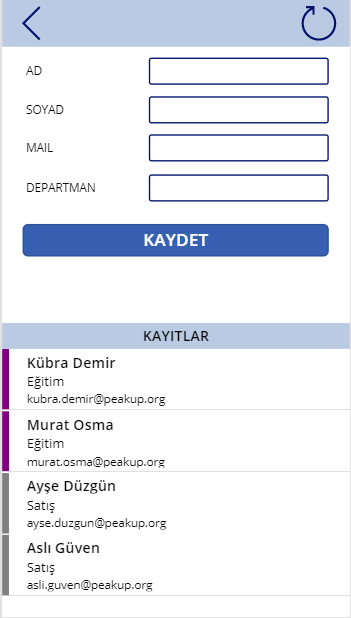
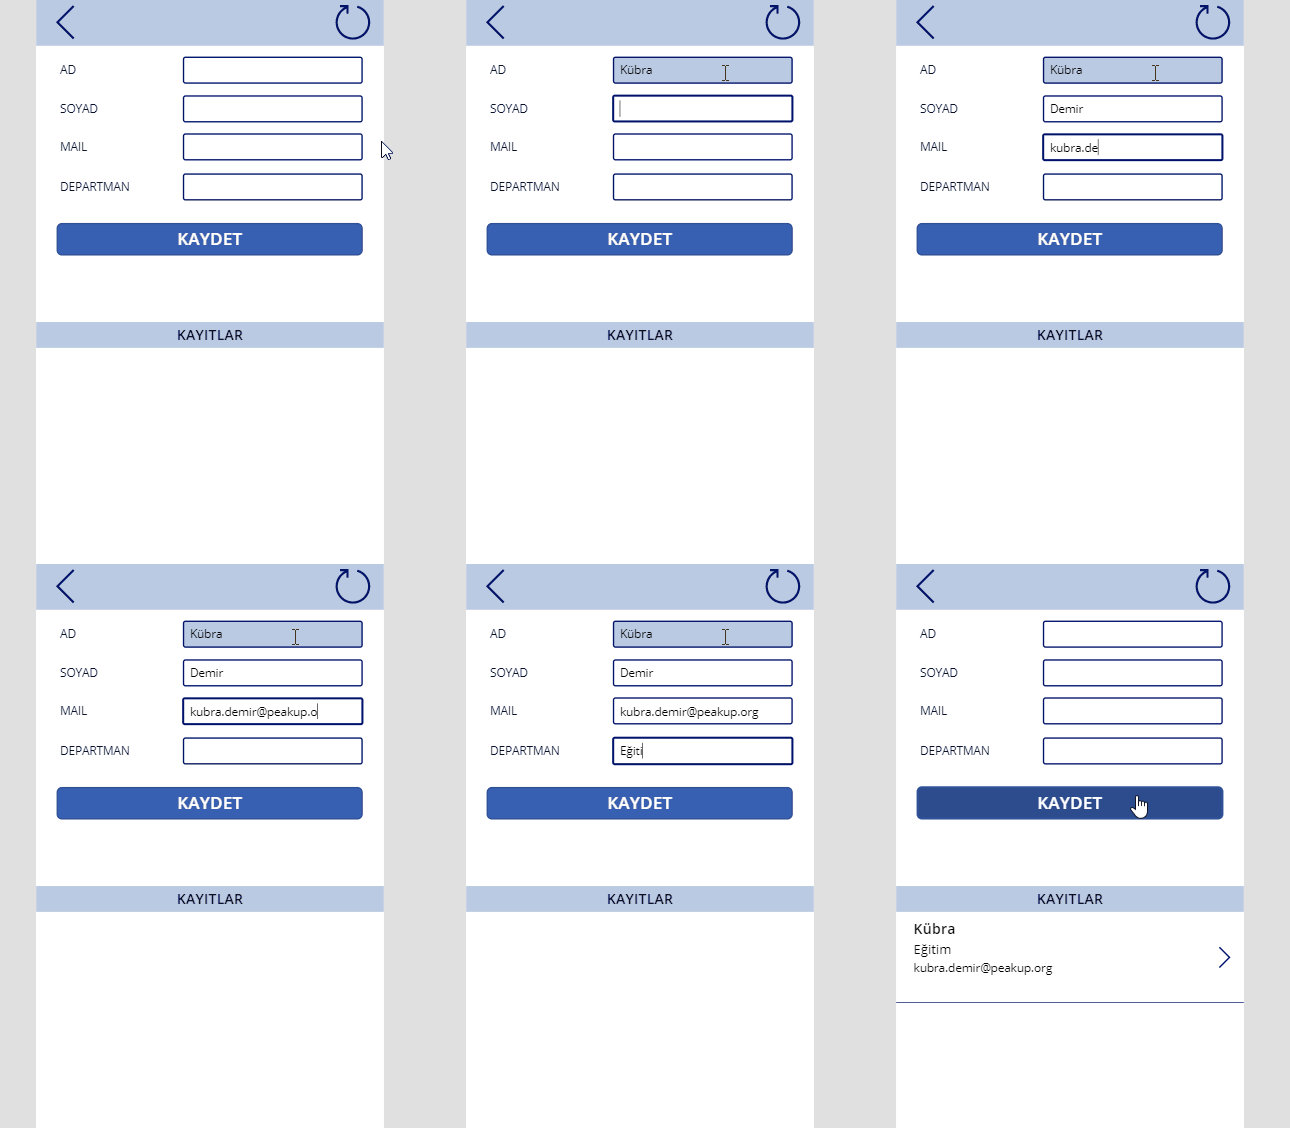
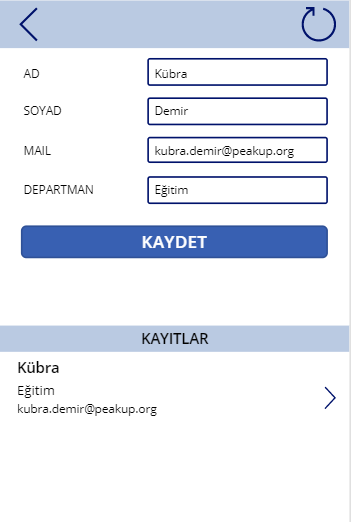
The personnel records will be written on collection in the screen of the image you see. 4 textboxes, 4 labels, button and gallery items have been used in this screen.

Item names are frequently used in formulas. So, the functional items in the screen should be named based on what they do or the data they contain.

Textbox names are: txt_name, txt_surname, txt_mail, txt_department

The formula below has been written into the OnSelect property of the SAVE button for the data entered in textboxes to be written to the Collection table.

*Table and columns can be named as desired.

Collect( Personnel;
{
P_name:    txt_name.Text;
P_surname:    txt_surname.Text;
P_mail:    txt_mail.Text;
P_department:    txt_department.Text   } )

When you click the save button, the data will be transmitted to the collection in seconds.

How to View Collection Data

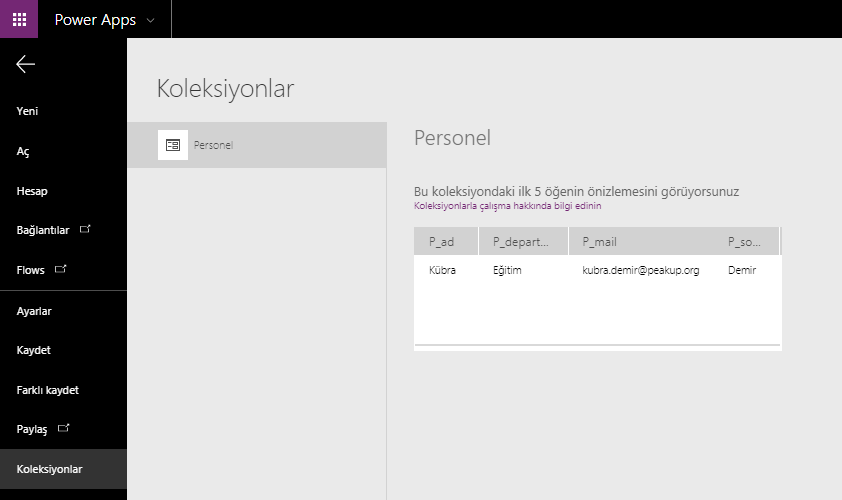
All collections and their contents can be analyzed on a single screen with the Collections button in the View tab.

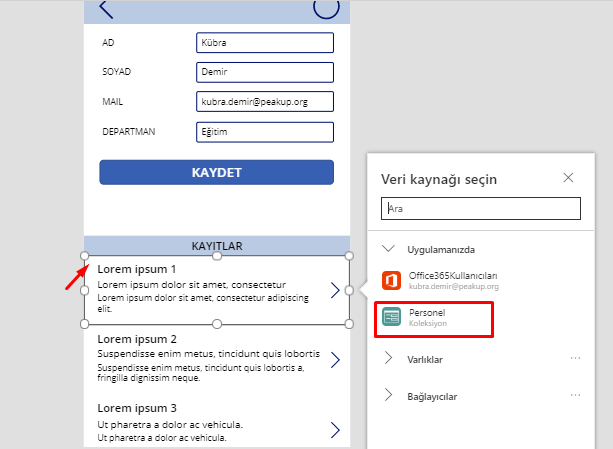
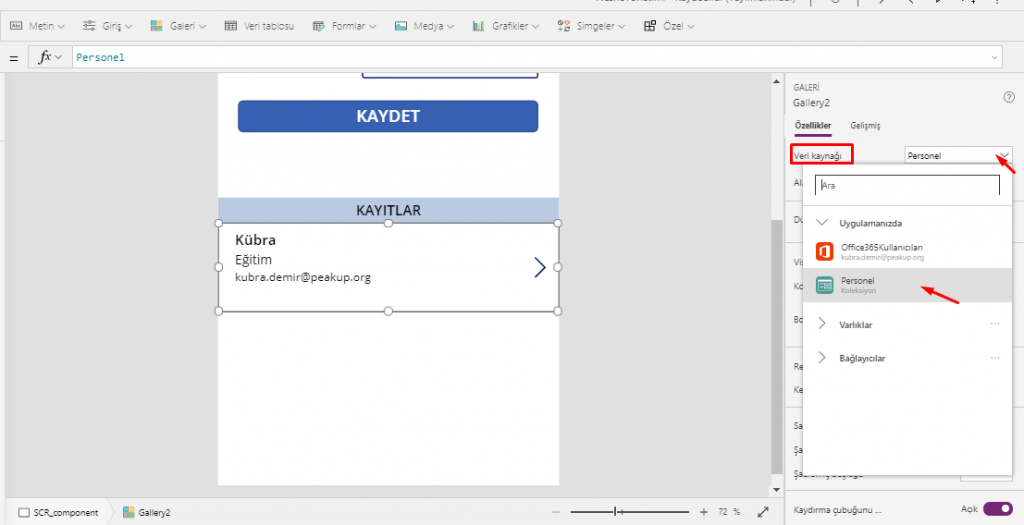
Click the gallery item to view the data in lists and choose the related Collection in the screen that opens up.

For the older versions, you can choose in the Data Source field in the Properties Window. Or you can execute the same action why writing the table name into the Items property of the gallery through formula bar.

To reset the textboxes after clicking the save button, the Reset() function is used.

*;; is used in actions that need to be executed successively.

Collect( Personnel;
{
P_name:    txt_name.Text;
P_surname:    txt_surname.Text;
P_mail:    txt_mail.Text;
P_department:    txt_department.Text   } );;

Reset(txt_name);;
Reset(txt_surname);;
Reset(txt_mail);;
Reset(txt_department)


Conditional Formatting Lists

You can design lists with a condition with the If Formula in the gallery. It is possible to control a lot of features of the objects like color, look, size and place with these conditions. You can authorize based on person/department , hide/show buttons on the screen and highlight status in tracking processes.

Designing Lists with a Condition

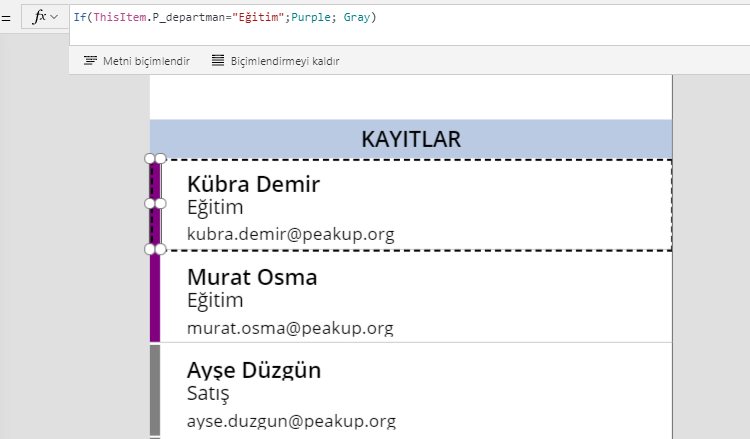
In this example, items indicated with colors depending on the information they contain. While all the items of the “Education” department are indicated with purple, the Sales department is displayed with Grey.

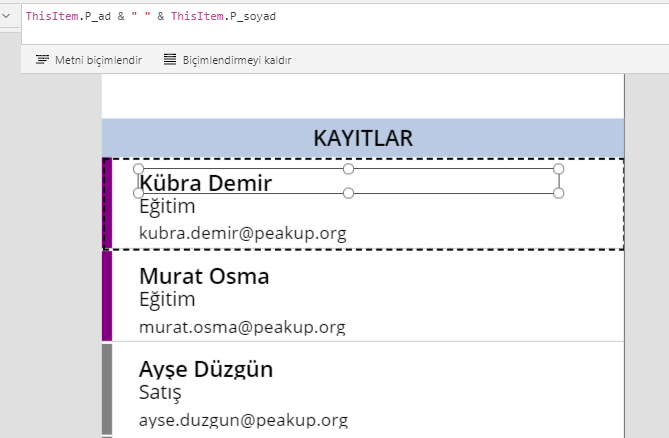
ThisItem word is used to individually evaluate each item in the gallery. This way, it is possible to access the data of a certain row among the items.

While registering, people enter their names and surnames separately. And the & concatenation operator is used to write the name and surname next to each other.

ThisItem.P_name & ” ” & ThisItem.P_surname

Adding a Condition

An empty Label is added to the gallery and placed on the left of the gallery to highlight the items.

If(ThisItem.P_departman=”Education”;Purple; Gray) is written into the Fill property of the Label.

With this syntax, each row in the gallery will be evaluated one by one and the department info will be checked. If the department is Education, it will be displayed with Purple. If it is another department, it will be displayed with Grey.

As well as you can write the color as Purple, Red, Blue; you can also write it through the RGB codes.

When you want to use a special color code, the RGBA() function is used.
This function is written as RGBA(255; 255 ; 255 ; 1) as well. The last parameter of the formula gets a value between 0 and 1 and affects the transparency of the color.

You can click here for the other Power Apps articles.

You can click here for the details of the use of the If function.

Manage Formulas by Creating a Formula Screen

You can have an interactive flow or execute visual actions by creating rules with formulas in application screens.

Usually hide, show, freeze, open to edit or change color, location, size actions are done for the determined objects. You can apply all these controls in all application scenarios easily and flexibly.

Depending on the situation in the application scenario, you can connect objects or actions to department, user mail, location, title, marital status or user choice in multiple-choice actions.You can apply all these controls in all application scenarios easily and flexibly.

In this article, we will be talking about managing the conditions in the screen centrally and formula evaluation duration. And most importantly, we will talk about the importance of executing an action after the formula evaluation duration is done.

What is Formula Evaluation?

Formula evaluation is the test done during the result that is created by the written formula. Depending on the performance of the formula, a certain duration is needed.

Why Does Formula Evaluation Takes Too Long?

Depending on the performance of the formula, duration will be longer or shorter. As the conditions in the screen get more complex; main reasons like using nested formulas, waiting for the control of  different objects related to each other to be complete, and executing an action depending on the respond from the data source can make the duration of formula evaluation longer.

For this reason, it is important to make the formula evaluation run as fast as possible. When the respond of a formula that hasn’t been completely evaluated yet is late, the default value can be accepted as a respond and cause wrong actions.

What if a Formula is not Evaluated?

When the respond of a formula that hasn’t been completely evaluated yet is late, the default value can be accepted as a respond and cause wrong actions. Moving on to the next action before the formula evaluation is complete will cause incorrect results. Which means that even the condition you’ve specified is met, since the respond came later it will look like it is not met. When the conditions don’t work as fast as they are supposed to, it is necessary to do actions and review formulas to manage the screens in which formulas run.

How Should the Formulas Be Managed?

  • An evaluation screen should be created for the formulas.
  • Like we always mention, it is very important to pay attention to naming correctly. The Label in which the formula is evaluated should be named based-on what it does and the outcome it creates.
  • The formula should produce 1 and  as a result when it is used with the If function.
  • Since actions like OnSelect, OnVisible,OnScan are instant actions, the formulas that has a long duration should be calculated outside with labels and be run with 1,0 control only.