During these working-from-home days, employers have started to take a lot of actions to bring all the work to the online. The changes can be mainly grouped as: management of the work of the employees, digitization of the company and customer meetings, documents being accessed from everywhere, securely accessing accounting and HR applications outside the company. Of course, the first and most important one of these topics to be taken action upon is common working platforms that provide the employees with a continuous communication.
You can read our interview where we talked about what to do during these times and recommendations for those who have a hard time concentrating at work or while working from home.
The Coronavirus pandemic caused the demand in digital workplace platforms to burst with the start of the working-from-home era. While transforming business life to home requires a compulsory digital transformation for employers, hard times await institutions that do not have the necessary technological infrastructure. In a very short time, the demands of companies operating in the retail and logistics sector for digital workplace platforms and services in this direction increased by 70%.
Within the framework of the measures taken against the epidemic risk, many companies decided to work from home. On the other hand, business processes need to be continued without interruption. Due to competitive global markets, generational change in human resources and digital transformation requirements, in the near future, almost all companies, large and small, will have to adapt to this change and quickly move to digital workplace platforms.
“We will adapt quickly to the digital workplace; our work culture will change”
PEAKUP COO Kadircan Toprakçı evaluated many firms starting to work from home and the digital workplace notion it brought together in Turkey said: “There is a great interest and demand for the digital workplace notion by companies at the moment. Because it has been seen that internet connection and computer alone do not mean sufficient hardware to work from home.
We are not talking about one or two people or one or two departments who must work outside because of their duties. All company employees transitioning to the digital working environment revealed many measures and infrastructure supplies. The biggest concern of employers in this environment is the disruption of team unity and work processes among employees, and the decrease in employee motivation. This situation will bring a forced digital transformation and rapid adaptation, especially for employees who are not used to digital work culture. However, very soon, all companies will start using digital workplaces and they will continue to renew their way of working after the pandemic.”
Retail and logistics industries are more demanding
“We receive high demand from all sectors including manufacturing, especially retail and logistics sectors,” said Toprakçı. “As the virus pandemic leads everyone to work from their homes, it is a very important responsibility for employers to ensure the continuity of the economy, to ensure that they work in a focused manner as if they are in an office, and to continue routine business processes.
Especially companies with many employees, branches and sales networks, and that has more than one office show great interest in the digital workplace platforms. The demand for our digital workplace platform Velocity, which was developed by Turkish engineers, increased by 70% in 3 days. Our entire sales team working from home focused on informing companies on this issue. We predict that these demands will intensify even more in the coming days.”
Impact of the Coronavirus on the digital workplace platforms
PEAKUP COO KadirCan Toprakçı emphasized that running business on digital platforms is easier and more effective contrary to the popular belief. “The fact that we are currently working from home has shown us that we can advance our business processes through digital platforms without disrupting them. This is actually the first stage for both employers and employees who are not used to the situation. In the next period, both sides will develop themselves more in this field, and will create new demands and new services. Being able to carry out our business processes digitally enables us to work more efficiently and to use our time more effectively. Of course, like everything else, this situation has its negative sides.
When we look at it from the perspective of human resources, it negatively affects the motivation to work, especially in pluralist societies like ours. However, when the adaptation process is completed, digital workplaces will be used more effectively and productively. Upon the requests from our customers who use Velocity effectively, we created a special module about the Coronavirus. A special application card was developed for companies to share the measures and decisions they took regarding the pandemic with their employees. Thus, information about all the measures taken, new implementation procedures and working conditions that have been changed can be provided quickly. This new module acts like an online crisis desk.
You can find and follow all monthly Office insider new features and fixes (updates) on our blog. 👍🏻 Officer insider gets updates and new features regularly. It is important to follow these Office insider updates and use them in terms of increasing your knowledge. Now let’s take a look at what kind of changes happened in Office insider in the month of July.
July 06, 2020
Outlook
Create polls in email quickly and easily
Easily create a poll, collect votes, and view results within an email.
We fixed an issue where Outlook would hang if there were over 130 recipients on the To line, and we also improved the performance of rendering the text.
We fixed an issue in the To Do Bar where events that spanned more than two days displayed the same end time for all subsequent days.
We fixed an issue that caused users of Outlook to see their message list stop updating for several minutes after using shared calendars.
Excel
Notable fixes
We fixed an issue where data model tables created in certain versions of Excel could not be seen in ‘Table Preview’ even though the query associated with the table had not been edited.
We fixed an issue where disabling Ignore Relative/Absolute references in the Define Name Apply Names dialog would cause formulas not to work.
We fixed an issue where clearing an advanced data filter could lose table formatting.
We fixed an issue where the full path of an embedded PDF document would show in the document caption rather than just the filename.
We fixed an issue where after disabling the Wolfram cloud connector and then saving and re-opening an Excel workbook could result in a crash.
We fixed an issue where booting Excel with the Solver add-in enabled would result in a crash.
PowerPoint
Notable fixes
We fixed an issue where pasting HTML to a text area on a slide would instead get pasted into a text box created at the top of the slide.
We fixed an issue where selecting all slides in Presenter View, then exiting Presenter View using Alt+Tab and returning to the slide show, and clicking ‘End Show’ would result in an unhandled exception.
Word
Notable fixes
We fixed an issue during co-authoring mode when there is a merge conflict, and the user has already chosen to discard changes. We no longer display the option to save or discard changes.
We fixed an issue that, when attempting to save a file containing a macro under a new name, would cause it to be saved with a .docx extension and the filename WRO0004.docx regardless of what the user entered, which rendered the document unusable.
Project
Notable fixes
We fixed an issue where Project may crash when opening certain XML files.
We fixed an issue where you couldn’t open a Project file from a SharePoint document library if the library were in modern mode.
We fixed an issue where projects couldn’t be opened in the Project desktop client from the Project Web App if the URL ended in .com.
July 10, 2020
Word
Notable fixes
We fixed an issue where Word would stop responding after pasting some text and an image in a comments box.
We fixed an issue where the New comment button would be disabled after deleting the last comment.
Outlook
Notable fixes
We fixed an issue where the Allow Forwarding option was missing from the shared calendar meeting Response Options if Download Shared folder was not checked.
We fixed an issue that would display the print button in a disabled state even though the user had the appropriate print permissions.
Project
Notable fixes
We fixed an issue where if you tried to save a PDF/XPS from Project to a SharePoint document library, nothing would happen.
July 15, 2020
Excel
Sheet View
You can now sort and filter your Excel file while collaborating with others with Sheet View. This new feature prevents you from being impacted by other user’s sorts and filters while coauthoring the document.
The LET function allows you to name, and then use a calculation or value in your formulas, and increase both readability (by giving context to others) and performance (by reducing the number of times an expression is calculated). It’s names but on a formula level.
You can create PivotTables in Excel that are connected to datasets stored in Power BI with a few clicks. Doing this allows you get the best of both PivotTables and Power BI.
Have you ever used SUMIFS, AVERAGEIFS, COUNTIFS, MAXIFS, and MINIFS as well as their singular counterparts SUMIF, AVERAGEIF, COUNTIF, MAXIF, and MINIF to aggregate lots of data? In this update of Excel, you’ll notice these calculations are noticeably faster.
These functions now create an internal cached index for the column range being searched in each expression. This cached index is reused in any subsequent aggregations that are pulling from the same range. The effect is dramatic: For example calculating 1200 SUMIFS, AVERAGEIFS, and COUNTIFS formulas aggregating data from 1 million cells on a 4 core 2 GHz CPU that took 20 seconds to calculate using Excel 2010, now takes 8 seconds only, on Excel M365 2006.
PowerPoint
Faster playback comes to Microsoft Stream videos
Microsoft Stream lets people in your organization upload, view, and share videos securely. You can share recordings of classes, meetings, presentations, training sessions, or other videos that your team needs. We previously enabled Stream as one of the supported online video sources in PowerPoint. Over the last few months, we’ve made significant performance improvements to the video playback experience. Now you’ll experience faster playback of Stream videos in your PowerPoint presentations.
Outlook
Create polls in email quickly and easily
Easily create a poll, collect votes, and view results within an email.
We added an option to quickly reopen items from a previous Outlook session. Whether Outlook crashes or you close it, you’ll now be able to quickly relaunch items when you reopen the app. This feature is on by default. To turn it off, go to Options > General > Start up Options.
Do you find the @ mention picker more annoying than useful? Now you can turn it off. Find the option under the new checkbox under File > Options > Mail > Send Messages in Outlook.
Transfer Outlook settings automatically
Outlook will now store/retrieve settings from the cloud, so when you set up a new Windows device, your settings will be loaded automatically based on your Office identity.
Store your signatures in the cloud
Signatures now follow your account across Windows devices. Set up your account once, and new installations of Outlook will have your signatures.
July 17, 2020
Excel
Notables fixes
We fixed an issue where any time a pivot chart with hidden leader lines was saved and reopened, the leader lines would become visible.
We fixed an issue where charts were not always updated as expected when “ForceFullCalculation” was enabled via VBA for the workbook.
Word
Notable fixes
We fixed an issue where the Show Markup command was disabled when the focus was on a comment text box.
We fixed an issue where the Editor command was disabled when the focus was on a comment text box.
We fixed an issue in custom XML that state of comments may be lost when opening the document.
Outlook
Notable fixes
We fixed an issue around creating multiple profiles in Outlook from the same email domain.
We fixed an issue that caused the lock icon to fail to display in the header of S/MIME encrypted messages.
We fixed an issue that caused attachments to get stripped from S/MIME messages when sending as unencrypted.
We fixed an issue that caused users to be unable to save OneDrive attachments from outside their tenant to their local computer when selecting the Save option on the security dialog.
We fixed an issue that cause recipients to be unable to save rights protected messages even when the save as permission was granted by the sender.
We fixed an issue that caused plain text S/MIME messages to become garbled when sending.
We fixed an issue that caused attachments to become corrupted when sending an S/MIME email unencrypted.
We fixed an issue that caused the labels for some Advanced Search options to be truncated in some languages.
Project
Notable fixes
We fixed an issue where the tasks listed in the Task Board view were not in sync with those in the Assign Resources dialog.
We fixed an issue where if you copied and pasted a task that had multiple dependencies, not all dependencies were copied correctly.
Office
Notable fixes
We fixed an issue where after the user opened a new app window from the taskbar and created a new blank document, additional files were created.
We fixed an issue where if a user was editing a document but had lost permissions, we were not notifying the user that they had to re-authenticate.
July 24, 2020
Visio
Create charts with data in worksheet
Visio Data Visualizer can help users convert their excel data into high quality flowcharts, swim line diagrams, and org charts. These diagrams can be viewed in Visio, downloaded as images, printed, etc. They can also be opened in Visio for richer editing capabilities.
We fixed an issue where an occasional hang occurred while opening HTML files.
We fixed an issue where the Specific People option for Track Changes was disabled.
We fixed an issue where the placeholder text in the Search edit box would overflow if the application window was resized to a small dimension.
OneNote
Notable fixes
We fixed an issue where the placeholder text in the Search edit box would overflow if the application window was resized to a small dimension.
July 31, 2020
Excel, PowerPoint, Word and Outlook
Insert Apple photos into Office easily
We’re happy to announce inserting Apple photos into Office is easier than ever. You can now insert pictures taken with your iPhone or iPad into Word, Excel, PowerPoint, and Outlook on Windows! We had heard from many of you that converting these files was too time consuming, so we’ve simplified the process.
We fixed an issue where a copy of an image with a radial gradient fill did not match the original.
Excel
Notable fixes
We fixed an issue where if the order of a chart series was changed, the corresponding checkbox aligned with the series was not reordered along with the series.
PowerPoint
Notable fixes
We fixed an issue where the Forms button in PowerPoint did not allow the creation of Forms when access to the Office Store was not permitted.
Word
Notable fixes
We fixed an issue where if a comment was added to track a change, the revisions pane would unexpectedly open.
We fixed an issue where links to documents were not being inserted to the comments box via the Insert > Link dropdown.
We fixed an issue where the hyperlink count in the VBA hyperlinks collection was not iterating correctly after adding an image containing a hyperlink.
Outlook
Notable fixes
We fixed an issue that caused users to be unable to add a signature when replying to a digitally rights managed message from an inspector window when the user did not have Owner permissions on the message being replied to.
We fixed an issue that was causing Outlook to fail to display line breaks properly in markdown content.
Access
Notable fixes
We fixed an issue where trying to run certain queries have previously produced the error message “Query is too complex.”
Project
Notable fixes
We fixed an issue where for a SharePoint tasks list, the ribbon buttons on the second tab may be disabled.
We compiled all the new features and fixes in July in Office insider. Hope to see you in our other articles, bye bye. 🙋🏻♂️You can share this article with your friends and family to help them get information about Office insider updates released in the month of July. 👍🏻
In this article, I will be talking about one of the new dynamic array functions: the RANDARRAY function. Sometimes we need a data table filled out with random data. With this function, you can quickly fill as many rows and columns with numeral data. And you can find our articles about other functions on our blog.
WHAT DOES IT DO
The RANDARRAY function returns an array of random numbers. You can specify the number of rows and columns to fill, minimum and maximum values, and whether to return whole numbers or decimal values. The function returns a random set of values between 0 and 1 if you don’t enter an argument. For example, you can create a 20-row and 5-column table that contains whole numbers between 50 and 500 quickly in a few seconds.You will see an example below.
SYNTAX
=RANDARRAY([rows],[columns],[min],[max],[whole_number])This function has 5 arguments.
All of them are optional.
Now, let’s take a look at these arguments and what they mean, and what we will give them.
[rows]
Optional
The number of rows to be returned
[columns]
Optional
The number of columns to be returned
[min]
Optional
The minimum number you would like returned
[max]
Optional
The maximum number you would like returned
[whole_number]
Optional
Return a whole number or a decimal value
TRUE for a whole number
FALSE for a decimal number.
WORKING CONDITIONS
If you don’t input a row or column argument, RANDARRAY will return a single value between 0 and 1.
If you don’t input a minimum or maximum value argument, RANDARRAY will default to 0 and 1 respectively.
The minimum number argument must be less than the maximum number, otherwise RANDARRAY will return a #VALUE! error.
If you don’t input a whole_number argument, RANDARRY will default to FALSE, or decimal value.
The RANDARRAY function will return an array, which will spill if it’s the final result of a formula. This means that Excel will dynamically create the appropriate sized array range when you press ENTER. If your supporting data is in an Excel table, then the array will automatically resize as you add or remove data from your array range if you’re using structured references. For more details, see this article on spilled array behavior.
RANDARRAY is different from the RANDfunction in that RAND does not return an array, so RAND would need to be copied to the entire range.
An array can be thought of as a row of values, a column of values, or a combination of rows and columns of values. In the example above, the array for our RANDARRAY formula is range D2:F6,or 5 rows by 3 columns.
Excel has limited support for dynamic arrays between workbooks, and this scenario is only supported when both workbooks are open. If you close the source workbook, any linked dynamic array formulas will return a #REF! error when they are refreshed.
USE OF THE FUNCTION
Now, let’s see how this function works with 3 different examples. First, we will determine rows and columns. And then we will give row, column, min and max number values and return a retrospective array. And then, we will request the numbers to be returned to be whole number. The image we will obtain is going be like this:
See you in other articles, bye. 🙋🏻♂️ You can share this post with your friends and get them informed as well. 👍🏻
Admin panel interfaces have been completely renewed.
A new screen where end user web portal setting can be done has been added.
A new screen where the content of SMSs sent to end user can be edited has been added.
Device information screen has been rearranged as to show more device details.
Velocity :
Web Push Notification: Your users will be informed about all contents and news you add to Velocity with instant notifications, even if their browser is not open.
Moving Widgets: You can sort your widgets the way you want in the portal. You can move your widgets to the left, right, up and down through admin panel.
Multi-Tenant: MultiTenant development where you manage the separation based on Holding > Group Companies > Branches, Locations can has been completed. Group companies or companies that have multiple offices and want to create a special portal for themselves can manage their tenants completely separately. With the MultiTenant infrastructure, it will be possible to download widgets in the sub-portals and decide which widget will be shown to which tenants specifically.
Founded in 2012, Turkish technology company PEAKUP aims to facilitate the daily life of businesses with the software it develops. Velocity that has been developed by PEAKUP aims to increase the interaction of employees and add efficiency to the institutions with its collective structure.
Accessing information and documents is among the most challenging processes for institutions. Researches show that the average time for a white-collar employee to search for information and documents in e-mail is 45 minutes per day. And this situation worries the Human Resources departments. These days that the digital workplace notion is coming to life, it is important to be able to easily carry out intranet processes on a single platform.
The notion of “Digital Workplace” that the whole world is talking about, is getting more and more important in terms of removing geographical barriers and providing access to information 24/7 with its cloud services, mobility and artificial intelligence applications. Processes such as increasing employee loyalty, making a difference in terms of collaboration and productivity, content / document management and facilitating business processes are among the important goals of digital workplace applications.
Information exchange makes the business life easier
According to a study, approximately 39 percent of corporate data uploaded to the cloud is related to file sharing applications. This ratio is higher than any other category. On the other hand, the vast majority (71.4 percent) of the 35.7 percent of document sharing is done by the in-house employees.
Velocity, an intranet platform that digitizes communication processes developed within the scope of all this information and that simplifies the use, will be one of the most important assistants of companies in digital transformation. Velocity, which enables various departments to follow the communication processes of the company on a single platform, aims to activate the interaction between employees continuously. This product that enables the instant information flow to accelerate will also increase the performance in professional life.
Distributing information flow to multiple channels makes communication integrity difficult
PEAKUP CEO Ahmet Toprakçı, who stated that communication disruptions affect all companies regardless of scale, defines Velocity as an important assistant of the digital transformation journey. He said: “The fact that the channels such as social media are increasing day by day makes us realize the difficulty of information and document management, and requires the transformation of the way organizations do their business. Researches show that it takes 45 minutes a day for a white-collar employee to search for information and documents in an e-mail. On the other hand, it is very difficult to follow and control the information shared by e-mail in terms of security.
Our product Velocity, which we developed to add efficiency to organizations and facilitate processes, ensures the communication integrity of different departments. Our product, which maximizes the productivity of the employees with its fast and secure infrastructure, simplifies the work between teams and increases motivation. Velocity, which offers the use based on needs, is one of the biggest assistants of companies in their digital transformation journey.”
Happy employees make the customers happy
Velocity strengthens socialization, information exchange and cooperation among employees. Employees who can share information non-stop prevent unexpected situations. Velocity, which allows the prevention of information loss, ensures that the correct information is obtained in the fastest and safest way. This product that enables measures to be taken against all security vulnerabilities on a single platform, strengthens communication and increases interaction between employees. This product that increases employee productivity; raises customer satisfaction to the next level by producing fast and effective solutions to problems
In this article, we will be talking about methods of Copying a cell as a picture in Excel. There are three methods we can use for this action. You will see these methods and our recommendations in our article. You can find a lot of features like this on our blog, don’t forget to follow.
WHY DO WE NEED THIS?
Sometimes we want to transfer the image of a range in our table as a picture to other office applications or any application. For example, when we want to copy the selected table range and directly paste on Outlook, Word etc. it will be pasted as a table. This way, it will be possible to be edited. So, it would be better to copy the cell as a picture or paste the copied data as a picture.
METHODS OF COPYING A CELL AS A PICTURE
Our first method
is through the Copy as Picture in the Clipboard on the Home tab.
Our second method is choosing the Picture option in the Paste Special Option after selecting and copying the cell range.
This way, when you paste it as a picture, the data on the picture won’t change when the data in the cell you’ve copied changes. But when you paste as Linked Picture in the paste special options, you can see that the cell changes when you make a change in the cells you’ve copied. This will provide us with a dynamic look.
The same way, you can view the change you make in the cell range you’ve copied in Excel in other Office apps like Word and PowerPoint too by choosing the Paste as Linked Picture option from the paste special options.
Now let’s give an example of paste as a Linked Picture. You will see that when we change a data in the copied table, the change will go through in the picture as well.
Our third method is to take a picture of the cell range we want with the Camera feature in Excel and then transmit it from the memory to the cell we want to paste the picture into. For this, you can add the Camera feature to the Quick Access Toolbar with these steps:
File
Options
Quick Access Toolbar
Commands Not in the Ribbon
Camera
Add
OK
After executing these actions, you will see the Camera Icon on the Quick Access Toolbar. I recommend you to have the camera feature there all the time.
Now, let’s see how easy it is to copy and paste the cell as a picture with this feature.
You can save the cell range as a picture with these methods we’ve shared with you. If you want, you can get extra information on Microsoft Support.
See you in other articles, bye. 🙋🏻♂️
You can share this post with your friends and help them get informed as well.👍🏻
In this article I will be talking about a must decision/condition structure in macros. At the end of the article, we’ll have learned what IF Decision structure is and how and when to use it.
WHAT IS THE IF DECISION STRUCTURE?
This
condition structure is the structure that exists is all programming languages and allows the code blocks to run separately when certain conditions are met or not.
Allows you to execute actions depending on the True/FalseBoolean value that the indicated condition returns. If the condition is said to be True, the statements under the indicated condition(s) are applied. If the condition is said to be False, the statements indicated after the IF structure are applied. In addition, depending on the situation, if we have indicated the Else or ElseIF statements the control of those rows are done as well and when the outcome returns as True, the indicated commands are applied.
WHEN TO USE?
We use this structure when we have a thought/condition that starts with If or if we want to execute a multiple-condition action while coding. There are a few other Decision/Condition structures other than this one; Select Case, IIF, Choose and Switch structures. Having knowledge of these structure will help you while coding.
HOW TO USE?
First, let’s take a look at its syntax, i.e. how we can write this IF structure on VBA.
SYNTAX
Here is its syntax. Blue parts cannot be changed. Red parts can be changed.
If condition(s)Then ‘Your codes End If
You can think of its logic as “If this number is bigger than 10, do this…”
If we have one condition only, you can use the syntax like this too: Ifcondition(s)Then‘Your codes If there is only one condition, you can remove the End If statement and write the condition next to the Then statement.
The conditions between If and Then statements can be multiple depending on the situation.
For example; If the numbers in the cells of the A column are bigger than 10and not blank. You can use logical operators like And, Or, Xor.
Here is a little code sample for you to understand this part completely
If sayi > 10 And sayi < 20 Then
You can increase the condition to 2-3-4… by using logical operator in a If .. Then statement. Let’s say that we have some numbers in the A2:A10 call range and we want to write “bigger” on the B column of the numbers bigger 10.
Here is the code we need for this:
Sub IF_Kosul_Yapisi()For i =2 To 10IfCells(i,"A")>10 Then
Cells(i,"B")="Büyük"
End If
Next i
End Sub
You can see how these codes work in the GIF below.
IF structure
MULTIPLE CONDITIONS AND ELSE
If we have multiple conditions and you logically don’t want to execute actions depending on two situations like If it is like this do this, if not do that; you can write this in a line like this:
If Cells(i,"A")>10 Then Cells(i,"B")="Büyük"ElseCells(i,"B")="Küçük"
and you can also write them one under the other with the Else statement. Then, your syntax will be like this:
Ifcondition(s)Then ‘Your Codes If True Else ‘Your Codes If False End If
Some sample codes..
If Cells(i,"A")>10 Then
Cells(i,"B")="Büyük"ElseCells(i,"B")="Küçük"
End If
The code above writes Bigger to the B column of cells bigger than 10, and Smaller to the smaller ones.
ELSEIF
Now, let’s increase out conditions by including the ElseIf statement.
You can think the logic of this syntax as “If it’s like this to this; if not and it’s like that, do that; if not and it’s like the other way, then do that way.”
Here is the syntax.. If conditions Then ‘your codes ElseIf conditions Then ‘your codes ElseIfconditions Then ‘your codes End If
Let’s have our outcomes written to the Outcome column according to these conditions.
If the number is equal to zero, it will say Zero.
If the number is equal to 10, it will say Equal.
If the number is smaller than 10, it will say Smaller.
If the number is bigger than 10, it will say Bigger.
Depending on the conditions we’ve stated, the code we’ll need will be:
Sub Eger_Kosul_Yapısı_2()
Dim i As Integer
For i =2 To Range("A65536").End(3).Row
IfCells(i,"A")=0 Then
Cells(i,"B")="Sıfır"ElseIfCells(i,"A")=10 Then
Cells(i,"B")="Eşit"ElseIfCells(i,"A")<10 Then
Cells(i,"B")="Küçük"ElseIfCells(i,"A")>10 Then
Cells(i,"B")="Büyük"
End If
Next i
End Sub
You can see how these codes work in the GIF below as well.
ELSEIF and ELSE TOGETHER
Lastly, if none of the conditions above are suitable for our codes, then we can include the Else statement before the End If row and get another outcome written in the cell as well.
Sub Eger_Kosul_Yapısı_3()
Dim i As Integer
For i =2 To Range("A65536").End(3).Row
IfCells(i,"A")=0 Then
Cells(i,"B")="Sıfır"ElseIfCells(i,"A")=10 Then
Cells(i,"B")="Eşit"ElseIfCells(i,"A")<10 Then
Cells(i,"B")="Küçük"ElseCells(i,"B")="Büyük"
End If
Next i
End Sub
You can find and follow all monthly Office insider new features and fixes (updates) on our blog. 👍🏻 Officer insider gets updates and new features regularly. It is important to follow these Office insider updates and use them in terms of increasing your knowledge. Now let’s take a look at what kind of changes happened in Office insider in the month of March.
March 28, 2020
Outlook
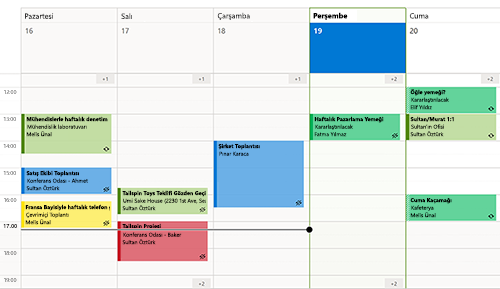
Calendar visual refresh
Last year, we brought you a refreshed mail experience, and, this year, it is the calendar’s turn to get a facelift! The updates are fresh but familiar so, as a seasoned Outlook user, you can jump in and be more productive right away.
This change addresses delays when processing images with malformed or invalid protocol information.
This change fixes an issue where the latest changes to draft emails were not being updated.
Fixed an issue where right-mouse clicking on a file and using ‘Send to’ would not work.
Fixed an issue where if a user had a customized the search path for the Address book, Outlook’s name resolution scope would be limited to the customized path rather than including the Global Address List (GAL).
Fixed an issue where within a set of returned search results, sorting the results by Categories would not display the Category colors.
PowerPoint
Synchronize changes while you are presenting
For years, PowerPoint didn’t allow changes made to slides by others to be displayed while presenting. This ensured that the presenter was in full control of the content being shared. No one could revise slides, either accidentally or maliciously. It also ensured that all of your computer resources were used for slideshow rendering. A concern that is especially important if you are running on a low-end machine.
However, while some presenters may still desire this original design, we’ve heard from others that they are seeking more flexibility. With an increased focus on collaboration and real-time updates, we’re excited to make available the ability to synchronize changes whenever they are made, even when the presentation is in Slide Show mode.
How it works
You can synchronize changes in two ways: automatically or manually.
Automatically update slide content
1. Select the Keep Slide Updated check box on the Slide Show tab on the ribbon.
2. Start the presentation by selecting the appropriate button on the Slide Show tab.
3. Whenever an update to a slide is made and detected, the content is automatically updated and visible in the slide show being presented.
Manually update slide content
1. Clear the Keep Slide Updated check box on the Slide Show tab on the ribbon.
2. Start the presentation by selecting the appropriate button on the Slide Show tab.
3. Whenever an update to a slide is made and detected, an Update Slides button appears at the top of Presenter View.
4. Click the Update Slides button to manually synchronize the slide content.
Word
Notable Fixes
Fixed an issue where the functionality to post comments was disabled.
This change addresses delays when processing images with malformed or invalid protocol information.
This change addresses an issue where the account manager would not dispatch messages resulting in a hang with third party applications.
This change fixes an issue where the Table of Contents would get updated with heading styles which were not present in the document.
Fixed an issue where digital signatures saved in Word documents would be removed when mailing the documents.
Excel
Notable Fixes
This change addresses delays when processing images with malformed or invalid protocol information.
Project
Notable fixes
Fixed an issue where the ‘ProjectBeforeTaskChange’ Visual Basic Applications (VBA) event did not fire when a user clicked the “Inactivate” button found on the Tasks Ribbon within the Scheduling grouping.
If you set predecessor or successor details from within a Form type view, the ProjectBeforeTaskChange Visual Basic Applications (VBA) event didn’t always capture the changes. For example, if you deleted a dependency and clicked OK on the form, the event did not fire. This behavior has been fixed.
Fixed an issue where the latest values for the Actual Cost of Work Performed (ACWP) would not be displayed after making a change, such as a date change.
Fixed an issue where opening a project using the Most Recently Used (MRU) menu opened the project file with Read/Write access.
This change fixes an issue where if you created a manual task with a start date and a time (but no duration), it would be displayed with an incorrect time on the timeline.
Fixed an issue where printing a timeline using Hijri calendar would result in a month being skipped or duplicated in the print view.
This change addresses an issue where working in Team Planner with GDI objects, could result in the over allocation of GDI objects and create low memory conditions.
March 13, 2020
Word, Excel,PowerPoint andOutlook
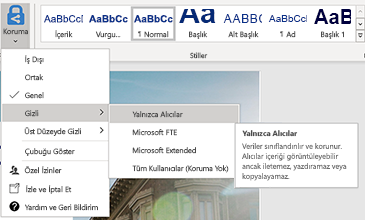
Sensitivity labels
You can now apply a sensitivity label that your organization has configured to prompt you for custom permissions. Learn more
How to Access
If your organization has set up Sensitivity tags in Microsoft Information Protection and enabled users to assign permissions, you can access them. For example, choose Home> Protect, then select the label you want to apply to the document, workbook, presentation, or email.
Outlook
Notable Fixes
Addresses an issue that caused the “Last Modified”; date on a file to be updated when adding an attachment to a mail or saving an attachment from a mail by dragging and dropping it (as opposed to via a menu).
Addresses an issue that caused hitting enter in the expanded find pane to fail to start a search, requiring instead that users click on the search button.
Fixed an issue where search shows no information about users when the option to “Show user photographs when available” is disabled.
Word
Notable Fixes
Fixed an issue when typing or editing a comment and using Ctrl+A would result in selecting text in the canvas instead of selecting text just within the comment card.
We fixed an issue in which the alignment of words in a document gets scrambled when tried to edit after printing using Quick Print.
We fixed an issue when merging two documents into one document.
Fixed an issue where marking revisions involving equations could result in a failure when saving the file.
Excel
Notable Fixes
Fixed a performance issue that users may have experienced when programmatically editing a large range of cells.
Fixed a performance issue that occurred when opening csv files with Japanese environments.
Project
Notable Fixes
Fixed an issue where summary task dates weren’t always getting calculated correctly.
Fixed an issue where the OnUndoOrRedo event doesn’t fire without first running the OpenUndoTransaction method.
Access
Notable Fixes
Fixed an issue where international versions of Access were displaying English strings in the user interface.
PowerPoint
New Features
Look above.
March 10, 2020
Excel,Word,PowerPoint andOutlook
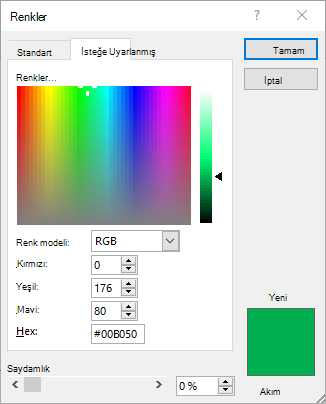
Pick the perfect color
We heard you! Converting Hex colors to RGB values is now a thing of the past. For any property where you can define a color, click the appropriate button in the ribbon (such as the Font Color button) and click More Colors. Then, in the Colors dialog box, click the Custom tab and enter the Hex color value in the Hex box, for example, #0F4C81 or 444.
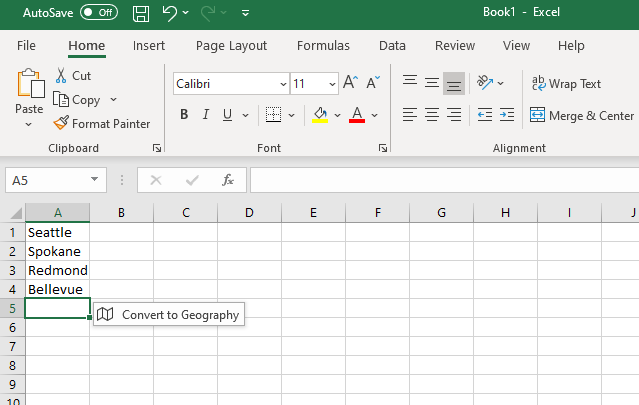
When you type a data value that resembles a possible stock or geographic location, Excel offers to convert it to the appropriate connected data type – Stocks or Geography. Give it a try!
Type in several geographic locations (such as “Seattle”, “London”, or “Tel Aviv”) or stock ticker symbols (such as “MSFT”, “ADBE”, or “AAPL”) in separate cells in a column.
When Convert to Geography or Convert to Stocks appears to the right of the selected cell, click on it.
* This feature is only available in English right now.
Outlook
Drag emails to a group you own
As a group owner, you can now move and copy messages and threads by dragging and dropping them from your mailbox to the groups’ mailbox. Once moved, the content is visible to all the group members, and anyone can read the messages and participate in the conversation.
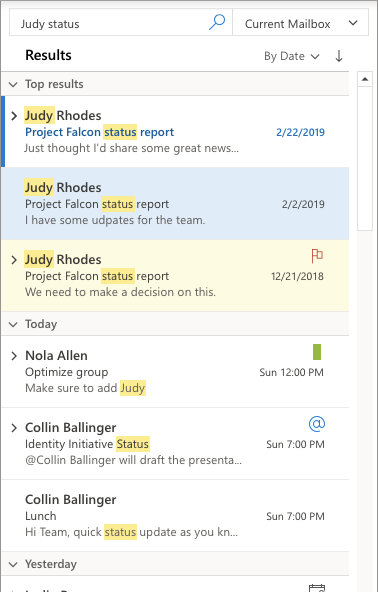
The Search experience in Outlook just got a facelift! It is now more reliable, intelligent, and faster than ever. Also, any search entry is now being spell checked and, if errors are detected, helpful suggestions are offered to ensure that you get to the results you’re looking for. Finally, notice that the most relevant search results are presented at the top of the results list, making access faster.
PowerPoint
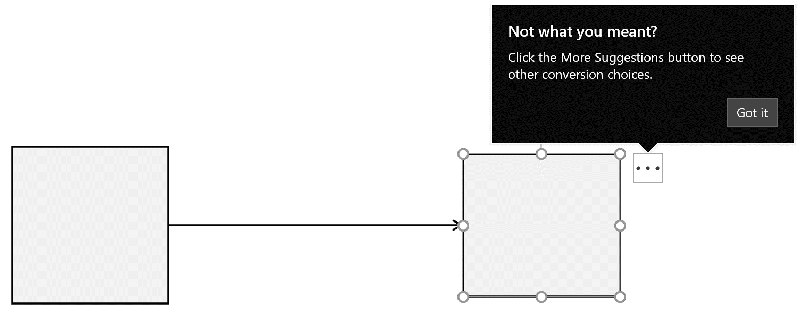
Diagrams get connector support
Now, the converted lines between objects are connectors anchored to the shapes.
Ink conversion is also easier than ever with just clicking the Convert your ink button . Select the converted object again to be able to access other conversion alternates, to make sure the conversion fits your needs. Give it a try! Give it a try!
March 6, 2020
Outlook
Notable fixes
We fixed an issue that was preventing users from attaching a file to their mail messages when that file was open in another application.
We fixed an issue where creating a rule with Outlook Web Access did not persist to the Exchange server and resulted in a conflict.
We fixed an issue with Outlook that wouldn’t show the drop-down list in the “From” field when using dark mode.
Word
Notable fixes
We fixed an issue that made the User Principal Name (UPN) people case-sensitive, e.g., User.Name@microsoft.com would fail to match user.name@microsoft.com, and prevented users from accessing the SharePoint Sites service.
We fixed an issue that prevented the Compare feature from working when the document was protected for editing.
PowerPoint
Notable fixes
We fixed an issue that made the User Principal Name (UPN) people case-sensitive, e.g., User.Name@microsoft.com would fail to match user.name@microsoft.com, and prevented users from accessing the SharePoint Sites service.
We fixed an issue where the recommended thumbnails flashed when hovering your mouse over the thumbnails. In some cases, this could cause PowerPoint to crash.
Excel
Notable fixes
We fixed an issue that made the User Principal Name (UPN) people case-sensitive, e.g., User.Name@microsoft.com would fail to match user.name@microsoft.com, and prevented users from accessing the SharePoint Sites service.
We compiled all the new features and fixes in March in Office insider. Hope to see you in our other articles, bye bye. 🙋🏻♂️You can share this article with your friends and family to help them get information about Office insider updates released in the month of March. 👍🏻
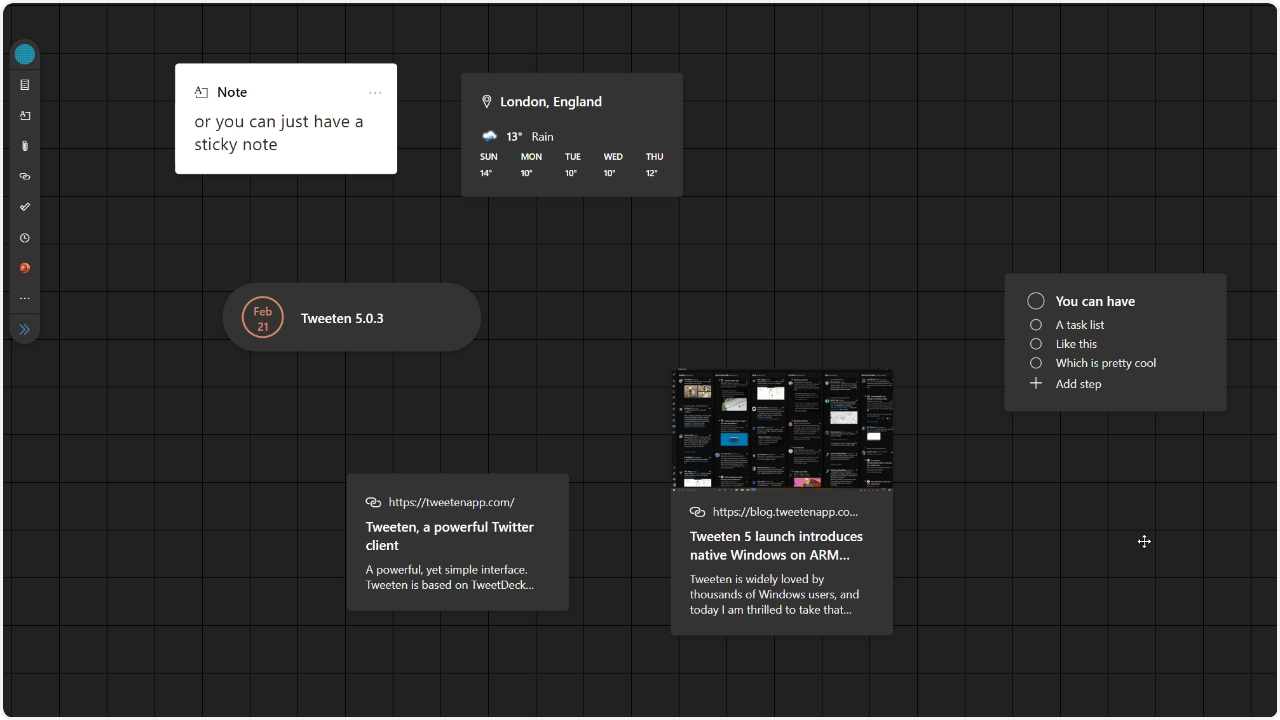
In this article, we will be giving information about Microsoft Outlook Spaces, which hasn’t been officially announced yet. It seems like Outlook is going to be the bomb! I think it is pretty assertive concerning the whiteboard look, drag and leave experience, viewing different apps in one screen. But there is a detail in the video that I want you to pay attention to: we can view multiple projects in different whiteboards.
Microsoft is working on Microsoft Outlook Spaces, which is a project management tool that unites all documents. The address is going to be: https://outlook.office.com/spaces but it is still under construction. WalkingCat -a famous Twitter account about leaks- have shared an online video concerning Outlook Space. If you want to follow this kind of leaks, you can follow WalkingCat on Twitter.
This new tool that can be accessed through Outlook web, makes it possible to organize and view different information of a certain project. It looks like a whiteboard where the user can pin different info from various Office 365 tools. I am already looking forward to Microsoft Outlook Spaces. 😎
Enabling Outlook Spaces
If you want to use Outlook Spaces right now, WalkingCat found a way to enable it a little early. You simply have to open up outlook.office.com/spaces and go into the developer tools on your browser (press F12). From there, go to the Console tab on the developer tools, copy and paste the following code into the console, and hit enter:


 Outlook
 Excel
Excel PowerPoint
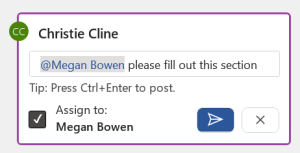 Word
Word Project
 OneNote
 Access