The Weekday Function

In this article, I will be talking about on of the Date and Hour functions, the WEEKDAY Function that will helps us in our daily lives. This function returns the number that represents the day of the week of a specific date. It gives us a number between 1 and 7, and so we know which day of the week it is and do actions depending on that. If you want, you can get the details about the Weekday Function on support office. You can find our articles about the other function on our blog


WHAT DOES THE WEEKDAY FUNCTION DO?

The WEEKDAY Function

gives us a number stating the which day a date is in that week. For example, If we want to know which dates in a column are weekend, we can have them highlighted. Or, doesn’t matter which day the payment days are in the column, if your payment day is Friday you can organize all the dates on Friday in their weeks.

SYNTAX

WEEKDAY(serial_number,[return_type])

The WEEKDAY Function

has 2 arguments.
The first one of them is required and the other one is optional.

Now let’s take a look at the meaning of these arguments, i.e. what this function wants from us and what we will give it.

haftanıngünü fonksiyonu argüman listesi


WORKING CONDITIONS

The working conditions of the WEEKDAY function are:

  • Microsoft Excel stores dates as sequential serial numbers so they can be used in calculations. By default, January 1, 1900 is serial number 1, and January 1, 2008 is serial number 39448 because it is 39,448 days after January 1, 1900.
  • If serial_number is out of range for the current date base value, a #NUM! error is returned.

  • If return_type is out of the range specified in the table above, a #NUM! error is returned.

  • If the Calendar is Gregorian, the returned number represents the Gregorian day of the week.
    If the calendar is Hegira, the returned number represents the Hegira day of the week. If the calendar is Hegira Calendar,  the argument number is any number that can represent a date and/or time from 1/1/100 (Gregorian Aug 2, 718) to 4/3/9666 (Gregorian Dec 31, 9999).


USING THE WEEKDAY FUNCTION

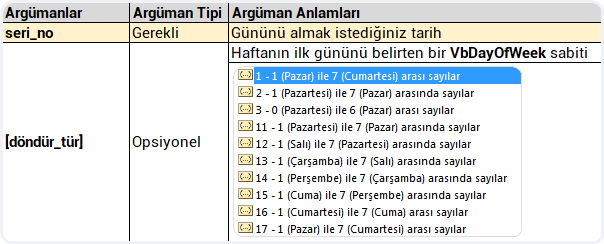
In the Weekday Function, we choose the date that we want to get the day number for the Serial_number argument first. Then, we choose the type that we want the Return_type argument to return. We will come across the list where the first and last days of the week are stated. For us the option is the one with the number 2, where first day is Monday and the 7th day is Sunday. So, we choose the 2 option for the return_type argument and complete the formula.


 HIGHLIGHTING THE WEEKENDS

Let’s assume a list in which there are dates of March in a column. At the first glance, we cannot know which day those dates are. If you choose that column, choose Long Date as Format in the Number group in Home menu, you will get the day name and it might be useful for you. But we don’t want the day name, we want the weekends to be highlighted. We can achieve this with the WEEKDAY Function in the Conditional Formatting feature. Colors are very useful when it comes to analyzing a data.

Let’s start practicing with examples. You can apply these steps with me.
Unfortunately, an available rule that does what we want doesn’t exist in Conditional Formatting.
So, what do we do? We create our own rules with a formula, and achieve highlights based on that rule.
You can find and highlight the weekends like this.

weekday fonksiyon kullanımı


SETTING THE PAYMENT DAY AS FRIDAY

Let’s do an example of setting the payment day as Friday.
For this action, we will use the CHOOSE and WEEKDAY functions together.
Try to do this action as well and try to comprehend its logic by repeating few times.

weekday ile ödeme gününü cuma gününe ayarlama


See you in other articles, bye. 🙋🏻‍♂️
You can share this post with your friends and get them informed as well. 👍🏻

CREATE CUSTOM LISTS IN EXCEL

In this article, we will be talking about how to create a Custom Menu depending on your needs in Excel without any codes. You can find articles about other features on our blog.


ENJOY YOUR OWN CUSTOM LIST

As you know, there are a lot of menus and tons of features in those menus in Excel, from File Menu to Help menu. Sometimes we spend a lot of time looking for a feature in menus or there are features in menus that we don’t use at all. And sometimes, we are just up for a change. 😃 In all these case, you can create your own custom menu and place it anywhere you want, and just do all actions within that menus. And on top of that, you don’y need any UI Editor to execute this action.

özel menü


WHERE TO START?

To create a custom menu, we need to go to the  Customize Ribbon field in the Excel Options. There are two ways to go there.

The 1st way:

  • File
  • Options
  • Customize Ribbon


The 2nd way: 

  • Customize Quick Access Toolbar
  • Other Commands
  • Customize Ribbon


The window we’ll access through both ways will be this one.

şeridi özellştir


Come to this window, choose the Help menu and create a new tab/menu by clicking the New Tab button.

Choose New Tab (Custom), click “Rename” and name the new tab. For example, let’s type in PEAKUP. You can choose “New Group” and name it based on the features you’ll add. For now, we can call it Data Analysis.

Now we can add the features/commands we use the most to this menu.


If you want, you can do all the actions we’ve covered so far like in the image below.

özel menü ekle


If you right-click the Data Analysis group and choose Hide Command Labels options,


komut etiketlerini gizle

Your command will be seen as mini commands in the menu like this.mini etiket


You can add multiple groups into a menu by creating New Groups. Or you can create New Menus with the New Tab button and place it in the first place after the File menu.

özel menü yeni

I say create menus like this for a while and just try it out. 😄 You can check here for more details.


See you in other articles, bye. 🙋🏻‍♂️
You can share this post with your friends and help them get informed as well.👍🏻

Manage Formulas by Creating a Formula Screen

You can have an interactive flow or execute visual actions by creating rules with formulas in application screens.

Usually hide, show, freeze, open to edit or change color, location, size actions are done for the determined objects. You can apply all these controls in all application scenarios easily and flexibly.

Depending on the situation in the application scenario, you can connect objects or actions to department, user mail, location, title, marital status or user choice in multiple-choice actions.You can apply all these controls in all application scenarios easily and flexibly.

In this article, we will be talking about managing the conditions in the screen centrally and formula evaluation duration. And most importantly, we will talk about the importance of executing an action after the formula evaluation duration is done.

What is Formula Evaluation?

Formula evaluation is the test done during the result that is created by the written formula. Depending on the performance of the formula, a certain duration is needed.

Why Does Formula Evaluation Takes Too Long?

Depending on the performance of the formula, duration will be longer or shorter. As the conditions in the screen get more complex; main reasons like using nested formulas, waiting for the control of  different objects related to each other to be complete, and executing an action depending on the respond from the data source can make the duration of formula evaluation longer.

For this reason, it is important to make the formula evaluation run as fast as possible. When the respond of a formula that hasn’t been completely evaluated yet is late, the default value can be accepted as a respond and cause wrong actions.

What if a Formula is not Evaluated?

When the respond of a formula that hasn’t been completely evaluated yet is late, the default value can be accepted as a respond and cause wrong actions. Moving on to the next action before the formula evaluation is complete will cause incorrect results. Which means that even the condition you’ve specified is met, since the respond came later it will look like it is not met. When the conditions don’t work as fast as they are supposed to, it is necessary to do actions and review formulas to manage the screens in which formulas run.

How Should the Formulas Be Managed?

  • An evaluation screen should be created for the formulas.
  • Like we always mention, it is very important to pay attention to naming correctly. The Label in which the formula is evaluated should be named based-on what it does and the outcome it creates.
  • The formula should produce 1 and  as a result when it is used with the If function.
  • Since actions like OnSelect, OnVisible,OnScan are instant actions, the formulas that has a long duration should be calculated outside with labels and be run with 1,0 control only.

Open your Reports with Report Filter Pages

Before we get started with the topic, I want to talk about PivotTables shortly. When we want to report from tables or lists, we usually start by creating a PivotTable. PivotTables helps us to create tables that we can customize without touching the main data at all. PivotTables enables us to execute actions like reporting, calculating, editing tables easily, formatting and filtering easily. And the topic we’ll talk about in this articles is Report Filter Pages.

In the example below, a PivotTable has been created from a list that containes data like Company Name, Personnel Name Surname. The column titles added to filter field in PivotTable Fields become criteria that can be filtered on the table and we filter with this information. In the sample PivotTable below, the City column has been added to the filters field. And the Personnel Name Surname and Company name columns has been added to the rows field. We will be doing city-based reporting through city-based filtering.

The Long Method

We can observe the change of the table one-by-one for each city chosen from the filter. We might not have some any problems while analyzing a few pages, but when we want to do reporting on more pages we usually don’t prefer this method.

Report Filter Pages

For the City criteria in the filter field, reports of each city will be quickly and practically opened with one click with the Report Filter Pages.

For this action, we click on the Options on the left of the Analyze tab in Ribbon after we add Filter to the PivotTable fields, and choose the Show Report Filter Pages from the list that opens. With this action, the City on the filter field is chosen. If there were a few more filtering criteria, we could choose the criteria based-on which we wanted to report.

Afterwards, the filtered versions of information of cities in all personnel makes sales is opened in different pages quickly.

In the page that’s been opened, we can see the City information. Since there are a lot of cities from A to Z, the cities that didn’t fit in are represented with …

Get practical reports with the Report Filter Pages.

Text Functions

Power Apps Writing Formulas

PowerApps has its own software language and its special functions. Alongside these functions, it also contains a lot of functions that exist in Excel. These functions are offered in a general frame, they are not separated into categories as function groups like text, date, and statistic. In this article, we will analyze text functions.

It is very practical to code with PowerApps, with the formula language you are used to from Excel.

You can write all formulas on objects. After you choose the related object, you can write on Formula Bar.

*While writing a formula, you can write with commas (,) or semicolons (;) (depending on the browser language), you don’t need to use the equal sign.

Text Functions

There are basic text functions like Concatenate, Left, Right, Mid, Len, Upper, Lower in the Power Apps functions. You can edit or create text expressions with these functions.

Let’s write the formulas below for a textbox in which Text Functions is written. The name of this textbox is txt_sampletext.

The Concatenate function concatenates a mix of individual strings and a single-column table of strings. When you use this function with individual strings, it’s equivalent to using the & operator.

ConcatenateString1 [, String2, …] )

Concatenate(txt_sampletext.Text;  txt_sampletext.Text;  txt_sampletext.Text)


Left function returns the beginning characters of a string.

Left( StringNumberOfCharacters )

Left(txt_sampletext.Text;1)


Mid function returns the middle characters of a string.

Mid( StringStartingPosition [, NumberOfCharacters ] )

Mid(txt_sampletext.Text;3;1)


Right returns the ending characters of a string.

Right( StringNumberOfCharacters )

Right(txt_sampletext.Text;1)


Len function returns the length of a string of text.

Len( String )

Len(txt_sampletext.Text)


Lower function converts any uppercase letters to lowercase.

Lower(txt_sampletext.Text)


Upper function converts any lowercase letters to uppercase.

Upper(txt_sampletext.Text)


Proper function converts the first letter in each word to uppercase if it’s lowercase and converts any other uppercase letters to lowercase.

Proper(txt_sampletext.Text)


The Trim function removes all spaces from a string of text except for single spaces between words.

Trim(txt_sampletext.Text)


The TrimEnds function removes all spaces from the start and end of a string of text but leaves spaces between words intact.

TrimEnds(txt_sampletext.Text)


You can access the list of all the other functions here.

Automatic Page Redirect with Timer

Navigate Between Screens

The Navigate function is used to navigate between screens in PowerApps mobile apps. Navigation between screens can be done when the objects are touched/clicked(by the trigger of user) or within a certain period of time(with a timer). In our previous article, we navigated by writing a formula into the OnSelect property of a button. In this article, we will automatically navigate after a while.

Timer

You can use the Timer object for each action that will be executed based on a duration. This way, when the time start or ends, it will be run to be applied on the actions you’ve determined. Timer works here as a trigger (It is a word that we use a lot in our Power Automate articles). It starts for the time to be up and starts the flow.

Timer objects has properties like OnTimerStart, OnTimerEnd, Duration, Repeat, and Reset and actions are executed with these properties. You can take a look at the general features of Timer here.

For example, you can display a text and image that states uploading/saving/wait etc. You can start the page redirect when it’s OnTimerEnd.

When it’s OnTimerStart and OnTimerEnd, you can create a collection. You can create or compare conditions.

Navigate

Let’s make an example where we see a screen with the “Saved successfully” text after saving and when the duration is done we go back to the main page.

Two screens need to be added into the application. Let’s call one of the screens SCR_Mainpage , and SCR_Action_Successful the other.

Timer object will be added to the SCR_Action_Successful page.

Duration property of the Timer objects writes in milliseconds, and this indicates the duration of the times. When you add a timer, standard Duration comes as 60 000 and it indicated 60 seconds. Which means that when the timer start from 1 and end with 60, it will start the actions.

Let’s make the Duration 3000 and get the action done in 3 seconds in order not to wait for too long and to see the results faster.

Duration: 3000

When the specified time of 3 seconds ends, we’ll be redirected to the main page.

OnTimerEnd: Navigate(SCR_Mainpage)

It was set as true in order for the timer to start automatically.

AutoStart: true

After these actions, the timer works actively. If you want, you can hide the time by setting the Visible property as Visible.

Methods of Declaring VBA Variables

In this article, we will be talking about Declaring VBA Variables. Variables are essential elements of programming. Using and managing variables are one of the musts while creating a project. I will try my best to tell it as simple as possible. Reminder: You can find other articles about VBA on our blog. 👍🏻


About Declaring VBA Variables

Variables are usually used to store a data and use it when necessary. They are usually separated into two classes. Global variables and Local variables. Global variables can be used by all the functions of the program, but the local variables are used by the functions that have declared them.

It can be called back, reassigned or fixed during the execution of a procedure, function or module.
Declaring a variable will enable you to indicate the names of the variable you’ll use and the data type the variable will contain.

For example, if Result = 10, the variable Result can be declared as Integer Whole Number .

We usually name the variables in a short and easily remembered way. The most frequently used variable names are one character names like i, a, n, x ,y ,z, s so that it is easy to write in the code. If the variable name is a name that you can remember while using in the code, the probability of making a mistake while writing the code decreases.

Now we can move on to the declaring part.


The syntax concerning declaring variables is usually like this.
Dim variable_name [(stringsize)] As type
Public variable_name[(stringsize)] As type
Static variable_name[(stringsize)] As type


Along side this general declaring, the declaring methods below can be used as well.

  1. Declaring with Dim
  2. Declaring with Data Indicators (Abbreviations)
  3. Declaring with DEF

Declaring with Dim

It is the most known and used VBA Variable Declaring method.

We indicated the syntax Syntax below. Let’s make it clear with a few examples. Let’s say that we will declare a variable named row to use in the rows (cells) in the A column. Since the row numbers are whole numbers, we can used one of the whole number types we’ve indicated in our Data Types article. It would be better to use the variable data type depending on the row number we’ll get controlled or the maximum number that can be in the cell.

As well as we can use as Number or Whole Number, we have 3 basic variable data types: ByteInteger and Long. If the number we’ll assign to the row variable is 255 or less, then we can use the Byte variable data type. If the number we’ll assign to the row variable is between –32767 and+32768, then we can use the Integer variable data type. If it can be a bigger whole number, then we should use the Long variable data type. If a bigger number than what the variable can contain is sent, that the Overflow error occurs. And if a text data is sent to a variable that was determined as number, Type Mismatch error occurs.


Let’s give a few examples of declaring variables with Dim:

Sub PEAKUP()
    Dim row As Long
    Dim column As Byte
    Dim text As String
    Dim start As Date
    Dim money As Currency
    Dim object As Object
    row = 15
    column = 5
    text = "Excel Turkey Forum"
    start = "24.06.2018"
    money = 300
    Set object= ActiveSheet
End Sub

We can write each variable one by one in different rows like that, but we also can write them side by side like this. We just need to put Dim in the beginning and put a comma between each variable.

Sub PEAKUP()
    Dim row As Long, column As Byte, text As String
    Dim start As Date, money As Currency, object As Object
End Sub

We need to be careful about this here: Some users make a mistake and declare incorrectly.

If you write the code I gave above like this one below, I mean if you start with Dim and think that you’ve declared the first variable and not declare the other variables with the suitable variable data types. Since in the “column”, “text” variable the data type is not stated, Byte and String are not indicated but Variant is -which is undefined data type. Since in the first variable I’ve declared with Dim, you declare the data type in the first variable. So, it doesn’t mean that you declare the next variables as well. You need to state the data type of each variable one by one.


Declaring with Data Identifiers (Abbreviations)

Abbreviations 

They are also known as Type Indication suffixes.
They are not used much but they help to save in codes.
It is also possible to tell a variable type by adding a special character to the end of the variable name in VBA.

Dim number% 'Integer
Dim longnumber& 'Long
Dim sum! 'Single
Dim subtotal# 'Double
Dim payment@ 'Currency
Dim name$ 'String
Dim longestnumber^ ' 64 bit LongLong


Data Type Abbreviation Characters

VBA

, as a fast way of declaring data type, lets you add a character in the name of a variable.
This method shouldn’t be used to declare variables and it can be used for retrospective purposes only.
The row below will declare a Double data type and a variable.

Dim dDouble#

But it is better for this row to be declared with the “As” keyword.
Dim dDouble As Double


Data Type Abbreviation/ Suffixes

If you you abbreviations, you don’t have to declare the type.
If you use the % expression, you don’t need to write “As Integer”.
These abbreviations can be helpful to get available information to Variants.

For example: count =10#


Declaring with DEF

We can declare our variables with different methods like we mentioned, one of these methods is declaring with DEF.
This declaration is usually done free from the procedure at the top of the code window.
We can abbreviate and declare the data type we use as variable like below.
The letter that comes after Def+Type indicated that the variables starting with that letter belong to that type.

def ile değişken tanımlama tablosu

Let’s see an example that shows the difference between declaring with Def and Dim.

First, let’s declare our variables like this with Dim.

Sub PEAKUP()
    Dim row As Integer, column As Integer
    Dim text As String, letter As String, word As String
    Dim date As Date, start As Date
    Dim number As Double, price As Double
    row= 10
    column= 5
    text = "PEAKUP"
    letter = "E"
    word = "Book"
    date = "24.06.2018"
    start = "14.12.1980"
    number = 1453.48
    price = 5647.15
End Sub

Now, let’s do the same declaration with Def.

DefInt R
DefStr L, W, T
DefDate S, D
DefDbl P, N
Sub PEAKUP()
    row = 10
    column = 5
    text = "PEAKUP"
    letter = "E"
    word = "Book"
    date = "24.06.2018"
    start = "14.12.1980"
    number = 1453.48
    price = 5647.15
End Sub

As you see, we got to indicate the type by using the initials and declare the variables. At this point, you want the variable declarations not to take too much space and be seen in less rows. As indicated below, you can write the Def rows in a row next to one other with a colon (:).

DefInt R: DefStr L, W, T: DefDate S, D: DefDbl P, N
Sub PEAKUP()
    row = 10
    column = 5
    text = "PEAKUP"
    letter = "E"
    word = "Book"
    date = "24.06.2018"
    start = "14.12.1980"
    number = 1453.48
    price = 5647.15
End Sub

By the way, you can easily follow and evaluate the names, values and types of all variables from Locals Window.

def ile değişken tanılamayı locals windowda görüntüleme


You can take a look at the Microsoft Docs page for more information.

See you in other articles, bye.🙋🏻‍♂️
You can share this post with your friends and get them informed as well. 👍🏻

Global Set Variable

Each object or property we use in Power Apps can be used as a variable. For example, we can set the value of a TextBox as TextBox1.Text and this way, it is defined as a variable that has a text value and that can be interfered by the users. Even though every object can be used as a variable, there are real functions designed to be a variable. These functions that are experts in assigning an using variables are used in more dynamic actions like calculating a value in an increasing or decreasing way, rather than a static Label moving data between pages. Set variable is one of them.

Properties

  • It’s a global/general variable, can be applied from all the screens of the app.
  • It can be created and applied anywhere in the app.
  • It can hold different data types like Numbers, Text string, Boole, Record and Table.
  • Set(variable_name; value)

Set Variable

It is a very easy-to-use function. You define the variable name and state the value that will be written in it. And then, the variable name is written in the required field and the data it contains is open to use.

Let’s practice with a counter example by creating a variable.

Add a TextBox and two buttons into the screen and position them like below.

Write + and – on the buttons. Set() functions will be written in the OnSelect property of buttons.

+ button: Set( Counter; Counter+1)

With this formula, the last value of the counter is increased by 1 and the data is transmitted to the counter again.

– button: Set( Counter; Counter-1)

With this formula, the last value of the counter is decreased by 1 and the data is transmitted to the counter again.

Label: Counter

Name of the variable is written in to the Text property of the Label and the value the variable holds is reflected on the screen.

Click here for the general usage of the function.

You can access the other Power Apps articles here.

GUID Function

What is the GUID Function?

A random id in all screens is created with the GUID function every moment. ID values are used as a key by the database systems like Common Data Service and SQL Server.

When the function is used on its own, it can include numbers, lower and upper case and hyphen. As you can see, this function returns pretty long outcomes but this function can be managed with some functions.

guid

GUID returns a different value each time the function is calculated.  If nothing else changes in the formula, it will have the same value throughout the execution of your app.

GUID is a volatile function when used without an argument. You can write it into a label in order to view or change the outcome of the function. You can convey it to the argument for the outcome to change actively.

A random id can be created while changing the page, opening the app, and saving data or with the timer.


GUIDE Function and Examples

Collect

For example, you can convey this function to a certain column by creating a collection.

Collect(Table1; {   Guid_Columns: GUID()  } )

Mid

GUID function creates an outcome that includes numbers, lower and uppercase and hyphen. For example, if you want to produce a 5-character outcome, you can use the Mid function.

When you add a label to the screen an set its Text property as Mid(GUID(); 1 ;5), a 5 character GUID is created.

Set

You can use the SET argument when you need to create a new argument id all the time.

Set the OnSelect property of a button you’ll add to the screen as Set(Guid_create ; Mid(GUID(); 1 ;5)) and the Text property of the label you’ve just added as Guid_create. Now each time you click the button, a new value will be created and it will be see in the  label.


Click here for the general usage of the GUID() function.

You can access the other Power Apps articles here.

Use Objects with a Condition in Gallery

We can design lists with a condition in the gallery by writing the If formula. With these conditions, it is possible to control a lot of features of objects like color, view, size, position. You can authorize based on person/department, hide/show buttons on the screen and highlight status in case of tracking.

Use Objects with a Condition in the Gallery

We will be going over how to show different objects for different question types in the gallery. This way, one question in the same group will be replied with the radio button and the other will be replied with rating.

Create a Collection

We will create a sample collection for an example with the data above. You need to create the collection by writing the code below into the OnSelect property of a button we will add to the screen.

ClearCollect( Questions;
{
Question:    “Question”;
Question_no:   “1”;
Question_type:    “Radio”   }
;
{
Question:    “Question”;
Question_no:   “2”;
Question_type:  “Rating”  }
;
{
Question:    “Question”;
Question_no:   “3”;
Question_type:    “Slider”   }
)

Show Objects in the Gallery

You need to add the Gallery object to the screen in order to do the action in the example. Questions collection should be connected to this gallery object’s Items.

The responding way of each question in the collection is indicated in the Question_type column. Depending on the responding way of questions, Radio Button, Rating and Slider has been added to the gallery. IF formulas will be written into the Visible property of each object and thus, the related item will be shown depending on the question type and the other ones will be hidden.


Radio Button Visible Code: If(ThisItem.Question_type=”Radio”;true;false)

Rating Visible Code: If(ThisItem.Question_type=”Rating”;true;false)

Slider Visible Code: If(ThisItem.Question_type=”Slider”;true;false)


You can click here to take a look at other Power Apps articles.

You can click here to take a look at the use of IF function.