Forests cover approximately the 30% of the land mass of our planet. While forests provide food, medicine, fuel for more than one billion people, people ruin this fundamental living space on a large scale and cause deforestation. Unfortunately, long-term benefits of trees are sacrificed for short-term gain.
This year, one of the topics of World Economic Forum was the long-terms hardships of climate change alongside decreasing the economical and political threats. Limiting climate change is on our hands just like we reversed the ozone depletion. Because there is one earth only and the risks awaiting us in the next 10 years can bee seen in the table below.
In terms of long-term risks, according to the report in which all the first 5 global risks of the next 10 years was about environment for the first time, extraordinary weather events, failures about decreasing climate change, large-scale natural disasters, loss of biological diversity, the downfall of ecosystem and the damages people cause to the environment are seen as global risks that can cause serious effects.
Deforestation
With the general definition, it is making the forests or planted fields non-forested lands by ruining them. Turning forestlands into fields, farms or urban usage areas can be shown as an example.
The positive impact of forests and trees make the base of our existence. For this reason, they touch a lot of areas from fighting poverty and hunger to decreasing climate change and protecting biodiversity. We can sort out some of the impacts that touch our lives like this:
Impact on Contagious Diseases:
In 1997 , Indonesia’s rain forests were burned down to make roads; the fire intensified with drought. Trees didn’t produce fruits, fruit bats didn’t have a choice but to fly somewhere else to look for food, and brought along a deadly disease. A short time after the bats places on the trees of Malaysia gardens, the pigs around them started to get sick. They probably started getting sick after they ate the fruits that fell onto the ground after bats chewed them, just like the pig farmers… In 1999, 265 people had a serious brain infection and 105 people died. It was the first know break-out of the Nipah virus among people, and this caused recurring pandemics in Southeast Asia from then.
In the last 20 years, scientific researches show that deforestation creates parasites that cause deadly diseases like malaria and Lyme caused by contagious viruses like Nipah, Lassa viruses by triggering a complicated action sequence. A lot of viruses coexist with the animals in the forests without any harm, because animals have evolved with them. But when humans go into the forest habitat or change it, they can be unwanted owners of pathogens. Also, the rodents that carry viruses have been detected in deforested lands in Panama, Bolivia and Brazil.
Impact on Water;
The three out of four of world’s freshwater comes from forests basins and the quality of water is impacted by the loss of trees. Forests are our water fountains. They provide water for more then 1/3 of the world’s biggest cities.
Impact on Food;
Source of income and food safety of around 250 million of rural poor household depend on live forests and trees. Even around 50% of the fruit we eat come from trees; thus, non-wood forest products (NWFP) provide as food as well. Increasing food security without reducing forestland is one of the biggest hardships of modern-day.
Impact on Energy;
Around 2,4 billion people utilize wood for cooking, boiling water and heating. In general, forests provide approximately the 40% of global renewable energy as wood fuel. For that, it is necessary to focus on producing wood fuel more sustainably to reduce deforestation.
Impact on Air;
Forests that act as carbon sinks, are equal to approximately 2 billion tone carbon dioxide each year.
Impact on Our Children;
Children are usually more active when they are in a green field. For example, the rate of obesity in children in places where green fields are more reachable is around 11-19% lower compared to places where reaching green fields is limited or impossible.
When we analyze the World Economic Forum outputs in terms of the risks all these impacts will cause in short-time, extraordinary heat waves and degradation of natural life is among the negative impacts of which increase is expected in the upcoming period.
How Much Paper an Office Worker Consume in a Year?
Have you ever thought why leading companies of the world are trying to integrate the “paperless office” notion to their workflow within the scope of digital transformation? Here are some striking statistics:
- An average office worker consumes 10 thousand papers a year. The same worker spends 30-40% of his/her time trying to find documents stored in his/her e-mail, file cabinet at the workplace or in drawers.
- An average documents is physically copied 9 to 11 times a day.
- 40% percent of the trees cut for industrial reasons are used for paper production only.
- The cut trees make the 12-17% of the global greenhouse gas emission.
Is It Possible to Use Papers without Cutting Trees?
According to the statistical data, to make 100% non-recycled 10 batches of copying paper a bit more than half a tree is needed. A tree produces a bit more than 8333 paper sheets; for a roll paper of 500 sheets 6% of the tree is used.
While some people think that paper usage is a corporate culture, the others use it because of personal habits. But, wouldn’t it be cheaper to create and test digital versions of different business models? In fact, these days there is no aspect of an entity that cannot be modeled. You can choose the digital tools that are suitable for you and create your vision accordingly. We have compiled some of our solutions that will help you during your digitization process.
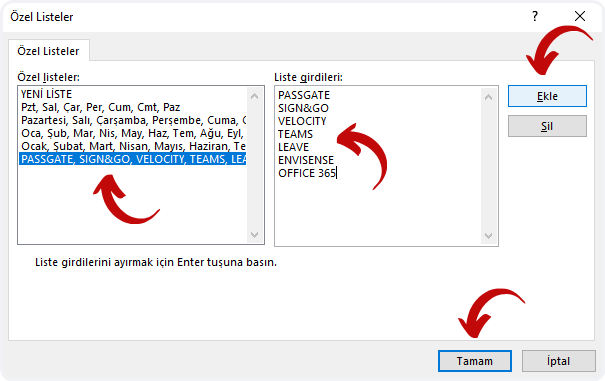
Let your e-mail signatures reach hundreds of people with Sign&GO.
As e-mail signatures take the place of business cards, the importance of messages they transmit increases. You can both announce your brand perception the best way possible and use the fastest and cheapest communication tool to increase your recognition with e-mail signatures that will reflect your corporate identity. Using less business cards equals to cutting less trees.
At the same time, it is not very easy to reach out to your customers fast and keep them up-to-date nowadays. Conveying your informative messages, current news to a lot of people will enable you to reach out to the right audience with your e-mail signatures. With your e-mail signatures, you can transmit messages that you can add like “During these hard times our country is going through, we are thinking about you, our partners, and share the most productive working methods on digital platforms with you” to hundreds of people.
Become Suitable for Collective Work with Velocity
Velocity is an intranet platform that digitizes and facilitates all the communication processes of companies. We know that the some of the essentials of a portal that creates your corporate culture are announcements, files, request forms (off-day, expenses, advance, training etc.). All these processes help you to solve your communication in a fast and integrated way with zero paper consumption.
You will spend less time sharing files and documents with your other branches. Enables you to show your corporate announcements on a single platform without needing any printed material like brochures of banners. It also helps you to publish documents in scope of Law of Protection of the Personal Data like employee clarification text and vehicle tracking system clarification text without using any paper.
Be Socially Responsible with Paper-free Projects
Maybe we should leave the old application methods aside and change to digital tools and create paper-free projects. During process we might be able to save our money, energy and a few forests… We should at least try it. Our world needs oxygen, water, food and our children.
We can start the change from our office where we spend most of our time and our corporate culture with digital workplace applications. Because one day some topics we remain distant from might become an obligation. Just like the Covid-19 pandemic that caused us to lock ourselves in the house. We wish everyone a health feature.
Sources:


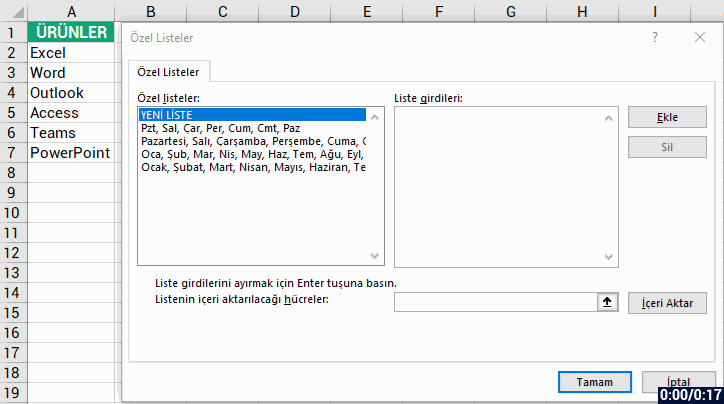


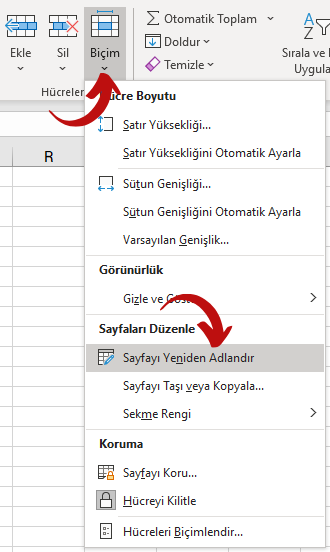
 2- Right-click the Sheet Tab