Hi there dear readers! Today, we will talk about Microsoft’s Power Automate (formerly called Flow). Power Automate is a member of Microsoft’s Power Platform family, and allows you to automate your business processes and design them with as little code as possible. It integrates with nearly 300 connectors and handles your work automatically without the need to visit multiple sites or run multiple programs. To begin with, I recommend reading this article and then looking at the templates on Power Automate’s site. These are ready-made templates that you can get started with right away. Here I leave a few of them for you to review:
-
Start an approval for new file to move it to a different folder
-
Get a push notification when you receive an email from your boss
POWER AUTOMATE FOR EVERYONE
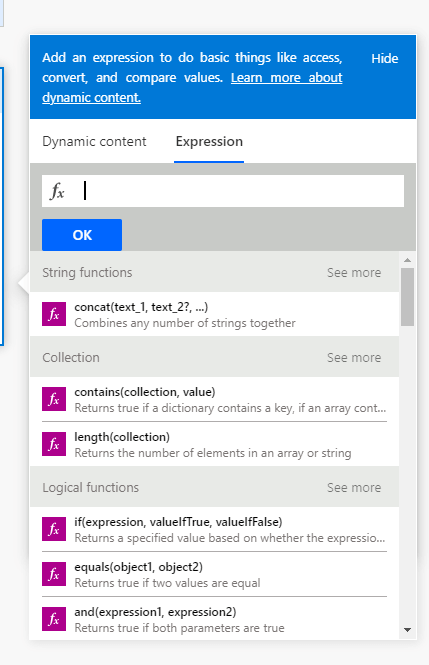
One of the best parts of Power Automate is that you can perform a variety of business processes in the simplest level possible, even without having the tiniest idea of how to code. Of course, every now and then you will need formulas here as well when appropriate, And for that kind of situations, Power Automate has its own formulas. Many of these formulas, referred to as “Expressions”, are similar to those of Excel.
FUNDAMENTAL COMPONENTS
Flows have 2 main components:
- Trigger
- Action
The main question when it comes to the trigger title would be “What will be required to happen for this flow to run?”
The titles like:
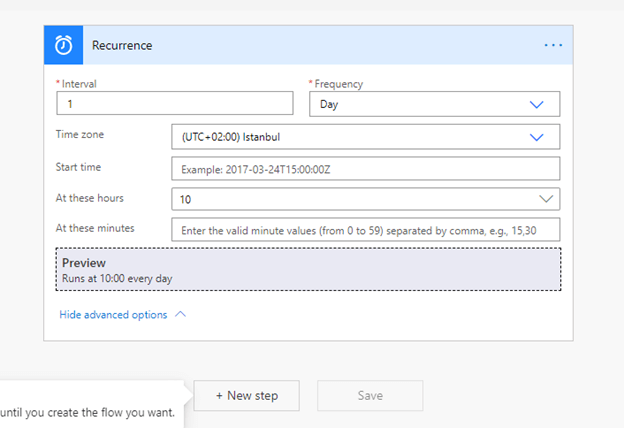
- When an e-mail is received,
- At 10 o’clock every day,
- When a new task is created,
- When a new line is added to the Sharepoint list,
- When a button (Power Automate button, Power Apps button, Power BI button) is pushed,
etc. are all triggers. A flow doesn’t work without a trigger.
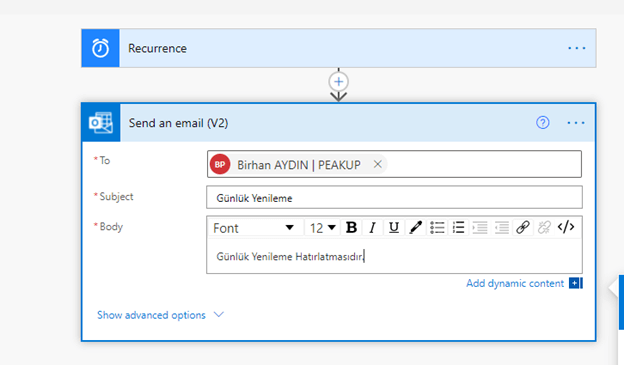
The main question when it comes to the action title would be “Which actions will be executed once this flow starts running?”
Here, we will select the actions we want to execute and connect them one after the other.
- Send an e-mail.
- Create a task.
- Send a message on Teams.
- Add a new record to the Sharepoint list.
- Create a new file on Sharepoint.
etc. are all actions.
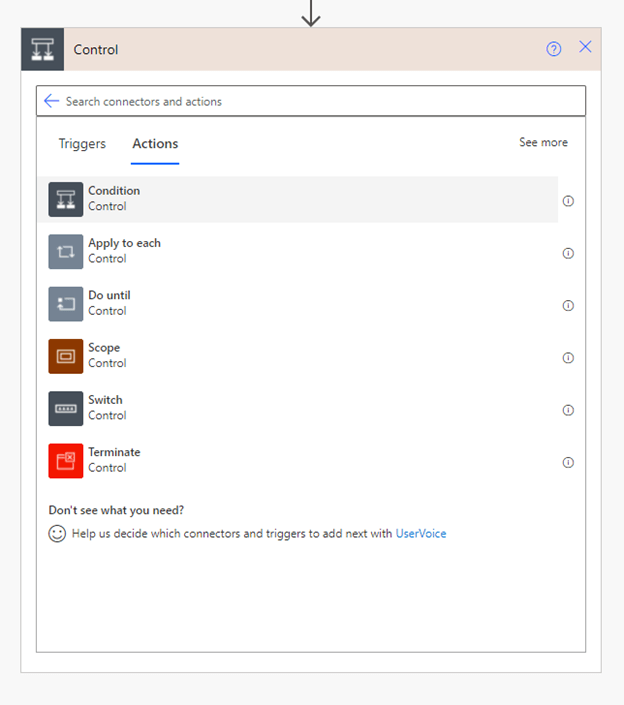
As a matter of fact, most of our business processes depend on various conditions and approvals. For example, you will save the files to a folder, but your administrator must approve these files first. Here the process gets a little more complicated and you have to apply various conditions to the processes as well. Since these situations are quite normal, Power Automate also has a solution for this situation: Flows can be designed to create special reactions to the results of certain conditions by selecting conditions as an action and working according to these conditions.
Everything goes step-by-step in the Power Automate flow. Thus, one of the main points to know here is that when you add an action, you can use the outputs of the actions or triggers from the previous steps. In the Dynamic Content area, Power Automate already shows you what and which titles you can use.
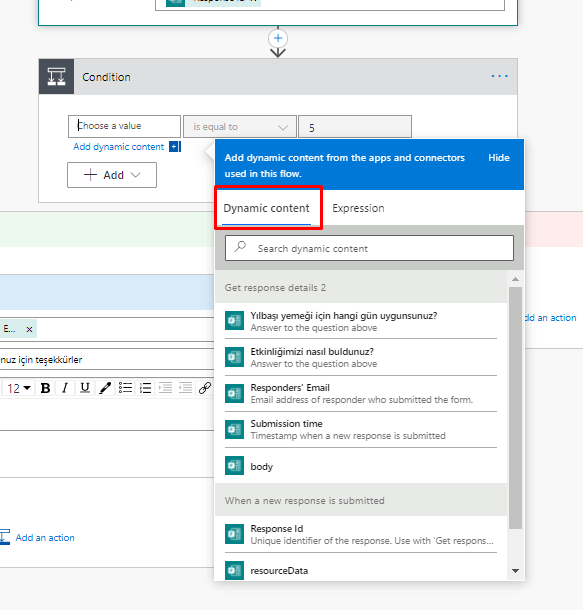
Below you can see an image of a conditional process.
The steps here are as follows:
- We have created a survey, and we want this flow to be triggered when a new answer comes in.
- We get the details of the answer that caused the trigger.
- In the survey, we’ve got the question of: “Did you like our event?”. We will execute 2 different actions depending on the answer to this question. For this very reason, we add a condition.
- We choose the title to which we will apply the condition: “Did you like our event?”. We want it to check if the answer here is equal to 5. 5 is the highest value.
- If it is equal to 5, then we send an e-mail to the sender saying “Thanks”.
You can click here to check out our other articles about Power Automate. And if you ever have a question, feel free to let us know. See you in other articles.

Good game, well played.