A Fast Report with Power BI In 18 Minutes and 23 Seconds

Hello dear reader! In this post I created a beginner-level guide for creating a fast report for people who never got to meet with Power BI but want to learn something about it or people who want to brush up on their information. We are talking about 18 minutes here. We cannot even get ready to get out of home in 18 minutes. 😂 If Power BI is not downloaded on your computer you can download the latest version here. Let’s start!

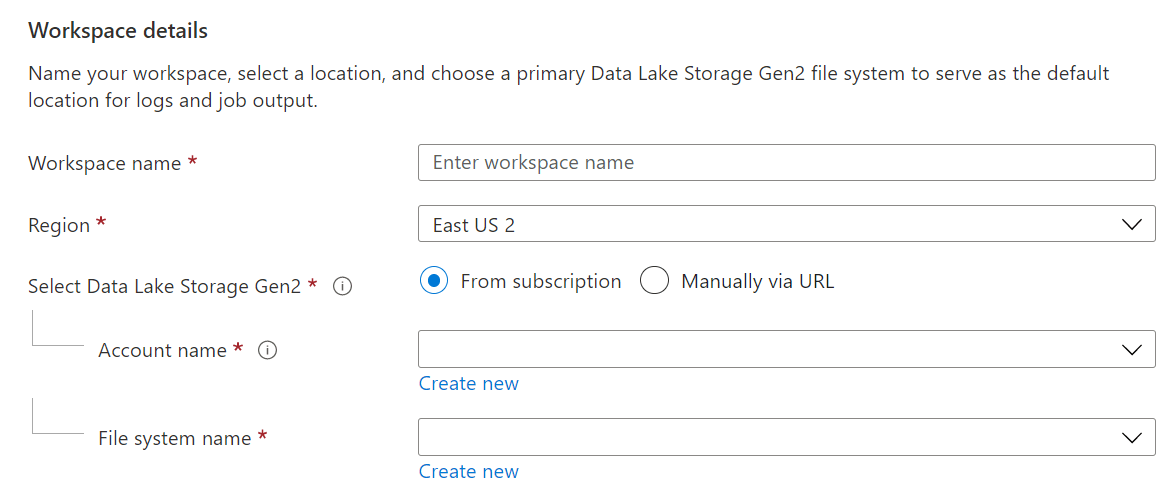
1- Where is your Data Source?

I thought it would be nice to start with a logical question since we know that there is a source that stores hundreds of data. Where is your data source? You have a few mainly known options as data source: SQL Server, MySQL, PostreSQL, Oracle… The Access authorization belongs completely to IT personnel and they are pretty stingy to put these resources into your service –they have justifiable reasons I’ll give you that. Thus, for your various tryouts in the first stage you need to use data sources that can be found online. Kaggle.com is a good website for that.

I myself downloaded this dataset that is about Udemy courses from Kaggle so that you can follow the same steps with me easily. This information about Udemy courses is found in this dataset: Name of the Course (course_title), publish date (published_timestamp), link of the course (url), payment status (ispaid), Price (price), main subject (subject), course level (level), duration of the course (content_duration), number of lectures (num_lectures), number of subscribers to the course (num_subscribes), number of reviews (num_reviews). Because aren’t we all tired of COVID!

2- Connect to the Data Source

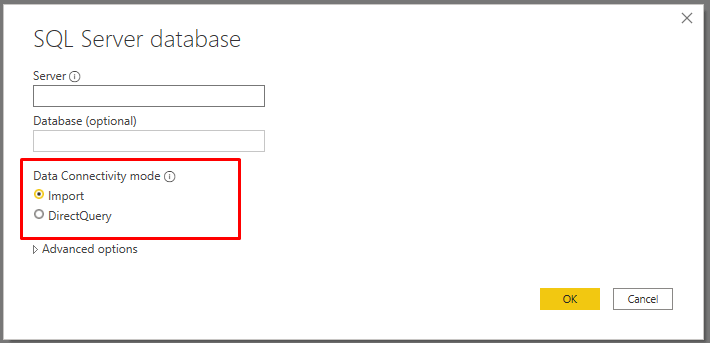
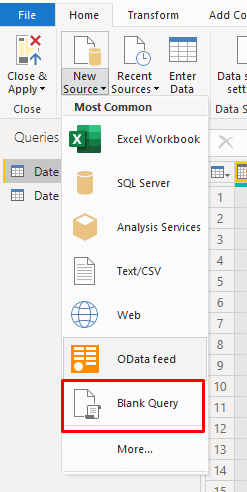
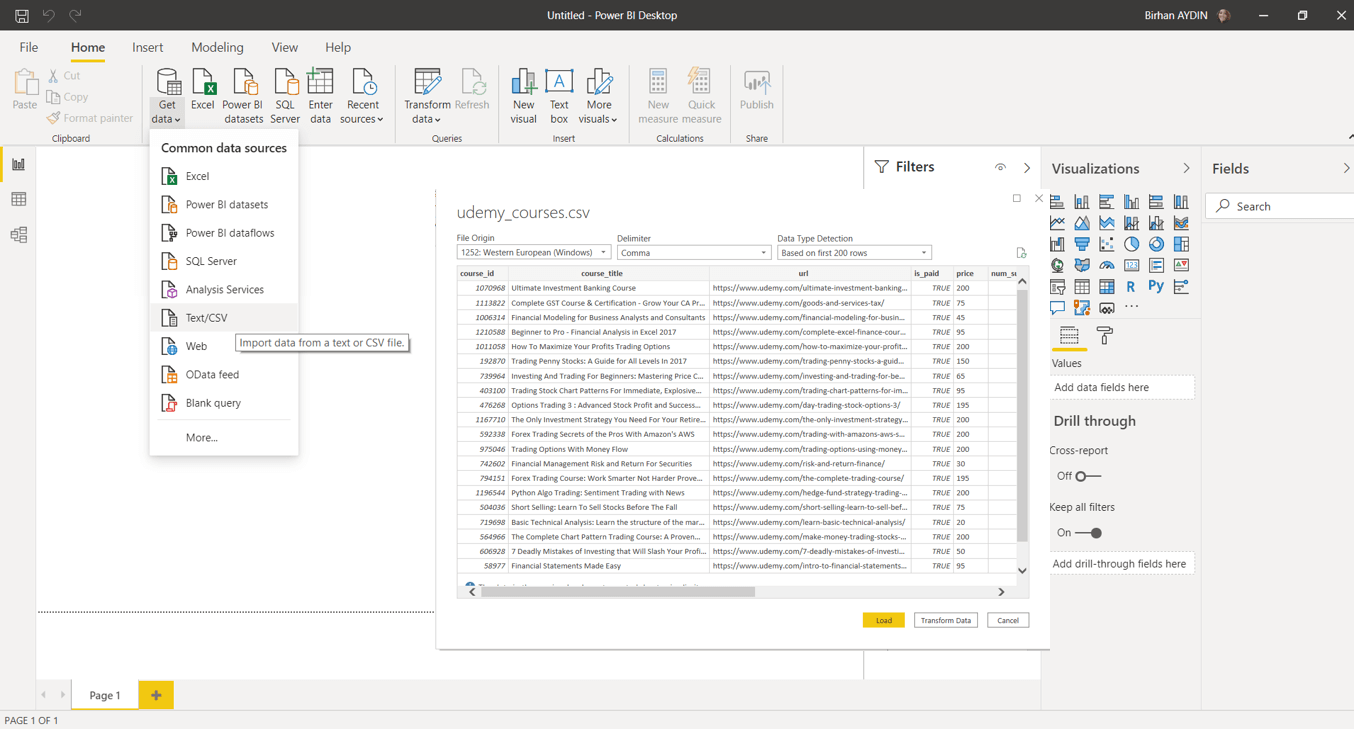
When you open BI Desktop you will see the title Get Data under the Home tab. It is attached right next to the most-used in that field. You might have noticed that you can also connect Excel directly. Here we click on Get Data and choose the Text/CSV title. Power BI asks you “Do you want you use this data directly or do you want to use it by making some changes?” every time you import data. I would like to say “I trust my data and choose to import it directly.” but I see that there is a bad data input on the ispaid column, for this I choose Transform. By the way as you can see it divided the .csv extension file itself by detecting the separators.

get data and transform

3-  Edit the Data 

We will be editing on the ispaid column in our data. The information on the column is given with the true/false expressions. We will be changing them as Paid&Unpaid and we will also filter a cell that has nothing to do with either of them.

Change the Data type 

Data type is very important when it comes to data editing. The data type of the ispaid column that we will make changes on is Binary. To be able to change the expressions as Paid&Unpaid we will change its data type as Text. Power BI arranges the data type first every time it imports data and since we are making data type changes after this step it asks “Do you want us to save it as a new step?” At this point it doesn’t matter which one you choose, I requested it to add it as a new step.binary to tezt

 Change the Values

Now let’s change the true expressions as Paid and false expressions as Unpaid on this column. We achieve this with the Replace Values command which is under the Transform tab. Here there is also a value that has nothing to do with the existing expressions and starts with “http..”. We filter this value and make it invisible on the front face.

replace values

This is all that we will be changing on this data. Finally, we close it by choosing Close&Apply. If you want to make a change on the data later you can access this display again with the Transform Data title in the Home tab.

4-Charts

Add the card that shows the number of courses

It is always nice to have cards that have information about the data on the corners. I actually want to get the information of how many courses there are in total. For this I will make the values on the Course_Id Column counted singularly. I hold this title and drag to the report area. It immediately creates a chart for me. I change it with the image of card and indicate that the values on the course_id column will do the enumeration. I transfer it to top right corner.

card

Add the charts that show the number of courses by prices and total hours

Now we are creating a chart for the second information that I am interested in. We take the price and course_id columns to the report area. We change the chart type as clustered bar chart. To see the number, we active the Data Label under the Format. We change the Display units as None. You can see that the numbers are very high in this stage. Just like in the card we change the action as Count for the Course_ID column.

fiyatlaragöre kurs sayıları

We do an action similar to the one above for the hours as well. We change the Price as content_duration and add it to the report screen. We can copy the existing image for this.

saatlere göre kurs sayıları

Add the chart that shows the number of courses by subject and level

We take the subject and course_id columns to the report area. We change the type of the chart as clustered column chart. To show the number we activate Data Label under the Format. We change the Display units as none. In this stage too you will see that the numbers are very high. In order not to deal with the same situation with the other charts we click the course_id column on the column tab upwards and we choose Count(Distinct)[Count(Singularly)] on the Summarization area and we transform it to count the course_id column in our existing chart.

We take similar actions for levels as well. We change Subject as level and add it to the report area. For this too you can copy the existing image.

konularına göre kurs sayıları -2

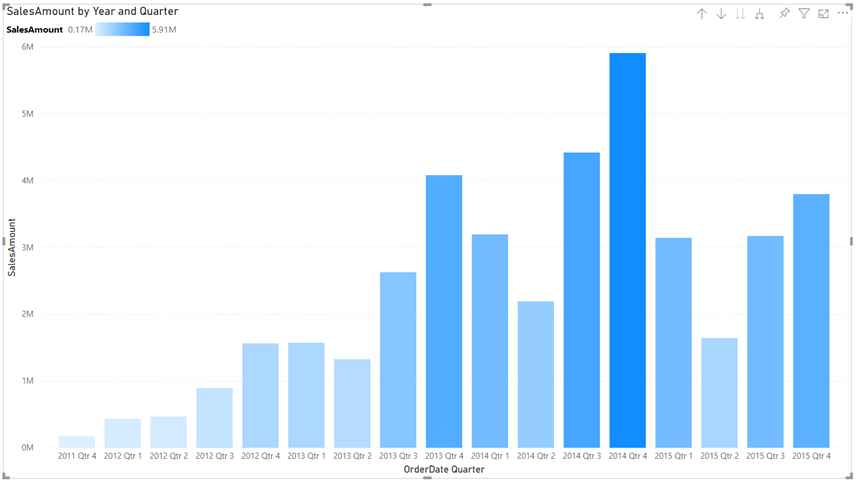
Add the chart that shows the number of courses by spreading throughout years

About the other chart that we are going to be adding… I saw a published_timestamp column and wanted to use it. Let’s see to which year the highest number of publications belong. For this published_timestamp and course_id take the stage. This time we will use the stacked area chart. After creating this chart, you will see that some of the years are visible, not all of them. This is because the dates generally continue non-stop. In order to fix this and see all years in the chart we go to the format tab and get to the details of the X-Axis title. Here we change Type as Categorical.

Add a Table

Is our screen getting more complex or what? Don’t worry in the end it will not seem complex at all! 😎But for now, we will increase the chaos and do another action by adding a table. Here I saw the web links of the courses and thought that it would be nice for it to go there by clicking the link from the table. If we are on the same page here, let’s go.

Let’s take the columns that will exist in our table: url, course_title, subject, published_timestamp, num_lectures, num_reviews, num_subscribes. The main concern here is to define a field as URL. By choosing the .url column we change the Data Category in the Column tab as Web URL and the url in the table changes into the blue and underlined writing that we are all used to. By making another change we will change it into a symbol. We achieve this by activating the URL Icon button in the Values field under the format of the table.

tabloFundamentally we have added everything that we were going to. Now it is time to organize all this. For this you can follow two options. Since we don’t know the data here, we created charts to see what can come up. In another version if there are fields that come to your mind you can directly start with the visual arrangement.

5-Organize the Page

Spoilers

: From this point on people who enjoy messiness will be sad.

Logo is one of the main factors to make a report seem corporate. We download the logo of Udemy from the internet.

We import it in Power BI. We add the Udemy image by clicking on the Image option in the Insert tab. We usually put the logos on the top left corner, thus we can carry it there.

image ekle

Then we change the background of the page. We will use the code of F6F6F6 for the page’s background. In order for more columns of the table to be visible I change the page size from 16:9 to custom and make the height value 920. Afterwards I choose the Temperature theme that would be closer to the color of Udemy. After the theme all the colors in my charts become dark blue. I don’t want all of them to be same color. For this reason, I change the colors of two of them. You can achieve multiple selection with CTRL.

grafik rengi degistir

Then I change the places of the charts. We arrange the width of our card. We will put two clustered bar charts to the left and right corners and put other charts in between them. We will choose for the grey background to be seen in between the charts and arrange the width and the distance accordingly. After placing the charts for a nicer look, we will use round edges. For this we activated the Border field in the Format tab, change the color to white and maximize the radius.

grafikyeridegistir

Lastly, we give the last form to our table. I chose to close the left gap by making the column titles and the values and the width of the columns bigger. You can also add a small chart to the gap.

tablo

Aaand we are done! With all these steps by holding and dragging we created a fast and a basic report with Power BI. I hope that we haven’t lost anyone on the way while the article was flowing and that you liked it. I wish the best of luck to people who want to work on this report and improve it further, I am sure that there will be amazing visuals! I leave here a fast beginner-level link for you to take a look at our other articles about Power BI. Take care!

Good game well played

Power BI – 2020 May Favorites

Hello dear reader! Here we are with the Power BI May updates. Compared to last month, this month’s updates are a bit more superficial. But of course there are some subjects that stand out as always. Let’s go and start analyzing the Power BI May updates right away.

1-Apply All Filters

There is a new button in the filter field. What does this mean? It means that now we have some options while applying filters:

  • The report can change immediately in accordance with the values we choose on the filter field.
  • You can add Apply button to filter headers from the filter field. In this step, you need to press this button after making filter choices.
  • You can ad an Apply button that would apply all the filters at once on the filter field. First you do your filters on all the headers and than press this button.

You can access this new option by going to File > Options and settings > Options > Query reduction.


The necessity of it is arguable but to tell the truth, I know that it has been asked if all these new filter pane skills didn’t exist. So it is for sure that their existence will make some happy. By the way with this update we say goodbye to the old filter pane, bye sweetie.

2- Buttons Now Support Fill Images

A feature very convenient for people who want to use different images and shapes instead of writing an expression only. You can put different images to default, on hover, on press, and disabled options. You can access the option where you can use a button for this on the Fill field.


buton image

3-Drop Shadow Support for Visuals

I think this is the most prominent one of Power BI May updates. I am really happy to to have shadow effect! It gives dimension to the chart field and thus is very useful. Before, we arranged these shadowed fields on PowerPoint and than brought it to the Power BI background. By the way, there a lot of options like angle, transparency under the Shadow title. Since we don’t have to do this anymore, a wide range of people will be satisfied. ❤

shadow, gölge

4- Conditional Page Navigation

Drill through option that was on preview is now generally available. Not only that, they also added conditional page navigation! This is a huge step. This means that you can show pages based on users! Let’s analyze its details all together. The main logic is that you need to enter the name of the page that will navigated by conditions into the DAX indicator.

5-Feature Table (Preview)

Actually it is one of the most interesting features of this month. Before, you had to download the Excel Analyzer extension to your computer that would run the Power BI data sets you were going to work on. After this step you had to download the data set connection. Now we can find the Power BI Dataset header on Excel. But for now, you have to have all the Office Insider programs to have this feature. I am waiting for the moment when we will be talking about it in detail when it is available for all users!

filtre butonu

6- New Data Source

  • Witivio

Witivio is an enterprise chatbot platform for employees with a deep integration in Microsoft 365 and the Power Platform. Without code, users can design and monitor chatbots for HR, IT HelpDesk and change management. Chatbot admins can track the usage and the performance of their chatbots to build advanced analytics.

You can find this connector in the Online services section of the Get data dialog.

  • Linkar Connector 

Linkar is a suite of components that facilitates efficient connectivity to MultiValue Databases. Linkar SERVER works with almost all MultiValue Database platforms centralizing connections and optimizing DBMS license usage. Client apps use Linkar CLIENT libraries to interact with the database through Linkar SERVER, with bindings for popular languages. This connector allows easy integration with MultiValue Databases through the Linkar platform.

You can find this connector in the Database section of the Get data dialog.

 Webtrends Connector

Webtrends Analytics is a Microsoft-preferred solution built from the ground up for the nuances of measuring performance of your website or SharePoint environments. This connector allows you to import your data into Power BI via our Data Extraction API (REST) with point and click ease. All reports on an individual profile are now available at once; no more limited report lists. The date range options have been expanded to allow standard report periods as well as custom date ranges. A customer account with Webtrends is required to use the connector.

You can find this connector in the Online services section of the Get data dialog.

Planview ProjectPlace connector

Get work done across projects and teams. Projectplace lets you plan, collaborate and track progress of all projects and assignments in an easy and user-friendly way.
This connector is supported by Planview as the preferred method of reporting on ProjectPlace moving forward. Existing users of the ProjectPlace connector should consider rebuilding their reports on this new, Planview maintained, certified connector.

You can find this connector in the Other section of the Get data dialog.

Shortcuts Business Insights connector

The Shortcuts Business Insights connector enables you to consume, read and analyze your data collected via your Shortcuts point of sale product of choice. Gaining access to this data will enable you to realize valuable business insights from your appointment, transactional, client, employee, product, and service data. These insights will allow you to better serve your customers and anticipate their needs, while growing your business to its full potential.

You can find this connector in the Other section of the Get data dialog.

Vessel Insight connector

Vessel Insight is a vessel to shore data infrastructure delivered as a service. The service enables shipowners, operators, and charterers to capture data from onboard systems such as propulsion, navigation, cargo, VDR as well alarm and engine management systems. Vessel Insight aggregates and contextualizes the data before transferring it to the cloud using the KONGSBERG Global Secure Network. The Vessel Insight Power BI connector makes it easy to integrate and combine vessel data with existing systems and streamline reporting and decision making.

You can find this connector in the Other section of the Get data dialog.

Zoho Creator connector

Zoho Creator is a low-code cloud software which lets you create custom applications for your business. Zoho Creator can collect data, automate business processes or workflows, analyze the data in reports, and collaborate with your application users. The Zoho Creator connector allows you to analyze data and share insights based off all data in Zoho Creator, aside from the pivot report.

You can find this connector in the Online services section of the Get data dialog.


Power BI may notable updates go like that! You can click here to download this month’s update. You can reach our other articles about Power BI here. Take care.

Good game well played.

Power BI – 2020 July Favoruites

Hello dear reader! This month’s updates are for those who can resist the charm of sea and sand right in the middle of summer. There are two very important features among Power BI July 2020 updates. Let’s go and take a better look right away.

1-   The most important update: Financial Functions on Excel are now on Power BI!

A total number of 49 financial functions are coming to the infrastructure of Power BI. Since we build financial reports on Power BI, it is especially nice to have these functions. These functions added to Power BI have the same function same and syntax as in Excel. You can reach functions and their details here. You can find the names of new functions below.

FINANCIAL FUNCTIONS
ACCRINT CUMIPMT INTRATE PDURATION SLN
ACCRINTM CUMPRINC IPMT PMT SYD
AMORDEGRC DB ISPMT PPMT TBILLEQ
AMORLINC DDB MDURATION PRICE TBILLPRICE
COUPDAYBS DISC NOMINAL PRICEDISC TBILLYIELD
COUPDAYS DOLLARDE NPER PRICEMAT VDB
COUPDAYSNC DOLLARFR ODDFPRICE PV YIELD
COUPNCD DURATION ODDFYIELD RATE YIELDDISC
COUPNUM EFFECT ODDLPRICE RECEIVED YIELDMAT
COUPPCD FV ODDLYIELD RRI

2-Notable Update: Azure Maps visual

Another update we see as important is Azure Maps being included among the defaults images of Power BI.  But, why is it so important? This chart has different  features than the other map charts.

Now we can add extra layers to maps. One of them is “Reference Layer”. With this feature a GeoJSON file containing custom location data can be uploaded and overlaid on the map. This way you can use it as a reference layer containing different information like population and real estate.

Another one is “Custom Tile Layer”. Tile layers allow you to superimpose images on top of Azure Maps base map tiles. What tiles? For example, weather forecast.

Another standing-out thing is that you can see the real-time traffic overlay on the map in your report. If you work in a logistic related area, it will be very useful for you in terms of increasing efficiency.

In order to activate this update, you need to activate Azure Map Visual in Preview Features. Then, when you restart Power BI, you will see it among default images on the right .


3-Update: External Tools ribbon- Preview

External tools are non-Microsoft tools that work with Power BI and that allow you to create calculations and calculation groups and analyze data in terms of performance. The prominent ones are:

  • DAX Studio
  • Tabular Editor
  • ALM Toolkit

These feature cannot be opened on Preview Features. We need to create a folder and set up these programs in that file. The folder shortcut should be:

Program Files (x86)Common FilesMicrosoft SharedPower BI DesktopExternal Tools

You can get details about downloading these tools here.

4- Gradient Legend

You can now see the color scale that have been conditionally formatted by columns and bar charts as a legend. Of course, unless you add a legend on purpose.

5-Global option to disable automatic type detection

Power Query tries to automatically detect column headers and types based on the data. This feature didn’t function on schema-less data sources and we had to fix it manually. Now we can disable automatic type detection against schema-less sources. This new option can be found under the Options dialog under Global > Data Load.

We cannot talk about data sources in Power BI 2020 July updates 😮 We haven’t come across this situation for a while. If you want to see prior Power BI updates or take a look at other Power BI articles on our blog, click here. Till the next time, take care!

Good game well played

Power BI – Our 2020 June Favorites

Hello there dear reader!  As much as the weather has different opinions on this subject, according to the seasons calendar they taught us in the 1st grade,  summer is here! This month even if we write about just one of the updates, it would be enough. What an update! Come on, lets start analyzing Power BI June updates right away.

Without keeping you waiting for too long, here is the superstar of the Power BI June updates:

1- Enhancements to mobile authoring

We always liked the fact that Power BI had mobile authoring. Of course it lacked some stuff. For example the squares were too big. Not being able to change the background, not being able to place, not being able to put objects on top of each other could be a bit of a pain in the neck. We got rid of all of them with just one update! Now, isn’t that amazing?

We don’t have to display expressions with low values in huge areas anymore, we can place them to an empty part of a graph. Thus we obtain a mobile layout fully matched with the design of the report. We can easily find images by their names.

There is one more thing that I am still waiting for:  Images that are not displayed on page view can be displayed on mobile layout. For example I use a slicer on page view but it is not useful on mobile layout. I need another slicer special for mobile layout. I hide these slicers or any image that I will be using behind the other graphs. I wish it was not necessary, but i do believe that it will not be in the near future. 😁

2-Automatic Page Refresh

It was a feature that made Pro users on Premium cry out “Aren’t we gonna have automatic page refresh too?” Finally it is released for Pro as well. Now Pro users too can enjoy instant refresh. To enable this feature you have to connect to a Direct Query source with this method. After that you can see this feature in page properties.

3-Enhancements to Hierarchical Slicer

In February hierarchical slicer was introduced to us. We had some issues since then, like issues with icons and font size. It is indicated that with this month’s update we got a new slicer cleared off these issues completely. Now we have more options for expand/collapse icons. Now we are able to customize indentation for child items -we had too seek it in the space back in the day as you know. Also the icons are scaled with the font size.


4-RLS is now supported for Featured Tables in Excel’s Data Types gallery

The matter of connecting to Power BI datasets from Excel is developing rapidly. Now, when you mark a table as featured and then publish to the Power BI service, that table will appear in Excel’s data types gallery even if it has RLS rules applied. Previously, these tables were not shown in Excel. This new enhancement means that users in Excel will only see the rows of data they have access to.

5-Line chart dot formatting options

Sometimes we realized that something was not quiet right, that something was missing in this line chart. But what?  We found the missing point, or shall we say the missing dot. Now we can color the dot corresponding to the related title on the X axis in the line chart. We can do it on the Data colors tab in the formatting pane.

6-Data Connectivity

Palantir Foundry Connector

Palantir Foundry is a platform that reimagines how people use data by removing the barriers between back-end data management and front-end data analysis. Foundry enables users with varying technical ability and deep subject matter expertise to work meaningfully with data. With Foundry, anyone can source, connect, and transform data into any shape they desire, then use it to take action.

This connector will soon be available in the Online services section of the Get data dialog.


You can click here to go to the download page of Power BI June updated version. And to take a look at out other articles on Power BI you can click here.


Wish you all a great month. Take care!

Good game well played.

How to Create a Paginated Report with Power BI?

Paginated reports, long the standard report format in SQL Server Reporting Services, are now available in the Power BI service. These reports can be printed or shared. They’re called “paginated” because they’re formatted to fit well on a page. They display all the data in a table, even if the table spans multiple pages. They’re sometimes called “pixel perfect” because you can control their report page layout exactly.

Well, let’s create paginated report page!

STEP 1: DOWNLOAD & INSTALL PAGINATED REPORT BUILDER ON YOUR PC

Open your browser and navigate to https://app.powerbi.com/. Click to Download icon than click to Paginated Report Builder.

Download from app.powerbi
Fig.1- Download from app.powerbi

It will redirect you to Microsoft’s Download Center. You can download the .exe file by choosing the language.

STEP 2: OPEN PAGINATED REPORT BUILDER

Basic wizards are provided to enable you to create faster reports when you open Report Builder. If there is matching report layouts that is similar to what you want to design, you can select it and continue. In this article, I will proceed with an empty report.

New Report Wizard
Fig.2- Create New Report Wizard

STEP 3: ADD DATASOURCE & DATASET

To design a report with Report Builder, first, you should connect to a data source and access data sets from this source. Then, right-click the “Data Sources” in the files area on the left and click on “Add Data Source”. We will start by giving a name to the resource, we will use it in the window that opens. This name is important for us to distinguish this data source more easily. Then, we select the source we will connect to from the list. When we look at the list, we can see that we are facing a much more limited list than Power BI. Since, our sources are on Azure SQL, we select Azure SQL from the drop-down list.

Add Data Source
Fig.3- Add Data Source Wizard

After selecting the connection, it is time to configure the connection settings. Press “Build” and enter the relevant connection information. This information includes server, username & password, and related database information. Do not forget to test it after entering all the information.

Data source credential
Fig.4 – Data source credential settings

After adding the “Data Source”, we will create the related dataset that you will use in the report. Right-click on “Dataset” and select “Add Dataset”. Another window pops up. In this new window, first, we enter the name of the dataset; then, we select the data source we created as “Data Source”. Just down below (Fig.5) , we write a query for this dataset on the query screen. While writing this query, the most important point is to create a paginated report and to specify the parameters with a “where” clause while writing the requested ones in the query field.

By specifying the parameter, we can paginate according to this parameter.

Dataset Query
Fig.5-Dataset write query

STEP 4: DESIGN REPORT PAGE

At this last stage, we will give the report page a look we want. You can choose what you want to add to this page from the Insert tab at the Top menu. You can add tables, graphics, maps, text boxes, gauges and images as you wish. The most used ones are the tables and the text boxes. Having a logo of your company on the report page will always provide a good corporate identity. I prefer to use “table” in this article.

After adding the table, column headings are determined. Hence, when you hover over a cell down below, “table indicator” appears at the top right corner of the cell. You can choose which column to show here. If you want to add rows or columns to the table, you can right click on the fields on the left and right top of the table and click insert. By the way, number of rows is automatically determined by the data that is provided.

Design Table
Fig.6-Design Table

You can change the properties of each component on the page such as text color, background, position, border from the “Properties” on the right.

Properties for Features
Fig.7- Properties for Features

First, we add a text box to see the related order number on each page. We enter “sales order” to the input TextBox and right click to select “create placeholder” option. The “create placeholder” command allows us to show a metric that varies on each page. Placeholder window pops up to determine the parameter. We will continue from the “Value” section under the “General” section. To set “Value” as metric, click the “fx” next to it. In the pop-up window, select “Parameters” under “Category” to be able to select “SalesOrderNumber” under “Values”. Close the window by clicking “OK”.

Insert parameter to placeholder
Fig.8- Insert parameter to placeholder

STEP 5: RUN REPORT

After editing the design of the report, we run it by clicking “Run”. When the system runs, the builder expects a value from the parameter we created earlier to show the report page. We enter a value for the related parameter, and we get a page depending on the parameter we have entered. If there are parts you want to fix, you can go back to the design by clicking the “Design”.

Run Report
Fig.9-Run Report

After that, you can export the desired pages in .pdf format and/or print them.

See you later…


Good game well played.