A Deep Insight into Guest Access

Guest access allows users outside your organization to access your existing teams and channels and cooperate with the people in your organization.  

Guests are people like partners, suppliers, and consultants that are not workers or members of your organization. Anyone who is not a part of your organization can be added to Teams as a guest. Which means that anyone that has a business (I.e. an Azure AD account) or a consumer e-mail account (Outlook.com, Gmail.com etc.) can join your teams and channels with full access as a guest. All guests in Teams are covered by the same compliance and auditing protection with the rest of Microsoft 365 and can be managed securely within Azure AD 

Guest Access is tenant-level setting that is turned off by default on the Admin Center and when it is turned on everyone in your organization can add guests to Microsoft 356 Groups. Guest Access includes a lot of Microsoft 365 subscriptions without the need of an extra license 


There are two different options as Guest Access and External Access for communication with people outside your organization in Organization-wide Settings of Teams Admin Center . Guests access allows people outside your organization to reach your teams and channels while External Access allows communication by entering their e-mail into the Search Box in Teams. Most importantly, WHILE EXTERNAL ACCESS GIVES ACCESS PERMISSION TO AN ENTIRE DOMAIN, GUEST ACCESS GIVES ACCESS PERMISSION TO INDIVIDUALS!

You can see the guest access diagram below: 

Managing Guest Access 

Guest Access can be managed at 4 main levels: 

  1. Azure Active Directory
  2. Microsoft Teams
  3. Microsoft 365 Groups
  4. SharePoint Online & OneDrive for Business

Azure Active Directory

Microsoft Teams

Microsoft 365 Groups

https://docs.microsoft.com/en-us/microsoftteams/teams-dependencies

Ideal Office Environment During the “New Normal”

Workplaces have started to gradually go back to work life with the normalization process.  Terms that we didn’t use 3 months ago like social distance, face shield, 3 mm mask have come into our lives. We have to learn how to live with the new normal until we go back to the “normal” that we are used to. But how is our new normal going to be when we go back to our offices? Here are the precautions we have to take against Covid-19 that has a very high spreading rate: 

Inside the office:

  • We should disinfect our offices with a special team and equipment in a way that will provide 2 months of protection, 
  • Common use area should be reorganized in accordance with social distance rules; warnings and guidelines to inform people should be placed, 
  • Maintenance of air conditioners that we use for in-office air conditioning and ventilation should be carried out regularly. To fight Covid-19, disinfectants that provide long term protection should be applied to air conditioners and our equipment should be made safer, 
  • Masks and face shields should be provided to be used while coming to work and going from work, and at work. 
  • Hand sanitizers should be handed out to workers, 
  • Trash cans special for throwing used masks and gloves should be placed at the door entrances, 
  • It is a must to take and record every workers temperature while they are entering the office every day, 
  • Sitting arrangement of workers should be reorganized with regards to social distance rules, 
  • Offices, meeting rooms and restrooms, elevator, hand rails of the stairs, door handles, equipment like tools with screens that are frequently touched, computer keyboards, mouses and phones should be disinfected regularly. 

Services:

  • Capacity of all service vehicles should be redetermined with regards to social distance rules. 
  • Hand sanitizers and disposable masks should be provided in vehicles. 
  • To prevent possible overcrowdedness, service timetables should be rescheduled 

Keep in mind that we can prevent this pandemic by taking personal measures and keeping social distance.  We all have to take a responsibility in this new normal period. Just like authorities mention all the time, social distance and wearing masks are our most important weapons against the virus.  

Wish you a healthy day! 

Manage Microsoft Teams with PowerShell

Hello everybody, we all know that Microsoft Teams that has millions of active users daily has its Admin Center. So do we have the capabilities that we have on the admin center with Powershell that makes IT personnel’s job easier? The answer, for sure, is yes. 🙂 Even if we want to import the list of existing channels or make changes on policies, we can. I will be sharing Powershell cmtlets of the mostly used actions and some Powershell outputs. In addition to what I share, you can access Powershell cmtlet list published by Microsoft through this link. 

Connecting to Microsoft Teams with Powershell   

We need to connect to Teams via PS first to be able to run actions on Powershell just like in Exchange Online. But first we need to install the Microsoft Teams module on PS or if it is installed, we need to import it. I will accept it as not installed for you and share both versions below. 

1. Install-Module MicrosoftTeams

2.Import-Module MicrosoftTeams

3.$credentials=Get-Credential

4.Connect-MicrosoftTeams -Credential $credentials

Teams Login PSAs you can see in the image above, now we are connected to Microsoft Teams with Powershell 

Most Frequently Used Cmtlets for Microsoft Teams on Powershell 

Cmtlet To Find Out Current Team List :

Get-Team

Cmtlet to Find Out the List of users in Microsoft Team : Get-TeamUser -GroupId 2f162b0e-36d2-4e15-8ba3-ba229cecdccf

Cmtlet to See the Owners in the existing Team : Get-TeamUser -GroupId 2f162b0e-36d2-4e15-8ba3-ba229cecdccf -Role Owner

Teams

Cmtlet to Add a User to the Team on Microsoft Teams : Add-TeamUser -GroupId 31f1ff6c-d48c-4f8a-b2e1-abca7fd399df -User dmx@example.com

Cmtlet to Remove a User from the Team on Microsoft Teams : Remove-TeamUser -GroupId 31f1ff6c-d48c-4f8a-b2e1-abca7fd399df -User dmx@example.com

Cmtlet to Add a User to Private Channel on Microsoft Teams : Add-TeamChannelUser -GroupId 31f1ff6c-d48c-4f8a-b2e1-abca7fd399df -DisplayName “Engineering” -User dmx@example.com

Cmtlet to Remove a User from a Private Channel on Microsoft Teams :Remove-TeamChannelUser -GroupId 31f1ff6c-d48c-4f8a-b2e1-abca7fd399df -DisplayName “Engineering” -User dmx@example.com

Cmtlet to Remove a Team on Microsoft Teams : Remove-Team -GroupId 31f1ff6c-d48c-4f8a-b2e1-abca7fd399df


Even though the actions we run on Powershell save us time compared to GUI, the changes we make are going to take some time to be displayed on the system and always keep in mind that Powershell doesn’t afford mistakes. It is important to check the cmtlets that we haven’t tested or we are not sure 3 times before we run them.  

I hope that this was helpful for you. 

You can click here to read our article about the effects of severe paper usage in offices on deforestation.  

Active Directory Setup

First of all, hello everybody! In this article we will be talking about Active Directory Setup together. We need to go over the question of “What is Active Directory?” before we start the setup. It wouldn’t be wrong to briefly say that Active Directory is directory service. So what are the attributions of Active Directory? We can say manageability, delegation, replication, scalability, expandability, and management with group policy.

Before we go into the questions like “What is Active Directory? What is it used for? What are its FSMO roles?” I want to move on to the setup. Because all the attributions and roles we talk about here are an article topic on their own. First we can complete the Active Directory setup, Forest setup and AD Connect setup and then move onto the roles and their attributions. 

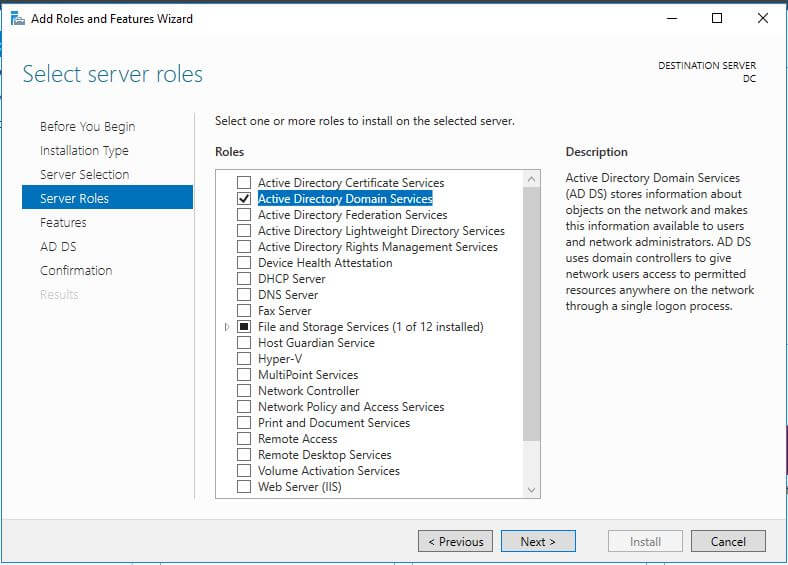
For setup we of course need a server. We activate the “Active Directory Domain Services” Role via“Add roles and features” on the server that we will set Active Directory up on.  

Active Directory

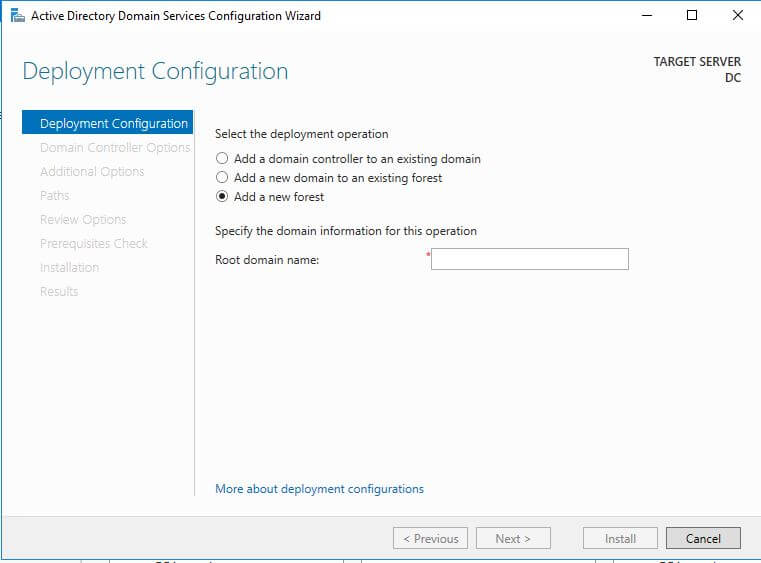
Once the said “Active Directory Domain Services” role is added, we will be required to complete the Active Directory setup.  We can access it through the part that is seen as a yellow flag on the Server Manager screen on top right. Since we will be setting up a new Active Directory in this part, we will continue with “Add a new forest”. We continue with next after entering the domain we want to use to the Root domain name section. 

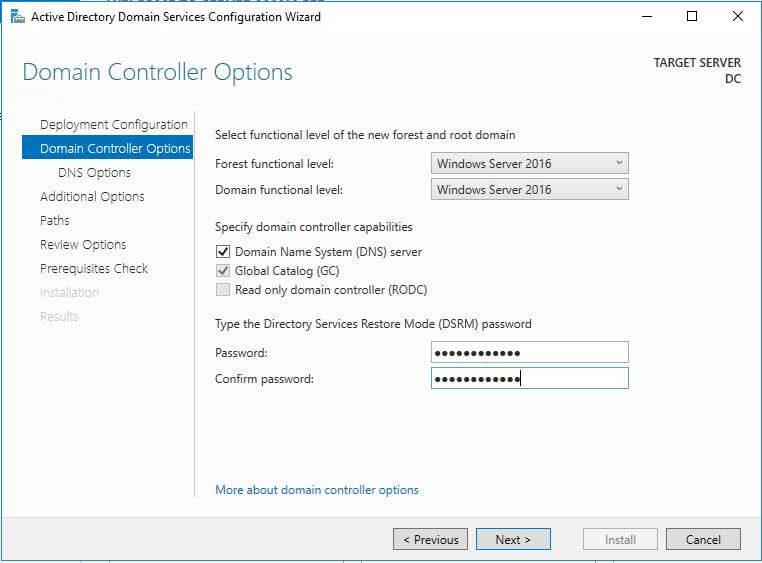
We are required to specify attributions of the dc that we will be setting up and enter a password after we enter the domain. The password we will be entering here is very important. If we were setting up AADC or RODC our steps would have been different. Since we are setting up Active Directory from zero here the settings can be kept as recommended.  

In the next screen we are welcomed by the area concerning DNS. I leave this area empty because I don’t want DC to provide DNS service for now. We will be coming back to DNS service setup and administration later.  We leave the parts that come after DNS service as default and complete the setup by clicking next-next-install. The server will automatically restart when the setup is complete. 

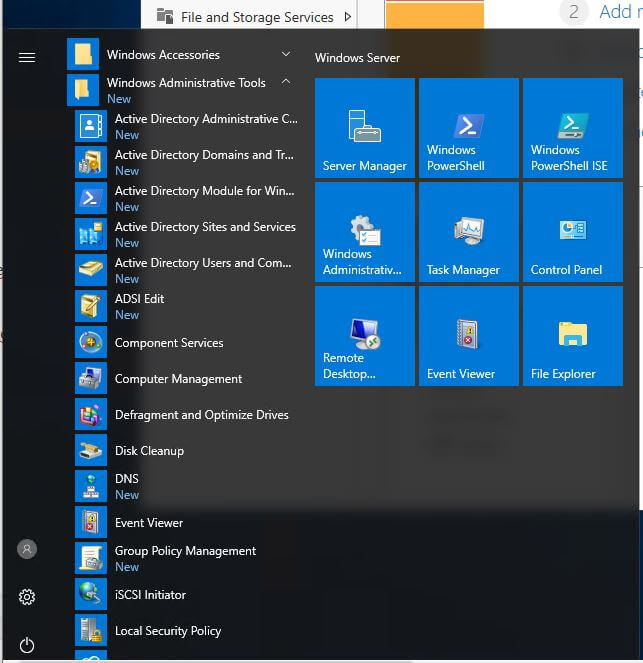
You can see that Active Directory Role on the “Tools” section which is located on top left and top right on Server Manager once the server is on again. To get to the AD you have set up, after clicking Windows button you can reach it through “Windows Administrative Tools”. 


To get to the Golden Rule with the Intranet Portal Velocity article click here