INSTALLING HYPER-V

In this article, we will learn how to install Hyper-V in Windows Server. We will add the Hyper-V role on ‘Server Manager‘ which starts by default after you install Windows Server, or we can start manually.

To add the role, select ‘Add roles and features’.

Then ‘Add Roles and Features Wizard’ appears. The ‘Destination Server’ on the right corner is our local server. This wizard tells us that is going to help us to install roles and features, after we read it, we can click the Next button.

We do not want to do Remote Desktop Services installation, we want to add a Hyper-V role just like the first option mention: “Configure a single server by adding roles, role services and features.” Select the first option and click Next.

After that, we wil select which server we want to install the role on. I have already chosen my destination server, so it is a selection from the server pool and the server appears on the table. So, I agree with the default options and click Next.

Now this is the page that we choose which roles we want to install on this server. We will select the Hyper-V option.

After that, wizard asks us if we want to add features that are required for Hyper-V. That is the remote server administration tools which includes the management tools named Hyper-V Module for PowerShell and the Hyper-V GUI (Graphical User Interface).

You can see PowerShell command screen below. You can manage your Hyper-V server with PowerShell more sophisticated than GUI.

They are very useful tools, so I want to add features. And after I click that, I see that Hyper-V box is checked. Then wizard asks us that if we want to install more features on this server. Due to choosing the additional management tools, the Remote Server Administration Tools are already checked.

IMPORTANT NOTE: Virtual Server

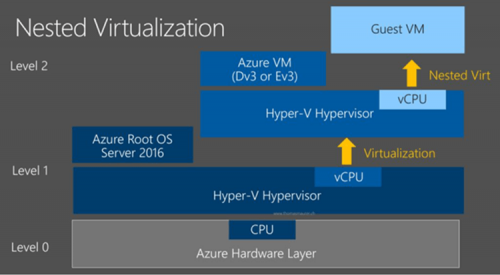
If your Server is virtual, you cannot install the additional management tools, then Hyper-V cannot be checked. In that case you should write a PowerShell command to allow nested virtualization which you can do it like below.

After we see the ‘Remote Server Administration Tools’ box is checked, we are clicking Next. Then some useful information appears, after reading, click Next.


Now, we are asked about creating virtual switches which allow our virtual machines to communicate with other computers out on the network. Creating a virtual switch now is recommended by the wizard to provide network connection to the virtual machines. And it mentions that one virtual switch will be created for each network adapter that we select. We can remove it or add new ones later by using Virtual Switch Manager. For now, to create my first virtual switch, I select my network adapter and then click Next.

Hyper-V provides us to live migration which allows running virtual machines to move from one host to another with no downtime. To allow our server send and receive live migrations, we are clicking the checkbox. If your Hyper-V server will be stand-alone, you can leave the box unchecked. Because of I want to focus on the installation of Hyper-V, I will continue with the default option and we will talk about the authentication protocols later.

Then, the wizard wants us to choose the storage of our virtual machine and its configuration files. By default, virtual hard disks are stored in C:UsersPublicDocumentsHyper-VVirtual Hard Disks and the configuration files are stored in C:ProgramDataMicrosoftWindowsHyper-V but you can change the storage place. I want to continue with the default option then I click next.

After that, the confirmation screen appears like below.

Here we can see that Hyper-V is going to be installed with its additional administration tools which we selected. Restarting is necessary, so I will check the box for automatic restart after installing. But you can leave the checkbox unchecked and restart your machine later.

That is all for installation, I hope it would help you. See you on another article.

Azure NestedVM

Merhabalar, bu makale Azure’da NestedVM özelliğini test etmek için lab ortamı kuracağım. Azure’ da öncelikle sanal makine açmamız gerekiyor. NestedVM özelliğini kullanmak için birkaç dikkat etmemiz gereken bazı detaylar mevcuttur:

  • Açtığımız sanal makinenin boyutu (size) Dv3 serisi ve Ev3 serisi olmalıdır.
  • Açtığımız makinelerin bölgesine (region) dikkat etmemiz gerekiyor. Dv3 serisi ve Ev3 serisi makineler her bölgede (region) açılmamaktadır.
  • Dv3 ve Ev3 serisi makineler hangi bölgede açıldığını aşağıdaki makaleden bulabilirsiniz.
  • Makalenin içerisinde detaylı bilgi mevcut olucaktır.(https://azure.microsoft.com/en-us/regions/services/)

İlk olarak Azure’da bir sanal makine oluşturalım.

Sol alandan “Virtual Machine ” alanına tıklayalım. Ardından sol üst köşedeki “Add” butonuna tıklayalım.

Açılan ekrandan Azure’un bize sunduğu hazır image’lerin başlıklarını görüntülüyor olacağız. Biz Windows Server özellikli bir makine kuracağımız için “Windows Server”a tıkladıktan sonra sağda çıkan ekrandan kuracağımız sanal makinenin işletim sistemini seçiyor olacağız. Ben Windows Server 2016 Datacenter’ı seçerek devam edeceğim.

Resimde de göreceğiniz gibi kuracağımız sanal makineye bağlanacak olan kullanıcın adını, şifresini , Azure da görüntüleyeceğimiz adını, subscription’ını, Resource group’unu ve location’ını belirtiyor olacağız.

Ardından gelecek olan ekrandan makinenin boyutunu(size) belirteceğiz.

Makalenin ilk bölümünde de belirttiğim gibi seçmiş olduğumuz bölgeye göre sanal makine boyutlarını görüyor olacağız. Bize 3 adet önerilen makine boyutu sunacak. Eğer bizim kullanacak olduğumuz altyapı daha fazla kaynak harcayacaksa sağ üstte bulunan ” View All “a tıkladıktan sonra tüm boyutları görüyor olacağız.

Resimde de göreceğiniz gibi açılan ekranda ise makineyi bir sanal network’e dahil edebiliriz,oluşturduğumuz sanal network subnet ekleyebilir hatta network’ü 2 subnet’e ayırabiliriz. Makineye bir publıc ip ve network security group da ekleyebiliriz. Network security group’u ekleyerek makine üzerinde açılması ya da kapatılması gereken portları yönetiyor olacağız.

“Purchase(satın alma)” butonuna tıklayarak makinenin kurulumunu başlatmış olacağız.

Ardından Azure’da kurduğumuz makineye kullanıcı adı ve şifresi ile makineye uzaktan bağlantı gerçekleştirelim. NestedVM özelliğini kullanmak için Hyper-V rolünü konumlandırmamız gerekiyor. “Add Roles and Features”e tıklayalım.

Ardından kurmak istediğimiz Rolü ya da özelliği hangi makineye kurmak istediğimizi belirtip “Next” butonuna tıklayalım.

Ekleyeceğimiz olacağımız Hyper-V rolünü seçip “Next” tuşuna basalım.Ardından “Features” ekranına geldiğimizde bir özellik eklemeyeceğimizden dolayı “Next” diyelim.

“Virtual Switches” Alanına geldiğimizde bir network adaptör seçmemizi isteyecek. Biz seçmeden devam edeceğiz. Çünkü sanal içinde sanal oluşturacağımız için Hyper-V içerisindeki sanal makine ya da makineler internete çıkmayacak. Azure’ da oluşturduğumuz makinede “NAT” kuralı oluşturarak Hyper-V üzerinde olan makineleri internete çıkaracağız.

Hyper-V rolünün kurulumu tamamlandığında makineyi yeniden başlatmamız gerekecek.

“Virtual Switch Manager” alanına tıklayarak bir adet sanal switch oluşturalım. Sırasıyla;

  1. Sanal switch olarak “Internal”ı seçelim
  2. Create Virtual Switch’e tıkladıktan sonra ok tuşuna tıklayalım.

Oluşturmuş olduğum “Virtual Switch”i Azure’da açmış olduğum makinede de görüntülüyor olacağız.Azure da olan makinin network ayarlarına gelerek, eklemiş olduğumuz “Virtual Switch”in IPv4 ayarlarına girelim.

Sonrasında IPv4 ayarlarını konfigüre edelim. İstediğiniz bir network aralığından bir ip adresi tanımlayalım. Ben 192.168.0.0/24 network’ünü tercih ettim. IP adresini verdikten sonra Azure’daki makine de PowerShell’i Administrator olarak çalıştıralım.

Powershell üzerinden bir NAT kuralı yazalım. Internal IP adresi kısmına ise Azure’daki makinenin “Sanal Switch”ine verdiğimiz IP bloğunu yazalım.

New-NetNat
–Name
NVMNat
–InternalIPInterfaceAddressPrefix
192.168.0.0/24

Ardından Hyper-V ortamına dönüyoruz. Hyper-V de oluşturduğumuz makinelere oluşlturmuş olduğumuz Internal Swith’i tanımlıyorum. Sırasıyla;

  1. Sanal makineye sağ tıklayıp “Settings”
  2. Virtual Switch’den oluşturmuş olduğumuz Internal Switch’i seçelim.
  3. Ok tuşuna basarak ekranı kapatalım.

Hyper-V de oluşturduğumuz sanal makineye bağlanarak. Network ayarlarına gelelim sonrasında oluşturduğumuz NAT’ın network’ünden bir IP adresi verelim. Burada dikkat etmmiz gereken unsur Gateway olarak Azure’daki makinenin IP adresini Gateway olarak vermek olacaktır.

Yapmış olduğumuz işlemlerin ardından ,Hyper-V de olan sanal makine üzerinden internete çıkıyor ve kullanılıyor olacaktır.