Operations Management Suite ile Veeam Backup Monitoring

OMS’in Veeam Backup çözümünü sizlerle paylaşmak isterim. Veeam Backup yazılımı ile aldığınız image ve yedeklerinizi Operations Management Suite ile monitor edebilirsiniz. OMS dashboard’una eklediğiniz Veeam çözümü sayesinde yedeklerinizin son durumunu görebilirsiniz. Aynı zamanda Veaam agent for windows ve linux çözümlerinde de kullanabilirsiniz.

  • Veeam Backup & Replication
  • Veeam Agent for Windows
  • Veeam Agent for Linux


Bunun birlikte çözümün içerisinde CPU, Bellek ve Disk ile ilgili Veeam Backup & Replication performans görünümünü de sizlere sunar.


Hizmeti test etmek için Veeam agent backup yazılımı kullanabilirsiniz.

Çözüm GitHub’da mevcuttur:  https://github.com/InsideTechnologies/OMS-Veeam

Teşekkürler.

Office 365 Auto Expanding Archive Nedir? Nasıl Etkinleştirilir?

Office 365 arşiv posta kutuları, kullanıcılara ek olarak mail depolama alanı sunmaktadır. Örn; Bir kullanıcının arşiv posta kutusunu etkinleştirildikten sonra, 100 GB’a kadar ek depolama alanı kullanılabilir. 100 GB depolama alanı sınırına ulaşıldığında, kullanıcı bir arşiv posta kutusu için ek depolama alanı talep etmek üzere Microsoft ile bağlantı kurması gerekiyordu. Artık süreçimiz bu şekilde ilerlememektedir.

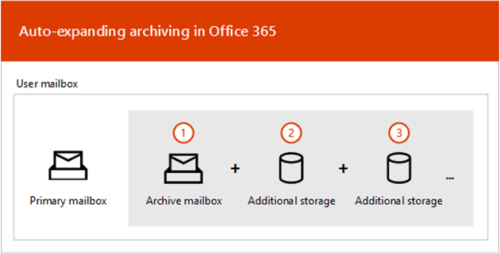
 Office 365’deki yeni sınırsız arşivleme özelliği (otomatik genişleyen arşivleme) ile birlikte kullanıcıların arşiv posta kutularına sınırsız bir miktarda saklama alanı sunmaktadır.Arşiv posta kutusundaki depolama kotasının sınırına erişildiğinde, Office 365 otomatik olarak arşivin boyutunu arttırır; bu da kullanıcıların posta kutusu depolama alanı dolmaz ve yöneticiler arşiv posta kutuları için ek depolama alanı istemek zorunda kalmazlar.


  1. Arşivleme, bir kullanıcı posta kutusu veya paylaşılan bir posta kutusu için aktif edilebilir. 100 GB depolama alanına sahip bir arşiv posta kutusu oluşturulur.
  2. Bir yönetici, posta kutusu için otomatik olarak genişleyen arşivlemeyi etkinleştirir. Ardından, arşiv posta kutusu (Kurtarılabilir Öğeler klasörü dahil) 90 GB’a ulaştığında otomatik olarak genişleyen bir arşiv haline dönüştürülür ve Office 365 arşiv için depolama alanı ekler. Ek depolama alanının hazırlanması 30 gün kadar sürebilir.
  3. Office 365, gerektiğinde otomatik olarak arşive daha fazla depolama alanı ekler.

Otomatik olarak genişletilmiş bir arşivdeki öğelere erişmek için Outlook gereksinimleri

Otomatik olarak genişletilmiş bir arşivde saklanan iletilere erişmek için kullanıcıların aşağıdaki Outlook istemcilerinden birini kullanmaları gerekir:

  • Windows için Outlook 2016
  • Web’de Outlook
  • Mac için Outlook 2016

Not:

Outlook 2013 kullanıcıları, yalnızca arşiv kutusunda saklanan öğelere erişebilir. Ek bir arşiv deposuna taşınan öğelere erişemezler.

Not: Otomatik genişletme arşivlemesi ayrıca paylaşılan posta kutularını da destekler. Paylaşılan bir posta kutusunun arşivini etkinleştirmek için, Exchange Online Arşiv 2 lisansına sahip bir Exchange Online Plan 2 lisansı veya Exchange Online Plan 1 lisansı gereklidir.

Auto-Expanding Online Archive özelliği

Tüm firma içinde Auto-Expanding Online Archive özelliğini etkinleştirmek için ;

  1. Set-OrganizationConfig -AutoExpandingArchive

Belirli kullanıcılar için Auto-Expanding Online Archive özelliğini etkinleştirmek için ;

  1. Enable-Mailbox -AutoExpandingArchive

Kaynak: https://support.office.com/en-us/article/enable-unlimited-archiving-in-office-365-admin-help-e2a789f2-9962-4960-9fd4-a00aa063559e

Azure Advanced Threat Protection (Azure ATP) Nedir? Part-1

Azure Advanced Threat Protection (ATP), ağlarınızdaki güvenlik olaylarını tespit etmenize ve araştırmanıza yardımcı olan, bulut tabanlı bir güvenlik çözümüdür. Aynı zamanda siber saldırılarına ve içeriden dışarıya bilgi sızdırma gibi tehditlere karşı korumanıza yardımcı olan bir güvenlik çözümüdür.

Bununla birlikte Azure ATP, kimlik doğrulama, yetkilendirme ve bilgi toplamak için birden fazla protokolün (Kerberos, DNS, RPC, NTLM ve diğerleri gibi) ağ trafiğini izlemektedir. Ayrıca kurumdaki kullanıcı ve servislerin davranışlarını öğrenip ve bu davranışlara ilişkin bir davranış profili oluşturarak, güvenlik tespitinde bulunur. Yapılan tespitler sonucunda ortama ayrıkı bir süreç fark edildiğinde Azure ATP portalında bu süreçler görüntülenir.

Azure ATP hangi tehditlere karşı bir koruma sağlıyor;

  • Şüpheli kullanıcı ve cihaz etkinliğini öğrenme akabinde analiz etme
  • Bulut ve kurum içi ortamlardaki tehditleri algılama
  • Active Directory’de depolanan kullanıcı kimlik bilgilerini koruma ve analiz etme
  • Windows Defender Advanced Threat Protection ile entegrasyon sağlayarak araştırma ve analiz seviyesini arttırma


Not: Azure ATP, hem bulut hem de şirket içi verilerinden faydalanıp, hatalı süreçleri azaltarak ve Windows Defender ATP entegrasyonuyla uçtan uca bir araştırma deneyimi sunarak, gelişmiş kötü niyetli saldırıları tespit edebilir.
Azure ATP aşağıdaki servislerle de ilişkilendirilebilinir.

  • SIEM Integration
  • Windows Event Forwarding (WEF)
  • Directly from the Windows Event Collector (for the sensor)
  • RADIUS Accounting from VPNs

Azure ATP, üç ana saldırı türlerini kontrol eder, bu saldırı türleri sırasıyla, Kötü amaçlı saldırılar – Anormal davranışlar – Güvenlik sorunları ve Riskler.

Bilinen belirli başlı saldırı türleri aşağıdaki gibidir;

  • Pass-the-Ticket (PtT)
  • Pass-the-Hash (PtH)
  • Overpass-the-Hash
  • Forged PAC (MS14-068)
  • Golden Ticket
  • Malicious replication
  • Directory Service Enumeration
  • SMB Session Enumeration
  • DNS Reconnaissance
  • Horizontal Brute Force
  • Vertical Brute Force
  • Skeleton Key
  • Unusual Protocol
  • Encryption Downgrade
  • Remote execution
  • Malicious Service Creation

Bu saldırı türlerine istinaden süpheli bir etkinlik olduğunda, Azure ATP portalında süreci nasıl göreceğimizi aşağıdaki ekran görüntüsünden inceleyebilirsiniz. Örneğin, ortamınızdaki bir kullanıcı ikinci bir kullanıcıya Pass-the-Ticket saldırı girişiminde bulunduğunda Azure ATP portalında bu saldırının nasıl gerçekleştiğini ve nasıl bir atak uygulandığını görebilirsiniz.


*Not: Enterprise Mobility + Security’nin E5 lisansına sahip kullanıcılar Azure Advanced Threat Protection (Azure ATP) ürünü kullanabilir.

Azure Availability Sets

When you started architecting infrastructure using Azure platform, you should consider a couple of things such as VM Network, Availability Sets, Regional and High Availibility Set, Load Balancer … etc. Before to plan your VM in Azure.

In this article, you can get answer for titles and questions in below:

Types of Failure in Azure

What is Availability Set ?

What is Fault Domain and Update Domain ?

How to create Availability Set ?

Your virtual machine can occur three types of failures in Azure Environment. These are :

  • Unplanned Maintance : These interruptions happen when hardware or any platform components related. physical machines in the underlying infrastructure about to fail. For example; Azure can migrate your affected virtual machine to a new one.
  • Planned Maintance : These interruptions happen when planned maintance or periodic updates made by Microsfot or require rebooting VMs on the Azure infrastructure.
  • Unexpected Downtime: : Rarely occurs on the Azure Infrastructure.

Unplanned maintances down time usually longer than planned maintances. After both of unplanned maintance and planned maintance updates your virtual machines will be rebooted. And users cannot access applications during that time.

Availability Set

Availability sets offer some protection against unplanned maintenance for your Azure Resource Manager assets. When you placed your VMs in an Availability Set, they are automatically isolated across multiple hardware nodes in a cluster.
That’s mean azure will place your VMs that are created within the availability set on separate physical servers, compute racks, storage units, and network switches.
Even hardware or any components failure happens in Azure after placed your virtual machine across multiple hardware nodes, only a sub-set of your VMs are affected. Your overall solution is safe in working status. Availability set ensures redundancy by spreading over multiple fault domains and update domains for VMs. If you want to leverage 99.95% SLA from Microsoft, you should place your VMs inside Availability Set except your virtual machines which have premium storage.

When placed virtual machines in an availability set, that is provides the virtual machines are spread over three fault domains and five update domains. But update domains can be increased to up to 20. For example, If you placed ten virtual machine in an availability set, they will spread over three fault domains. So If one of them failed, you will only lose 1/3 of virtual machines. Update domains are used during planned maintenance operations on the Azure Fabric. Microsoft doesn’t patch your VMs, but they have to update operating system that the hypervisors are running. Because of this, it will only take down one update domain at a time during these planned maintenance.

Update Domains vs. Fault Domain

VMs are periodically updated by Windows Azure. Updating a virtual machine, that machine reboots. Update Domains prevent virtual machines from updating same time related an application. When placed one more virtual machine in Availability Set, these virtual machines are placed different update domains by Windows Azure.

Fault Domains define unplanned maintenance that a group of WMs share common a hardware or physical failure such as a disk, power, network card … etc. same underlying infrastructure. You can think fault domains as a compute rack. This mean if any failure happens in shared system, all WMs will influenced from same underlying infrastructure.

The diagram showing us difference between fault domain and update domain below :

Picure 1: Difference Between Fault Domain and Update Domain ( quoted from Technet )

Creating An Availability Set

You have three options to create an Availability Set :

  • Create an availability set and VM at the same time in Azure Portal.
  • Create an availability set and use it while creating a new VM in Azure Portal.
  • Create an availability set with Powershell.


You can create an availability set when you create a new VM on Azure Portal. While creating new virtual machine also you can add your availability set in third step in creating vm steps like image in the below :


You should configure your fault domains size and update domains size when you create new availability set like image in the blow :


I have three fault domains if I add fourth VM, it will be placed in the same Fault Domains as the first VM by Azure. Also Azure distributed all VMs accross different Update Domains. One of importing things about availability sets, you can placed up to 100 VMs into each availability set.


Significiant Points Of Availability Sets

You should set one more VMs in same Availability Set for redundancy. So you will have %99.95 SLA.

You need to create virtual machines in the same resource group as the availability set.

You should placed application tiers in different Availability Sets. But you should placed servers which providing same function in same Availability Sets.

You can assign virtual machines to the availability set only during the creation of virtual machines. One virtual machine can only be in one availability set.

You should use Availability Set with load balancing where it can be used. Also Workload traffic should distribute between VMs in Availability Set from load balancing.

What is the Azure AD Pass-through Authentication?

We know that security is very important for IT administrators. In this article, you can find which ADConnect sync tool configuration is the best. I am going to explain what Azure AD Pass-through and Seamless Single Sign-On (SSO) does.

Normally, when you configure ADConnect with “Azure AD Password Hash Synchronization” feature, one copy of on-premise AD users’ passwords (hash values) always send to internet and store in cloud. Beyond this, authentication also happens in cloud.

Azure AD Password Hash Synchronization Process

Some companies don’t permit organizations to send users’ password even in hashed form because of their security and compliance policies. Nowadays security rules are very strict because of GDPR. Azure AD Pass-through authentication allows you to keep passwords on-premise and validate users’ passwords directly against your on-premises AD. Normally, if you want to authenticate users through on-premise you had to install ADFS server to on-premise side. To configure ADFS server in high availability mode you need minimum 4 servers (2 ADFS & 2 Proxy) + OS license + hardware + operational effort to keep the system running. That is why Pass-through authentication, where we don’t use ADFS servers, is a better solution.

How does Pass-through authentication work?

In lay terms when a user tries to

sign-in Office 365 and Azure with on-premises AD password, Microsoft servers encrypt the passwords using a public key and then a user-name and encrypted password wait for validation. Pass-through agent retrieves the user name and encrypted password by making outbound call from your network. Pass-through agent uses https port to receive information. You don’t need to open inbound ports on your firewall.

The agent decrypts the password using a private key that only the agent has access to and tries to validate it against an on-premise active directory. The active directory returns “success” or “failure” result to the agent and the agent forwards it up to Azure AD.

As a result, Azure AD decides to sign-in the service or not.

How to configure Pass-through authentication on ADConnect?

When you run ADConnect setup you should select the sign-on method as “Pass-through authentication” on the interface.

In the second option you can also select “enable single sign-on”. What is the benefit of SSO (Single sign-on)? In fact when you enable SSO in ADConnect , if users’ computers are “domain joined” and already signed-in ad account on domain network, they don’t need to write passwords on sign-in page while they are signing in Azure and Office 365 services. The feature providing users with automatic sign-in Azure AD.

If you have enabled SSO on ADConnect, you need to add Azure AD URL to the users’ Intranet zone settings by using GPO in Active Directory.

1-Browse to User Configuration > Administrative Templates > Windows Components > Internet Explorer > Internet Control Panel > Security Page. Then select “Site to Zone Assignment List”.

Enable the policy, and then enter the following values in the dialog box:

Value name: https://autologon.microsoftazuread-sso.com

Value (Data): 1 indicates the Intranet zone.

It should be as it shown below;

2- Browse to User Configuration > Administrative Templates > Windows Components > Internet Explorer > Internet Control Panel > Security Page > Intranet Zone. Then select “Allow updates to status bar via script”.

Enable the policy settings as it shown below.

Notes:

-If you use firewall or proxy, you have to
allow
*.msappproxy.net URLs over port 443 ,

-Enabling SSO services can take up to 30 minutes ,

Edge browser support is not available.;

-If you disable or re-enable the feature, users will not be able to get single sign-on experience until their cached Kerberos tickets, which are generally valid for 10 hours, have expired.

The feature is free, so you don’t need the paid edition of Azure AD.

To verify the feature:

https://aad.portal.azure.com/

Select Azure Active Directory in the left pane.

Select Azure AD Connect.