Interview with Our CEO Ahmet Toprakçı / ICT Medıa

PEAKUP CEO Ahmet TOPRAKÇI:

“We see that the technology priorities of all sectors, especially retail, health, production, and logistics, are gathered in cloud technologies, artificial intelligence, internet of things and robotic process automation. It is foreseen that this will leave 1 job out of 5 out of the picture, but new job descriptions will balance this employment gap. “

PEAKUP CEO Ahmet Toprakçı said that in the first half of 2019, financial uncertainty and exchange rate fluctuations in the economic markets were intensely felt. Stating that the sector is cautious about new investments for this reason, he added: “In this economic fluctuation, institutions focused on productivity in the products they use and excellence in business processes rather than new investments. This perspective has created a movement area for domestic software companies that develop products. In such uncertain times, ‘Pay as you use’ monthly options play an important role in purchasing decisions.” He stated that for many years the sales policy of the companies have been like this and continued: “Many firms are in recession in the industry or getting smaller, we completed the year with a growth of over 40 per cent in terms of net financial performance. We have barked on a global journey with our products such as PassGate and Sign & Go, Velocity that have been patented in Turkey and abroad. Brand registration titles abroad, especially the United States of America and England, were among our important goals this year. We carried out modest sales actions in countries such as the Emirates. In addition, this year we were among the top 50 fastest growing technology companies in the Deloitte Technology Fast50 research. Our biggest goal is to continue this momentum in 2020 with our R&D activities.[/mk_fancy_title][mk_fancy_title color=”#000000″ size=”20″ font_family=”none”]Toprakçı, said about the it developments awaiting Turkey and the world in 2020: “As the importance of technology unites increase day by day, we can talk about the need of the tasks of CIOs changing considering the managements being aware of this situation. We expect the continuous and sustainable IT performance adopted by CIOs in Turkey, which is at the top of the list with 64 percent, and the following operational efficiency topics to be replaced by improving customer experience, cyber security and smart systems design in the coming periods.

We see that the technology priorities of all sectors, especially retail, health, production, and logistics, are gathered in cloud technologies, artificial intelligence, internet of things and robotic process automation. It is foreseen that this will leave 1 job out of 5 out of the picture, but new job descriptions will balance this employment gap. Ahmet Toprakçı stated that the most important investment areas as an institution are human resources. For this reason, he stated that they will continue to invest in human resources in 2020 and continued: “The most important starting point for quality global products is the right human resource; therefore, we will continue to invest in our employees and our organizational culture. Of course, our investments will include R&D activities, channel structure for international marker and digital marketing. The R&D activities focus on software technologies, machine learning, business analytics, microprocessor circuits and multiple hardware components. The budget we spare for these areas is around 17 percent of our total turnover. We see an increase of 15-20 percent in our workforce planning next year.

We will be making this increase mostly on the technical resources side. Business intelligence, IoT, Mobile and Web-based Software departments will be the main areas in which we will be recruiting. ”

Stating that digitalization is a never-ending process, Toprakçı pointed out that it is wrong for institutions to perceive digitalization as transformation. Emphasizing that an approach such as “we will go digital and it will be over” would be wrong for institutions and organizations, Toprakçı continued his statements as:

“Therefore, companies should first adopt this perspective. When we look at the history of many institutions, we see that there are stillborn projects or wasted money. Instead of buying random software, it is very important to listen to the demands and needs of employees and customers and to move forward by choosing appropriate solutions. Because we see the people who work in the institution as the ones who start digitalization.

In addition, the perception that digitalization is only for institutions is very wrong. Digitalization is a concept that affects both the lives of individuals and the lives of institutions. Individuals and institutions have to keep up with digitalization in the face of these developing technologies. Companies that are afraid of digitalization and cannot give up traditional company understanding are gradually disappearing in this competitive market. When we look at the new generation, we see that they are smart, talented and have higher technology adaptation processes. While their expectations are different, so are their perceptions. For this reason, we have to offer smart systems that will make life easier. Long story short, digitalization is a constant journey and it must be accepted that this journey will not end. “

XLOOKUP: THE GAME CHANGER

THE XLOOKUP FUNCTION

Last you on August 29, two new important functions were announced: XLOOKUP and XMATCH. In this article, we will be talking about what the XLOOKUP function is, when and how to use it. When you start using this function, you will just not be able to let it go.

I want to mention a few things about VLOOKUP first: as you know, the VLOOKUP function was indispensable for many users, even those who didn’t know wanted to learn it. And even in the 7 Most Used Excel Functions presentation Microsoft prepared, the first function is VLOOKUP.

As dispensable as it is for some users, it was useless for some others. Because VLOOKUP required some conditions to run and the function returned us the first match it found. On top of that, it decreased Excel’s performance since it could cause unnecessary calculation in the stated table range. It is the function for those who have unique data, but in a table with duplicate data -i.e. recurring data-  it wasn’t very useful since it didn’t give us all the records. Of course, there are some methods to list all the records, but you either had to solve the issue by using auxiliary columns or list all the records with the Array Formula.

LONG LIVE THE DYNAMIC FUNCTIONS!

Fortunately, in September 25, 2018 the new dynamic array functions were announced and we got to breathe a sigh of relief. After waiting for such a long time, now the new function will be able to return a whole array instead of returning just one single result.

Instead of writing an Array Formula that was known as “MULTIPLE VLOOKUP” by everyone, we can list all the records of a data with the FILTER function easily. *We will be talking about the details in its own article. (Here are the article links of Microsoft, you can take a look.)


With the release of the XLOOKUP function, old functions like VLOOKUP and HLOOKUP are not needed anymore. And also, as they get into more detail and design what they can do, it seems like we will not need these functions:
VLOOKUP > HLOOKUP > INDEX > MATCH > OFFSET > IFERROR(VLOOKUP).. what else do you want?!👏🏻


Just one formula can:

  • Look up both horizontally and vertically,
  • Bring the first or last record, find the data considering the wildcard characters,
  • Bring the data we want on the left without a condition like the lookup_value has to be in the first column of the table_array in the VLOOKUP function,
  • Bring approximate vales in  certain range like the TRUE option in the range_lookup argument,
  • Allow you to say write this if no data is found without the need to use the IFERROR formula,
  • Find the most approximate lowest or highest value if there is no exact match.
  • And it offers all these in a way more faster way than before.

Enough with all the details, let’s see what this function does. 👍🏻


THE XLOOKUP FUNCTION SYNTAX


=XLOOKUP(lookup_valuelookup_arrayreturn_array, [if_not_found], [match_mode], [search_mode]

There are 6 arguments in this function.
The first 3 are required, the last 3 are optional.

Now let’s take a look at what these arguments mean, i.e. what the function wants from us and what we will give it.

Argument

Description
lookup_value

Required

The lookup value
lookup_array

Required

The array or range to search
return_array

Required

The array or range to return
[if_not_found]

Optional

Where a valid match is not found, return the [if_not_found] text you supply.

If a valid match is not found, and [if_not_found] is missing, #N/A will be returned.

[match_mode]

Optional

Specify the match type:

0 – Exact match. If none found, return #N/A. This is the default.

-1 – Exact match. If none found, return the next smaller item.

1 – Exact match. If none found, return the next larger item.

2 – A wildcard match where *, ?, and ~ have special meaning.

[search_mode]

Optional

Specify the search mode to use:

1 – Perform a search starting at the first item. This is the default.

-1 – Perform a reverse search starting at the last item.

2 – Perform a binary search that relies on lookup_array being sorted in ascending order. If not sorted, invalid results will be returned.

-2 – Perform a binary search that relies on lookup_array being sorted in descending order. If not sorted, invalid results will be returned.


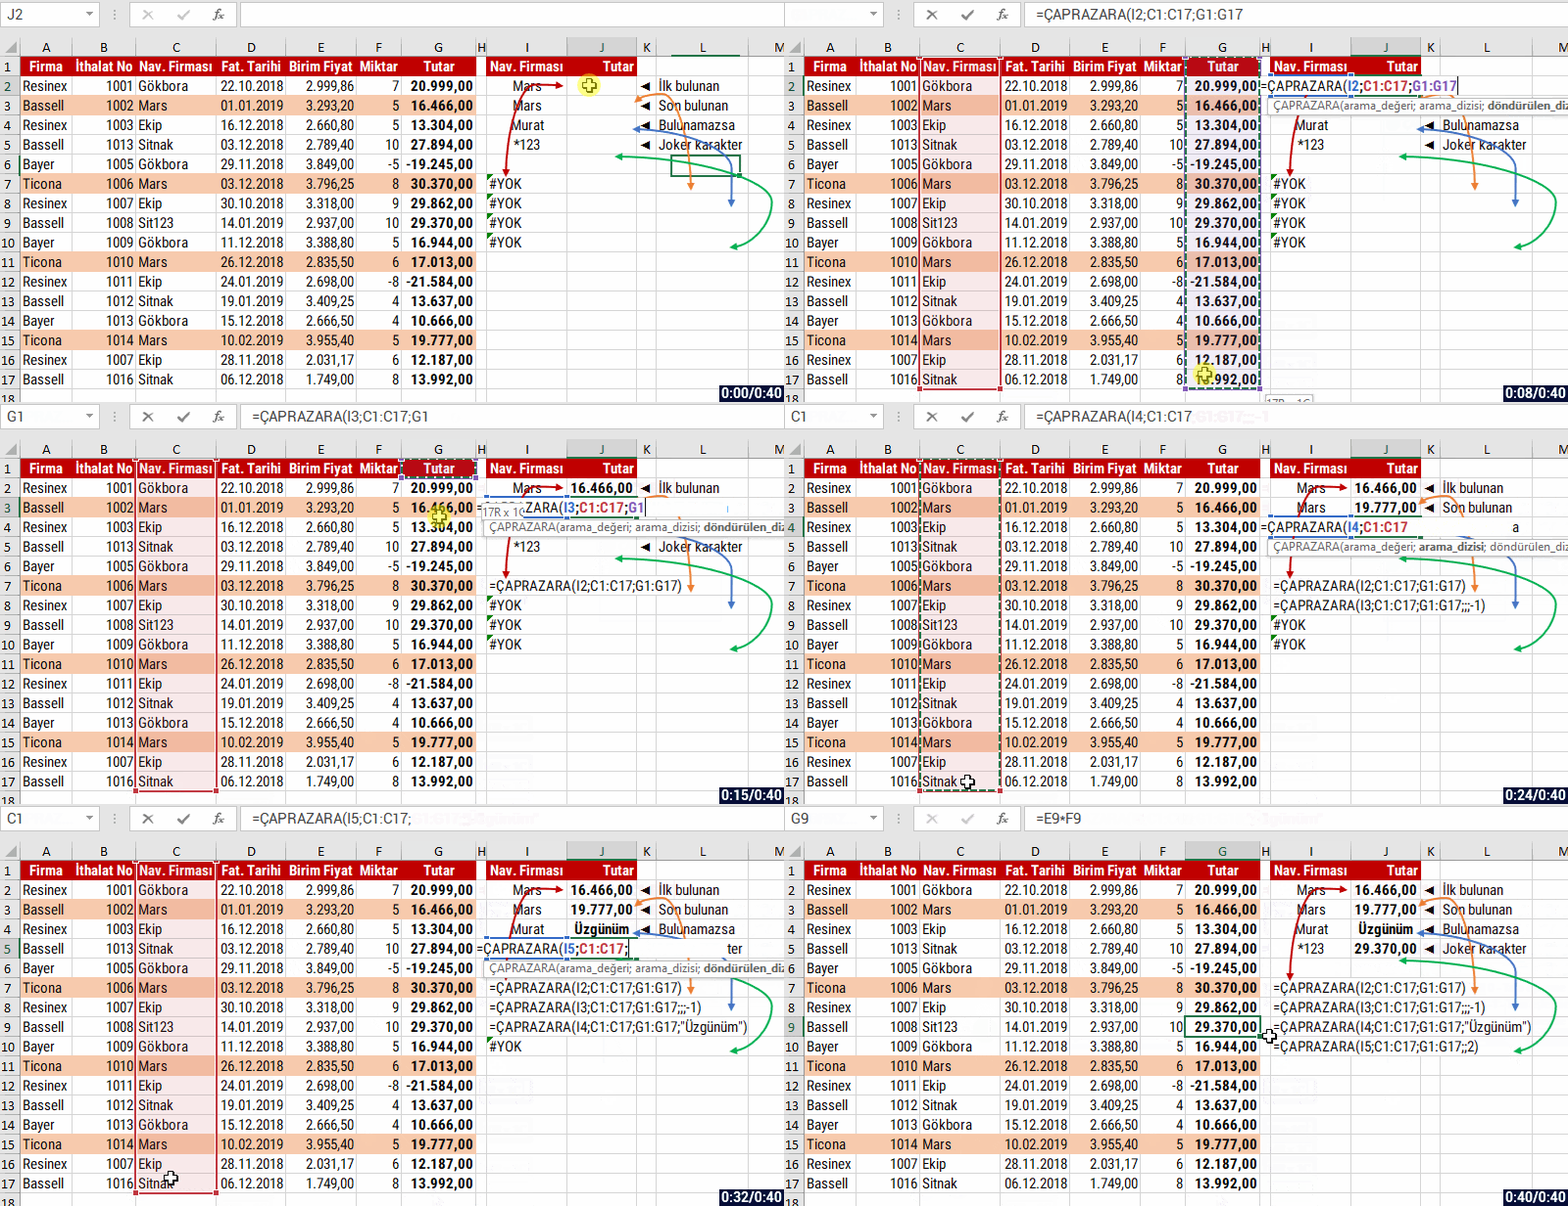
In the few examples below, you can see what you need to write when there is the first record and last record is not found of the looked up data and how to use it when looking up with wildcard characters.


Let’s have an example of the Match Mode argument with exact match or highest and lowest options.


So far we got the data from the column we wanted by looking up in the column just like in VLOOKUP. Now, let’s use this function like HLOOKUP.


Now, let’s have a 2 dimension look up. Let’s match based on both the Product name and Month, and find the data in the intersecting cell. Users who know how to use the INDEX and MATCH functions usually do the matching we are about to the with the INDEX + MATCH + MATCH formulas. Now, let’s see how it is done with XLOOKUP.


Lastly, let’s compare the VLOOKUP and XLOOKUP function while finding the same data. At first, you will see that you get the same result, but when we add or delete a column, the VLOOKUP function will give us an incorrect result. But the result will not change in the XLOOKUP function. The reason is this: Since we write the column number that we want to get manually in VLOOKUP, the col_index_num stays stable but the column of the data changes and it returns an incorrect result. And in XLOOKUP, it doesn’t matter how many columns you add or delete, since we stated the column we want, that column changes dynamically and returns the correct result without producing any errors.


You can see the result in this example.

I hope this was helpful..  👍🏻
You can share this post and help many others get informed as well. Keep in mind that information gets more valuable when it is shared.

Excel Shortcuts 2

It is possible for you to get to your destination the fastest way when you use shortcuts. But when you get support from the Navigation, it is probable that you will taking the fastest and traffic-free way.

We, as Office lecturers, offer you the most special and functional Excel shortcuts below for you to get to the result you want faster and in an optimum way.


Format Cells

Ctrl + 1 Shortcut :
Opens the Format Cells window.
It is the window that allows you to execute formatting actions like font type, cell color, cell borders in detail.

Repeat the Last Command

Ctrl + Y Shortcut:
As often the Undo (Ctrl Z) shortcut is used, this shortcuts that does the opposite exists as well. With Ctrl Y, you can do the actions that you have undone with Ctrl Z.

Fastest Filter

Ctrl & Shift & L Shortcut:
To filter your list quickly, you can use the Ctrl & Shift & L shortcut.

Print

Ctrl & P Shortcut:
You can use the Ctrl and P shortcut the print your page.
*This is a general shortcut. You can use it to print a file, document or image on your device.

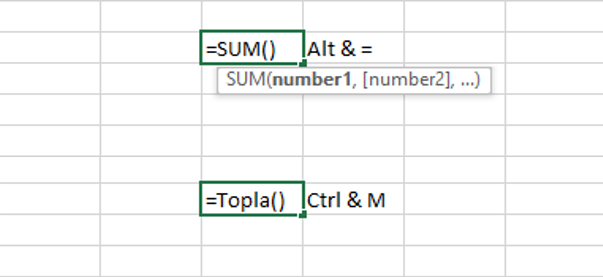
Sum Formula

Ctrl & M Shortcut:
Would you like to write the =Sum() formula the fastest way possible? You can create your formula instantly with the Ctrl & M shortcut.

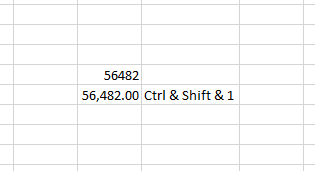
Show Decimal Points

Ctrl & Shift & 1 Shortcut:
You can show the decimal points of numbers quickly.

Save As

F12 Shortcut :
When you ned to save a copy of the document or need to save it in a different format, you usually go to File Tab –> Save As. This action takes a while, you can access the Save As window directly by pressing F12.

Go To Special

F5 Shortcut:
We use the Go To Special Window to detect the cells that contain special values like Conditional Formatting, Data Validation, Formulas… The shortcut to open this window is F5.

Open a New Document

Ctrl N Shortcut :
Allows you to open a new Excel document.
*This is a general shortcut. Allows you to open a new one of the same tab of a file, document or browser.

Add Comments to A Cell

Shift F2 Shortcut:
Allows you to add a comment to the active cell.

Add a New Page

Shift F11 Shortcut:
You can add a new page to Excel with this shortcut.

Replace

Ctrl H Shortcut :
You use the Fin&Replace screen to replace a text completely.
The Replace window is opened with the Ctrl & H shortcut.


*Note: You might need to use the fn key (depending on your computer) to use the function keys with F like F1 and F2.


A combination of little clicks and keys can accomplish great things!

EVERYTHING ABOUT THE VLOOKUP FORMULA

The VLOOKUP Function

Hello everybody,

As you can understand from the title, this article will be pretty long.
If you want to become an expert in the VLOOKUP formula, you can read this article till the end and apply it.

It is a function that everybody has heard of, everybody wants to learn and that everybody uses in Excel. We use the VLOOKUP function to find a value in the table.
Let’s explain it a bit: we use the VLOOKUP function when we search a data in a table or data range and want to get data from a column that corresponds to that data. For example: let’s assume that you have a personnel salary table. In one cell there is the personnel name, you can search your employee’s name and find out the salary they get easily.

SYNTAX

VLOOKUP (lookup_value, table_array, col_index_num, [range_lookup])

To express how the VLOOKUP function works simply:

=VLOOKUP (look for this; look in this table; if you find it bring me the one in the 2nd column; [TRUE – Approximate Match / FALSE – Exact Match])

Now let’s take a look at the arguments this function wants from us.

Argument name Description
lookup_value    (required) The value you want to look up. The value you want to look up must be in the first column of the range of cells you specify in the table_array argument.

For example, if table-array spans cells B2:D7, then your lookup_value must be in column B.

Lookup_value can be a value or a reference to a cell.

table_array    (required) The range of cells in which the VLOOKUP will search for the lookup_value and the return value. You can use a named range or a table, and you can use names in the argument instead of cell references.

The first column in the cell range must contain the lookup_value. The cell range also needs to include the return value you want to find.

Learn how to select ranges in a worksheet.

col_index_num    (required) The column number (starting with 1 for the left-most column of table_array) that contains the return value.
range_lookup   (optional) A logical value that specifies whether you want VLOOKUP to find an approximate or an exact match:

  • Approximate match – 1/TRUE assumes the first column in the table is sorted either numerically or alphabetically, and will then search for the closest value. This is the default method if you don’t specify one. For example, =VLOOKUP(90,A1:B100,2,TRUE).

  • Exact match – 0/FALSE searches for the exact value in the first column. For example, =VLOOKUP(“Smith”,A1:B100,2,FALSE).

Working Conditions

  • When the required arguments are not entered, the function doesn’t work.
  • If the range_lookup optional argument is not entered, TRUE- Approximate match is considered as default.
  • The lookup_value always has to be on the far left (in first column) of the selected/indicated table array. But this situation can be overcome by writing different functions in VLOOKUP. (We will see this below.)
  • If the lookup_value is not found on the left of the table_array, #N/A error is returned.
  • If there is a multiple number of the data written into the lookup_value argument in the range indicated in the table_array argument, this function returns the record of the first data it found
  • it is not checked if the text written into the lookup_value argument is with uppercase or lowercase.
  • when a numeric data is written into the lookup_value argument, if the data type stated as table_array in the first column is text, #N/A error is returned. the same condition is valid in the opposite condition.
  • if a smaller number than 1 or a bigger number than the column number in the indicated table range or a text is written into the col_index_num  argument, #VALUE! error is returned.
  • when a column is deleted from the field stated as table_array, #REF! error is returned.
  • 1 and 0 can be written instead of TRUE and FALSE in the range_lookup argument.
  • If TRUE – Approximate Match is chosen, the table assumes that the first column will be sorted by number or alphabetically and looks for the most approximate value on the base. If you don’t specify a method, this method is used as default.
  • If FALSE- Exact Match is chose, if there is a value that is exactly the same with the data you have stated in the lookup-value argument is look for in the first column of the table_range.


THE BASIC USE OF THE VLOOKUP FUNCTION

You see a search sample suitable with the basic language and working conditions of the VLOOKUP function in the image below.

We have said that if you find the name Sami Önder in the B column which is the first column in the B3:D9 cell range , bring the data in the 3rd column of the selected range.

We have mentioned that we can write 0 instead of FALSE. With this FALSE expression, it i checked if there is an exact Sami Önder in the B column.


USING WILDCARD CHARACTERS

We can get the same result without having to write the full name we are looking for on the same table by using a wildcard character after writing the name only. Let’s brush up on the Wildcard Characters that we can use in Excel.

We have 3 different Wildcard characters.

Use

To find
? (question mark) Any single character
For example, sm?th finds “smith” and “smyth”
* (asterisk) Any number of characters
For example, *east finds “Northeast” and “Southeast”
~ (tilde) followed by ?, *, or ~

A question mark, asterisk, or tilde
For example, fy06~? finds “fy06?”


The asterisk and question mark act as complementary character when it is in the beginning or end of a text in the lookup_value argument of the VLOOKUP function.
And ~ only limits the other wildcard characters by preceding them.

If the wildcard character precedes the text, it implies that the text ends with that. For example: *ali (if it ends with ali)
If the wildcard character is at the end of the text, it implies that the text starts with the. For example: ali* (If it starts with ali)
If the wildcard character is both in the beginning and at the end of the text, it implies that the texts contains that. For example: *ali* (if the text contains the word ali)
here is an example for the question mark: when you write ?ali, it means that there is a character (text, numbers or symbols) before the word ali.
You can analyze this image as an example of the situation I have mentioned. ‘=F4&”*”


METHODS OF GETTING DATA FROM MULTIPLE COLUMNS

All Functions in Excel -except for the recently added dynamic array functions- return only one result.
When we get a result with the VLOOKUP formula, we might want to get the other data in the table by dragging the formula right.
Instead of writing the formula over and over again for each column, we can get data from the others column in the field we have stated as table_array when we drag the cell we have written the formula in right after adding a function to the col_index_num  function that would change it as dynamic.
We can execute this action with a few methods. Now, let’s analyze these methods.

Our first method..

Let’s assume that we have a table like the one here.
We will get the data in the I.D. Number and Salary fields when we write the Name of the Personnel and drag it right.


We will have to write our formula correctly to execute an action like that.
And by correctly I mean using the cell styles correctly.
Which mean will we pin the cells while selecting the cell or cell range or not, or are we going to pin the row or column only?
As an answer to these questions, we have to write the $ (dollar) symbols in the direction it is supposed to be when we select the cell.
And then we will have to use a function that would allow us the make the col_index_num  part dynamic.

Well, let’s start.

While selecting a cell in the formula, we have to think about the pinning issue we have mentioned.
Since the place of the cell in which we write the Name of the Personnel is stable, we press F4 and pin it.
And since the place of the cell range we selected for the table_array argument, we press F4 again and pin that cell range as well.
And our formula will look like this as you can see in the image.
=DÜŞEYARA($G$2;$B$1:$E$7;2;0)
DÜŞEYARA is the Turkish word for VLOOKUP. So in English it would be:
=VLOOKUP($G$2;$B$1:$E$7;2;0)

And when we drag our formula right, since we wrote 2 manually to the col_index_num argument, that part will always stay as 2.
Our aim here is to change the col_index_num argument by increasing 2,3,4 when we drag the formula right and to get the data in those columns.
Right at this moment comes the COLUMN function to our help.


What is the COLUMN function? How is it used?

The COLUMN function returns the column number of the given cell reference.
It is used in two ways.

When it is written as =COLUMN(), gives the number of the column of the cell in which it is written.
When it is written as =COLUMN(reference address)  gives the number of the column of the cell stated as the reference address.

If you write the =COLUMN() formula into the E10 cell, since the E column is the 5th column in Excel, the formula will return the number 5.
Likewise, if you write the =COLUMN(B1) formula into the E10 cell, since the B column is the 2nd column in Excel, the formula will return the number 2.
Since we didn’t pin anything in the B1 cell address, when we drag the formula right it will change as C1, D1, E1. And this allows us to get the numbers 2,3,4,5.
Thanks to this, we will be able to get the data from the other columns in the table_array range.

You can see the sample formula below for the situation we want.


Our second method…

We will not use an auxiliary function in this method, but since the argument that will change will be col_index_num, we will try to get a result with the array in that part.
Which means that we will write the column index numbers we want to get as {2;3;4} and make it an array formula and make each one of these numbers transmitted to each column.

Here is how we’ll do it:

  • Edit the formula in the H2 cell like in the image.
  • Choose the field we will transmit the result of the formula to. (H2:J2)
  • Press F2 and get into the cell.
  • Press Ctrl + Shift + Enter and complete the formula entry.

Being able to write the col_index_num we want into the col_index_num argument within {…..} curly braces will allow us to get the data in the columns we want and grant us with flexibility.


VLOOKUP FROM THE RIGHT 

As you know, look ups are done from left to right all the time in Excel. Look ups can be from left to right in columns are in characters of a text.
And many functions have been created and released with the same logic. The VLOOKUP function is one of these functions.

As we have mentioned in the Working Conditions above, the lookup_value always has to be in the first column of the table_array in the VLOOKUP function. If it is not found, the formula returns the #N/A error.
By the way, this is not an “error” like we think it is, it is just a warning meaning that the looked up value does not exist in the table.
Getting an error when the data we look up is not in the first column of the range we have stated is a code related result of the VLOOKUP function.

Let’s have an example of this situation if you please.
If the cell range chosen for the table_array argument starts from the A column while looking for the personnel named Murat OSMA, an error will be returned since there will not be a personnel name in the first column of the field we have selected. This is completely normal.

We can arrange this working style of the VLOOKUP function that causes us to get an error the way we want.
There are a few different methods for this too, but I will try to explain the easy one for you.

We have a function named CHOOSE.
This function requires an index_num and selecting arrays, i.e. data clusters.
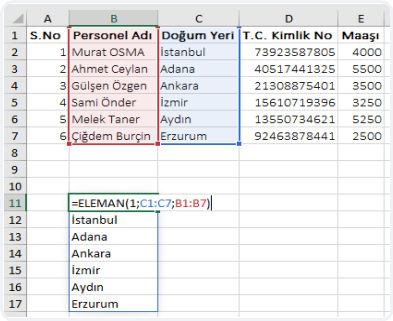
The formula written in the image below is: =ELEMAN(1;C1:C7;B1:B7)  [ELEMAN is the Turkish version of the CHOOSE function. Thus, in English it would be: =CHOOSE(1;C1:C7;B1:B7)]
We have written 1 as the index_num in the formula, and then chose each data range (arrays); first the  C1:C7 range and then the B1:B7 range.
Since we wrote 1 into the index_num and choose the C1:C7 data range as the 1st data range, this formula will return the data in the C1:C7 range.
If we had written 2 into the index_num, it would have returned the data in the B1:B7 range.

We get the data in the column we want when we state these index_num and arrays.
You see the formula you can use to prevent errors and get the data you want.
We state in which range the result should be by writing it in col_index_num within { … } in the index_num argument
by using the CHOOSE function in the table_array argument in the VLOOKUP function.
This way, if you write 1 into the col_index_numyou will get the result in the B2:B7 range and if you write 2, you will get the result in the A2:A7 range.


USING THE RANGE_LOOK UP ARGUMENT [TRUE – APPROXIMATE MATCH] (1)

We usually use the VLOOKUP function to get the data that matches exactly with the value we are looking for.
And 95% of the people who use this argument use the [range_lookup] argument as FALSE – Exact Match, i.e. 0.
So, what is this TRUE – Approximate Match?

When you look at the argument, it explains as:“the data in the first column of the table_array should be listed in an ascending order.”
So, when the [range_lookup] value is chosen as TRUE, sort the first column of the table_array before using the VLOOKUP.
If you don’t sort it, it is pretty likely to get the wrong data unless in an exceptional situation.
If the data in the table_array field is not sorted, if even if there is one that exactly matches, the #N/A error is returned.

When should you use TRUE – Approximate Match?

  • If the data in the table_array field is sorted, we can use the TRUE – Approximate Match.
  • If we are looking for a Numeric data and there is a number that matches with it, or there is no number that matches with it we can use it to bring the closest number to it.

Now, let’s have an example of this situation.
What we want to do in the formula written in the image below:
We want to find the Name of the Personnel of the Salary that is in the base of the number 3300 or numbers close to it.
For this action to give the correct result, keep in mind that the data in the first column of the table_array argument should be sorted.
The formula we write will give use the result of the name of the Personnel with the Salary of 3250 -since there is no one with the Salary of 3300 and this is the closest one-, so the name of Sami Önder.


VLOOKUP BY TWO OR MORE CRITERIA

We have used the VLOOKUP function to find a data in the table and then get the data  from the column we wanted so far.
If we want, we can also get a result depending on multiple criteria.

We have stated in the image below that we want to get this: Get the Name of The Personnel whose salary is 2500 and whose Place of Birth is İzmir.
And we used this formula for this:
=SUBSTITUTE(VLOOKUP(G2&H2&”*”;B1:B7&D1:D7&C1:C7;1;0);G2&H2;””)
We have used this technique here: We joined the Salary(Maaş in Turkish as you see in the image) and Place of Birth(Doğum Yeri in Turkish) in the lookup_value argument (G2&H2) and added &”*”  at the end, and thus got to state that our conditions start with these.
And we have joined the ranges of Salary, Place of Birth and the Name of Personnel that we want to get as a result in the table_array argument.
Since we have joined the ranges we wanted to get and we were looking for with in a single field, we have written 1 in the col_index_num argument.
We have written 0 for Exact Match in the range_lookup argument.
As a result, it returns us the 2500İzmirSami Önder text.
Lastly, when we say leave the data we write in the lookup_value argument blank in the text returned from the SUBSTITUTE function,
here will be the Personnel Name left Only.
This way, we got to find the data we were looking for by multiple criteria.


WHAT YOU SHOULD DO WHEN THE DATA TYPE YOU ARE LOOKING FOR AND THE DATA TYPE YOU FIND IS DIFFERENT?

Sometime even though a data should be numeric, it is determined as text because of the call style.
In this case, you might have realized that Excel warn you with green triangles and yellow warning symbol on the top left of these cells.
When you click that warning symbol, you will see the Number Stored as Text expression.
This explanation tells us that the data in the cell is a number but since the cell style is text, I store this number you have written as a text.

If the data type in the cell stated as lookup_value is a text,
the data type of the first column of the cell range we have stated as table_array must be text as well.
Or you can think of the opposite situation. To sum up: the types of the looked up and found data should be the same.
If they are not the same, the #N/A error is returned.
You can see the example about this in the image below. The formula used is:
=VLOOKUP(G2;B1:E7;2;0)
Since the data type of lookup_value is text, and the data in the first column of the table_array is numbers, there is no match and the #N/A error is returned.

So, how do we solve this? It is very simple!

We can solve this problem by applying a mathematical operation that would turn the text stated as the lookup_value into a number.
The mathematical operation to be applied shouldn’t affect the existing number.
For example, if we use any mathematical operation like +0, *1, /1, ^1 or — (plus 1, multiply by 1, divide by 1, exponent 1, hyphen hyphen), we will get the result you can see below.
The formula used: =VLOOKUP(G2+0;B1:E7;2;0)


USE VLOOKUP INSTEAD OF WRITING NESTED IFS

In some of our tables, for example when we want to calculate annual leave, we can write many nested IF function and find the solution that way.
But the VLOOKUP gives us the solution to solve this calculation faster and easier.
Now, let’s make the same calculation with nested IFs and then with VLOOKUP. You will see the difference.

Let’s assume that we have a table like the one below. We will determine different rations depending on the different processes. If we want to do it with nested If functions, we will have to write the formula long like this:

=IF(C2=”CV Search”;10%;IF(C2=”Bizde Mülakat Aşamasında”;20%;
IF(C2=”Aday Paylaşıldı”;40%;IF(C2=”Müşteride 1.Mülakatta”;50%;
IF(C2=”Müşteride 2. Mülakatta”;70%;IF(C2=”Müşteri Assessment Aşamasında”;80%))))))

We have shared this with the Turkish sentences so that you can see the cells in the table. However, the formula would be like this with the English translation of these sentences:
=IF(C2=”CV Search”;10%;IF(C2=”In the interview stage with us”;20%;
IF(C2=”The candidate has been shared”;40%;IF(C2=”In the 1st interview with the customer”;50%;
IF(C2=”In the 2nd interview with the customer”;70%;IF(C2=”The costumer is in the Assessment stage”;80%))))))

Whereas it would be way better to find the percentage ratio with the VLOOKUP function if we had a table of all processes and ratios.


Yeess…
If you have read, comprehended and applied everything so far, your are an EXPERT in VLOOKUP now. 👏🏻

You can share this post to help many people get informed and get Excel Training to use Excel more efficiently and productively. 👍🏻

WRITING MACROS WITHOUT KNOWING HOW TO CODE!?

DO YOU REALIZE THAT YOU CAN WRITE MACROS WITHOUT KNOWING HOW TO CODE?


That is an interesting title, isn’t it?
Just like touching the clouds. We want it a lot, but unfortunate we just cannot do it.
The situation is just like that for those who don’t know and write macros.
But don’t worry, don’t be sad about not knowing. PEAKUP is always here with you, for you.

Who doesn’t want to prepare daily, weekly, monthly routine tasks in a few minutes with macros, right?

This will save you a huge amount of time, you will have more time for yourself or will be able to spend more time on other tasks. Aren’t you just done with doing the same thing over and over again?
You know how we always ask ourselves: “For God’s sake, what age is this?”. So, for this reason there shouldn’t be anymore people who don’t know Excel & VBA (Macro).

You must be a bit excited now.
As much as this title sounds and seem a bit magical, we are definitely (and unfortunately) not wizards and witches.
Everything is in your hands.

Keep in mind that if you want to learn something, you should really want it and spare some time for it.

So, how is this going to be?
You will see that while you cannot even imagine coding without knowing macros and codes, you actually will be able to do it.

We know the happiness of being able to do something important for you as much as you do.
What we want from you is for you to read and apply this article patiently.
You will see at the end of the day that you will get your routine daily tasks done way easier with macros without having any coding information.

Now, let’s start to learn how we can do this.
(We will be adding a practice video at the end of the article for those who want to learn fast.)


WHAT ARE EXCEL MACROS?

Let’s start by learning what Excel Macros are.

We call these macros Excel & VBA in general.

What is VBA?

VBA

stands for: Visual Basic for Applications.
I.E. it is the structure that was adapted for the Office applications and that allows us to access the Visual Basic objects, methods and features.

Microsoft Office offered the Macro command in some of the Office packages to the users in order to automatize the routine actions.

While preparing Macros, the Visual Basic programming language that works in the background of Excel waits there. When you save anything, this programming language becomes active and translates the macro command you have prepared into the programming language. This way, when you want to run or edit the macro you’ve prepared, Excel offers you this opportunity easily.


WHAT IS THE RECORD MACRO METHOD?

It is a tool and method that activated the Visual Basic that is in the background of Excel and that codifies all the actions we have executed in workbooks, worksheets or cells.
You can complete your tasks faster with this read-made code. We will be using ready-made codes using this feature.

You can access the Record Macro feature in 3 different ways.

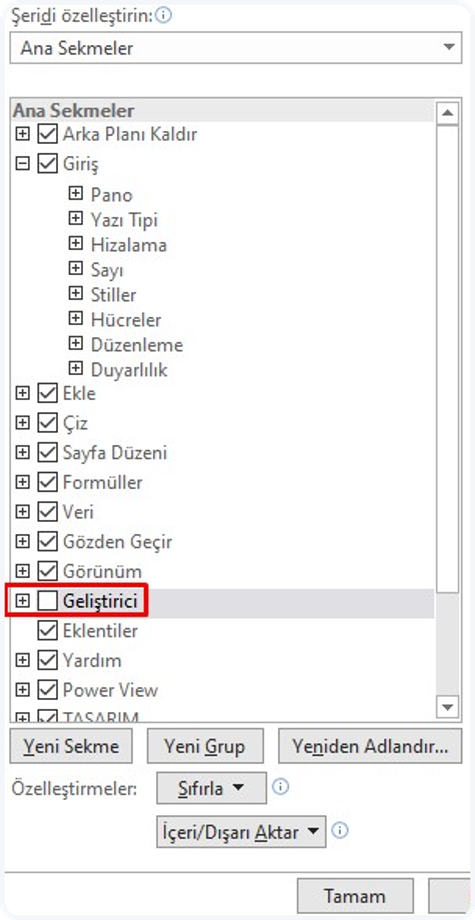
1- Through the Developer Menu

If you don’t have this menu in the Ribbon, you can add it like this:
File ‣ Options ‣ Customize the Ribbon ‣ Developer ‣ OK.
 

2- Through the View Menu


3- Through the StatusBar


You can active the Record Macro feature by using the method you want.
Now I will tell you about how to activate it. But just read it, we will practice it together later.

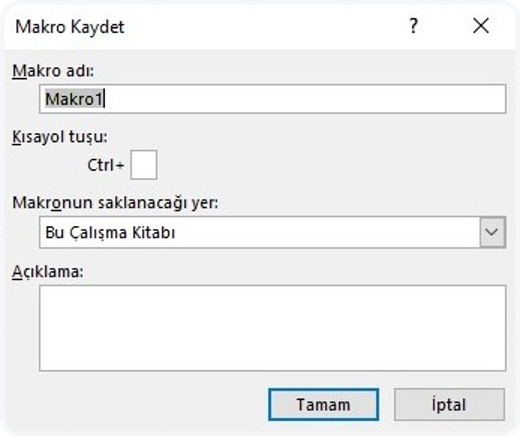
When your press Record Macro, this screen will pop up.
You can give a name in the Macro1 box about what you will do.
For example: if you will use it to filter, you can write filter and then press the OK button.
The moment we press it, the record will start, and it will record and codify each action in the background. When you are done, you need to Stop Recording. You can click Stop Recording in the same place.
 

Now, let’s see how easy it is with an example.

We all convert out data into a table. I mean, we have titles in the first row and data under those titles, right? And we filter many times in that table during the day. What do we do when we filter? We click the filter arrows in the field (column) to be filtered and select the data in the window that pops open or look it up and click OK and the table is filtered by the data we want.

We spend time even on this simple filter and lose extra time for nothing. Open the filter all the time, select, click OK. And when we are looking for another data, open the filter again, select and then click OK over and over again.

But only if we had an empty cell that we would use to filter and we could just click Enter or click the button to filter, wouldn’t that be way simpler and quicker?

This will save you time just for one action you will be executing in a day. But, imagine speeding up all your actions this way.


IN WHICH CASES CAN YOU RUN THE CODE YOU HAVE WRITTEN?

When you:

  • Select,
  • Righ-click,
  • Double-click a cell.
  • Enter data into the cell,
  • Open the page,
  • Open the file,
  • Close the file,
  • Click a button,
  • Press a key in your keyboard

etc. you can run the codes you have written.


Now, let’s execute this action with an applied example.

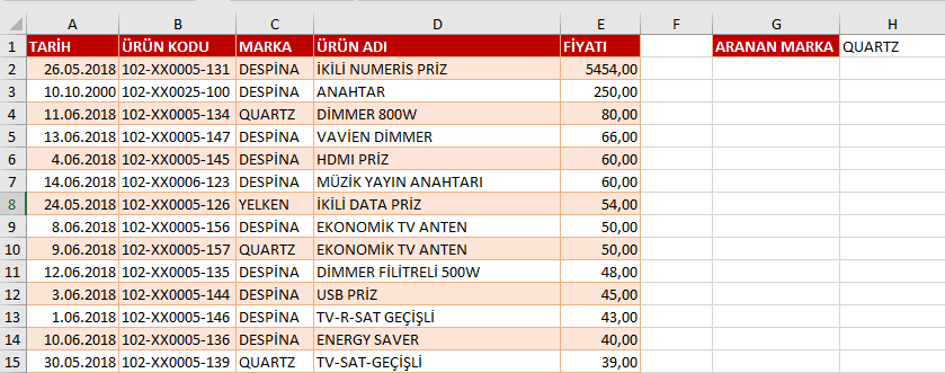
We have a file like in the image, you can try things out on that file and then practice on your own files.

Download the file here.

We want the data of a Brand to be filtered when we write that Brand’s name into the H1 cell in this file. When we write QUARTZ into the cell, the QUARTZ will be filtered in the Brand field. When we write YELKEN, YELKEN will be filtered. Thus, we will be using that cell as a filter box.


We will take the action in just a bit.

But before, you need to know this. There are fields to write codes depending on the running methods we have stated under the In Which Cases Can You Run the Code You Have Written? title.


These fields are:

  • Module – (Codes create with Record Macro or manually are stored here.)
  • Code Window of the Page (Code running actions of the related page are stored here.)
  • General Code Window of the Book (Actions that would affect the whole book are stored here.)

Since we want to filter when we enter a data into a cell in the page, we will paste the ready-made codes we have obtained with Record Macro to the Code Window of the Page. When data is entered to the cell, Change will be triggered and filter will be applied.


Don’t forget that you can use the Record Macro for all your tasks.


Let’s say that the steps to be taken will always be:

  • Click Record Macro
  • Manually do the action you want
  • Stop Recording

Codes will be prepared in the background.


WHERE CAN YOU ACCESS THESE CODES?


There are multiple ways to do something in Excel, just like in life. You can access these codes in a few different ways.

  1. By choosing View Macros where we chose Record Macro.

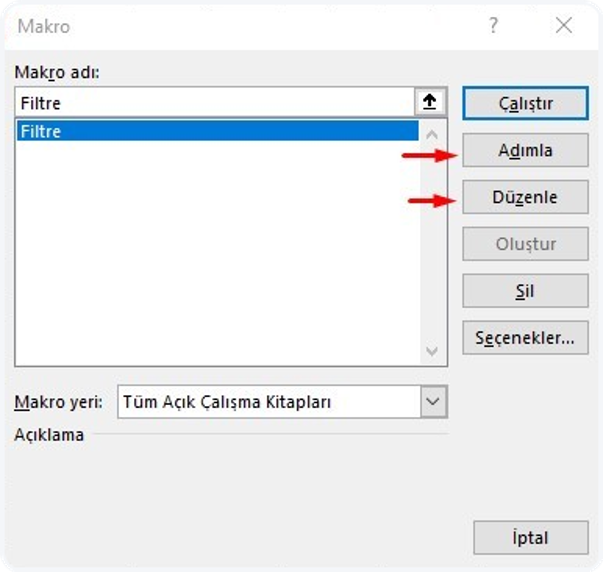
2. By pressing the Alt + F8 keys and accessing the window below with a shortcut.
 

3. By pressing the Alt + F11 keys and accessing the VBE window directly.

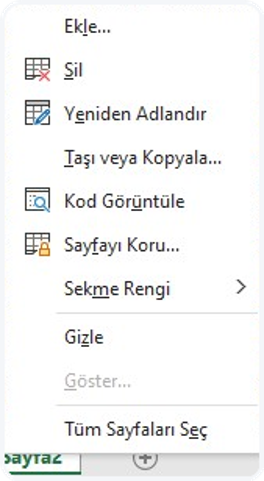
4. By choosing View Code after right-clicking the sheet tab.
 

Alriighht! Now that we have learnt enough, let’s take the action.

If you have already downloaded the file I have sent you, click Record Macro. Name your Macro, for example: Filter, and then click OK to start recording.

Choose any cell in our table and choose Filter in the Data menu.
Note: If you hover on the Filter a bit, it will give you the shortcut if there is. You can activate the filter with that shortcut as well.
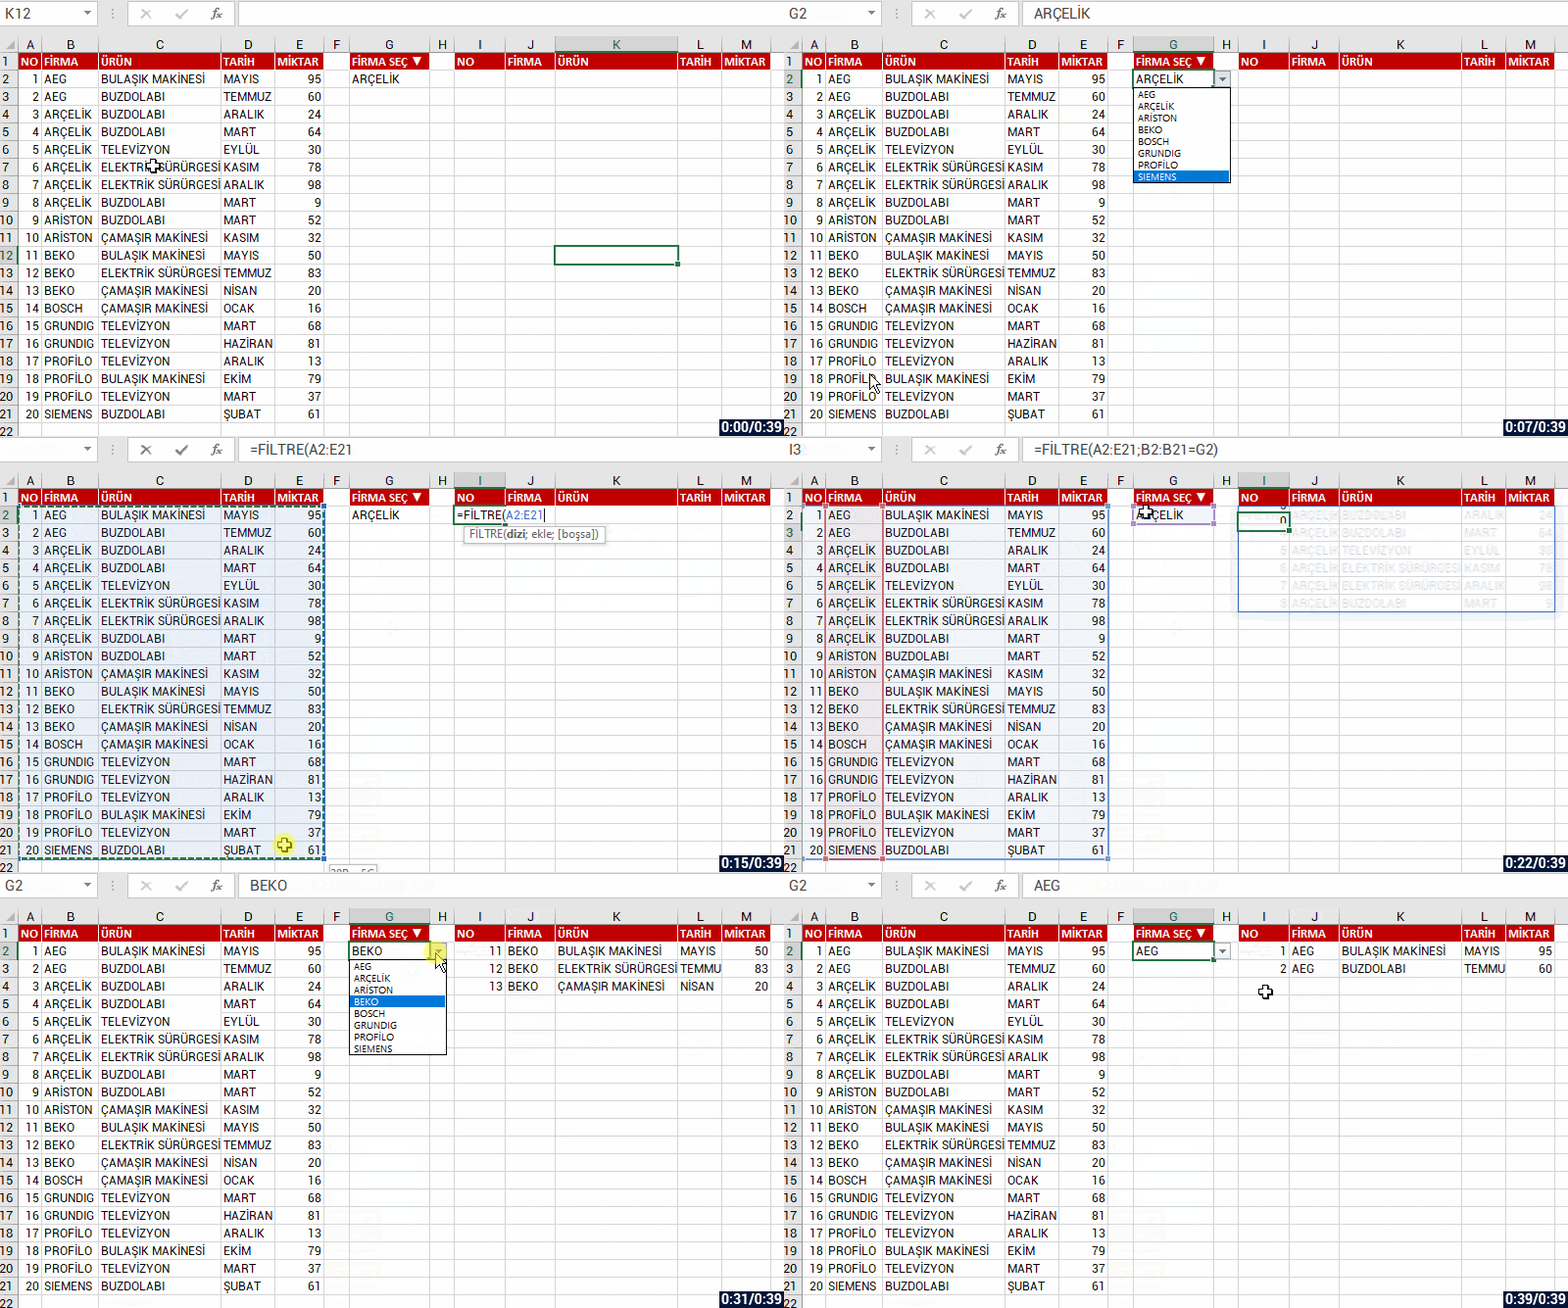
 

And then unmark all in the Brand field and choose YELKEN, and then click OK.

Since we basically want to get the code of filtering, we have executed the action and we are done.

Now click Stop Recording to stop recording. Click View Macros.
The Macro List window will pop up and the Filter macro will be selected on it.
You can press the Edit button and view the codes in the Module1.

The codes that have been created will look like the image below.
The green rows that start with an apostrophe are comment rows, they don’t affect the codes, they are just for the explanation.
Note: You can delete the Selection.AutoFilter row. The row under it does the real job.


As you can see, we have easily obtained the codes of filtering.

Here is another information: You can assign the codes that start with Sub in the Module like above, and then run the macro by pressing the button. You can try this method if you please.

I will show how to filter the moment data is entered into the cell -which is a faster method. So, please keep reading.

Yes… we have obtained the codes.
Now there is only making the criteria dynamic so that it filters whatever we write into the H1 cell instead of “YELKEN” which was stated as the criterion in codes and running it when data is entered to the cell.


We will make a simple edit for this. Here is the code row that filters:

ActiveSheet.Range(“$A$1:$E$52″).AutoFilter Field:=3, Criteria1:=”YELKEN”


If you write the cell address like below where “YELKEN” is written in the code, you can use that cell as a filtering box dynamically.
ActiveSheet.Range(“$A$1:$E$52”).AutoFilter Field:=3, Criteria1:=Range(“H1”).Value


We have made the criteria dynamic. Now, let’s run this code depending on the data in the cell.
We have mentioned that we were going to write this code into the Change action of the Code Window of the Page since we want it to run when a data in the page changes.


So, what do we need to do now?


Right-click the tab and access the code window of the related page by choosing View Code. It will look like the image below at first.
Choose Worksheet in General.

Page actions that you can use will be uploaded to the Declarations field, choose the Change action there.

Related action will be added to the window.
Write the name of the macro we have created as Call Filter in that action.
Since the Selection_Change is unnecessary now, you can delete it.
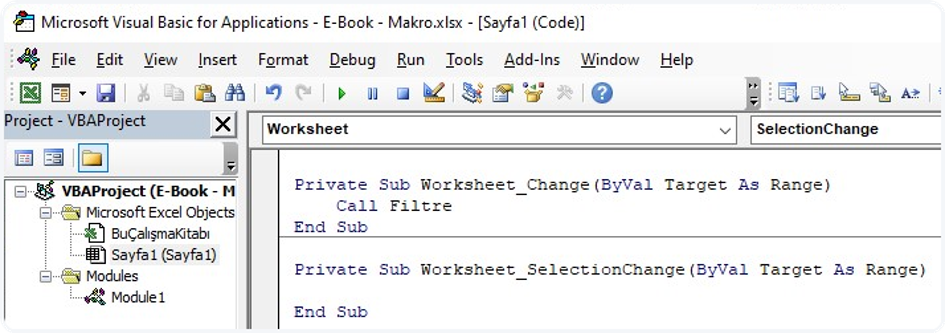
When a data is entered/changed in your page, the Filter macro will run.
At this point we might come across some difficulties. We have left our code as data entry in a cell, not in a certain cell. Even if we make a change in a cell other than H1, filtering will be done. Thus, after every action we take in the page, the filter will be applied.

It would make more sense to adjust is as run only a change is done in the H1 cell.
And if we accept this as the last touch to make the code run in a more stable way, we can settle the matter by adding a little condition.

That last touch will be this condition: If Target.Address(0, 0) = “H1” Then

Explanation: We complete our code by saying If the address of the cell into which data was entered is H1

You will see the result in the page like this. Whatever you write into H1, that name will be filtered in the Brand field.

Here is a little tip: if you write yel* into the cell and press Enter or add & “*”  to the end of the code, the cell will filter without you writing the full name of the brand. For example: if you write yel and press enter, it will list all the records that start with yel.

ActiveSheet.Range(“$A$1:$E$52”).AutoFilter Field:=3, Criteria1:=Range(“H1”).Value & “*”


After everything is done and it is time to save the file, you need to save the file as Excel Macro-Enabled Workbook. (The Save As shortcut is F12.)
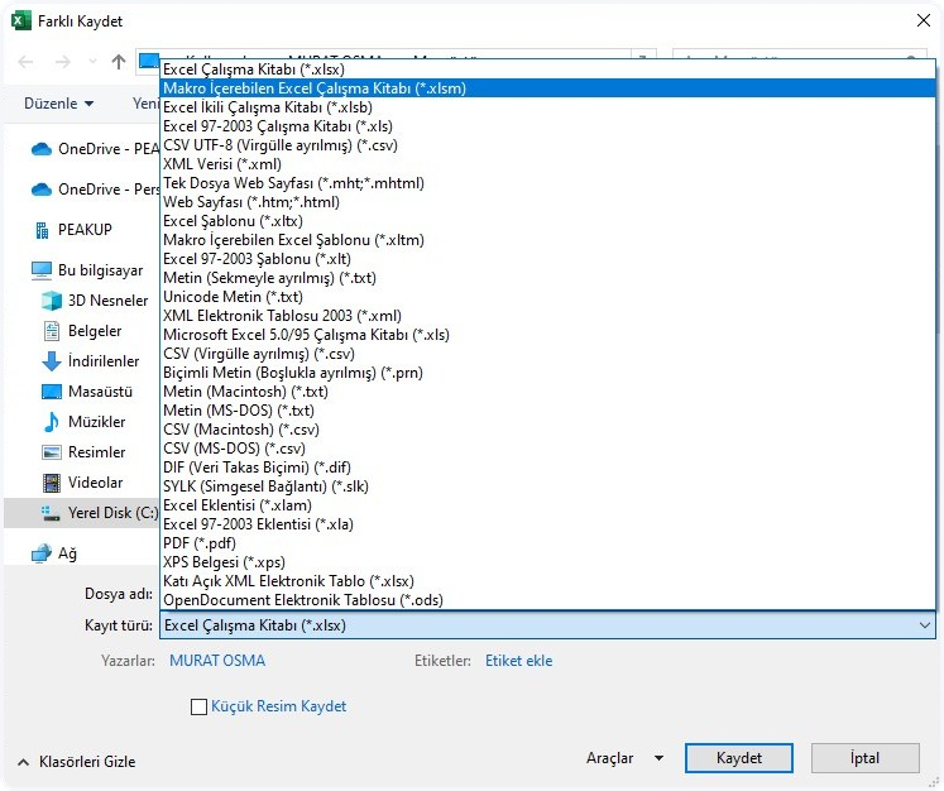
 

Congratulations! 👍🏻

You have just gained your first coding (creating a macro) experience.

These are very fun subjects, apart from also being very useful. I am sure the you will want more as you keep learning.
This article was for making you realize that you can get your tasks done quicker by codifying the actions you execute on Excel all the time.

You can access the last version of the file here.


Don’t forget that we can help you climb the success ladder in Excel with the Excel & VBA (Macro) Training and Consultancy Services as PEAKUP.

You can share this post to help many people get informed and get Excel Training to use Excel more efficiently and productively. 👍🏻

How optimistic are women about technology?

How optimistic are women about technology?

Technology affects everyone as it goes in many places in life. As much as is was a strong crowd saying “What were we doing without technology?”, there are also people that say “Was it like this before, where are those old times?”. The human race knows that they need to adapt quickly to the changes that come due to their survival motive and try to achieve this at the highest level. The occupation of Facebook by the generations before us may be one of the best examples of this. Since this change is obligatory, it does make some people uneasy. This can be divided into generations or as Female-Male.

The infographic below reflects how tech optimism breaks down along the lines of gender and generation:


Why did women lose interest in Technology?

The issue of women in business life emerges as one of the issues that is frequently mentioned and emphasized by everyone. The place and existence of women in business life is actually very simple, but it can also be very difficult. As a child, classifying toys by gender and attributing gender to business lines can be conditioned obstacles for women to work in many sectors. For example, asking “How can a woman be a taxi driver?” and saying businessman instead of simply saying businessperson …

There are many sectors in which we cannot see the name of women and cannot be attributed as women’s jobs. One of them is especially the technology area. In the early years of computers, the presence of men on the hardware side and women on the software side was in balance. In the 1980s, this balanced situation deteriorated with computers entering the house. Because one of the biggest reasons women were pushed out of technology was computers entering the house. As computers were introduced to the market as men’s toys, women’s interest in technology gradually began to decline. Thus, technology started to be seen and treated as men’s interest. However, did you know that the first software developers were women? For example, Ada Lovelace is considered the first computer programmer in history.


Technology Sector’s Hidden Heroes

Lack of balance between private life and work life, insufficient wages and benefits, scarcity of career promotion opportunities, and the male-dominated structure of the sector are among the prominent negativities. Decision-making processes in companies where a male-female balance cannot be established also negatively affect financial and managerial performances. According to Deloitte TÜBİSAD’s Report on Women in the Technology Sector, companies with management balance work more successfully and more efficiently. It means balanced corporate management for 73% of women, different perspectives in decision-making for 71%, and increase in commercial gain and financial performance for 51% in a management team with a gender balance.

According to the research conducted by Deloitte with TUBİSAD with white-collar women working in the technology sector, 85% of them are satisfied with being in the technology sector. Because the global, dynamic, changing, creative and developing structure of the technology sector are some of the attractive aspects of the sector for women. Being able to shape the future and to do interesting and challenging jobs is more attractive to women in the Y and Z generation society. The technology sector is also considered as one of the challenging areas for women.


How Should Women be Supported in their Career Journeys?

Turkey, while seen as a country that is seen risky of increasing and deepening of gender inequality, technology is seen as an area that is high in risk. In our society, there is more trust in men in areas seen as risky. Women are not desired to be in risky areas not only in the office environment but also in daily life. However, it should not be overlooked that women are more successful in staying cool and managing crisis in a crisis. Because first of all, being able to accept the presence of women everywhere will be one of the most important steps in their career paths.

Increasing the number of female leaders who can be role models for employees may be another action that can be taken. In addition to the inequality between small and large enterprises, especially in the use of information and communication technologies, there are also great differences between men and women, old and young, educated and uneducated individuals. For the future of the industry, focusing on eliminating digital inequalities and developing digital competencies is of great importance. The equality of the number of men and women working in technology can be achieved by directing female students to more technical fields during school years.

Programs for young high school and university students can be prepared so that support should start from education to business life. Female student quota can be placed in technical and engineering departments of universities.

ISACA, one of the organizations working on this subject, stated: “The SheLeadsTech work program continues to raise awareness to draw attention to the problems faced by women working in the technology sector and to contribute to the reduction of these problems, to establish a network among women, to provide support in areas of low motivation and to contribute to their education where they are lacking. “

How do we feel about this issue as PEAKUP? What do we think?

Especially for the increase of female employees in the informatics sector, incentives to be applied to companies and non-governmental organizations are very important. Efforts to increase women’s employment should be diversified, and respect for the different ideas of self-confident women with goals should be developed. We believe that the actions to be taken will increase the strength of the team and successful works will come out of these environments. It should not be forgotten that success will be achieved through the solidarity of men and women.

As PEAKUP, we try to maintain the female employee ratio as at least 50%.

In addition, women who continue to work successfully in spite of all conditions can sometimes get caught between motherhood and work life. Processes such as maternity leave and the desire to raise the child up to the nursery age can interrupt their careers. For these reasons, many sectors hesitate to prioritize women when hiring. Flexible and remote working opportunities can create a workforce model that will take women forward, because of the digital age we are in, so that they do not leave the sector due to the constantly developing nature of technology. The ability to benefit from the workforce of women from all fields by providing opportunities for not only working women but also housewives to do high value-added jobs may be one of the points to provide support.

As a result, conditions are not equal due to the nature of human beings, but when trying to create fair and equal working opportunities in society ceases to be seen as a duty, we will be a society that goes further and produces more. Because, women will continue to exist in all areas of working life despite all the difficulties they face.

We hope to never have to talk about a subject such a Women in Technology in the upcoming years…


Forgotten passwords can cause you problems!

Unupdated and forgotten password can cause you problems!

With the developing and improving technology, our business processes are obliged to keep up with the digital as well. You get most of your work done with your passwords and access many files through your accounts. Can you imagine not being able to access you e-mail or company apps when you forget your password? This situation slows done your business processes while affecting the time in which you could Updating Passwords is the biggest workload of the IT employees

Going to the help desk (IT Department) when you forget your password, the IT department getting your request and determining a new password, the new password reaching you slows down and halts most of your work. On the other hand, you can go to the help desk since they don’t work on the weekends and cannot access your e-mails that moment even if you have to respond right then. And this may interrupt all your business plans.

On top of all that, resetting passwords, unlocking locked accounts and all the requests for updationg profiles and passwords take too much time of the IT departments and became an extra workload.

You can relieve all the business process with a solution that allows employees to reset their own passports and unlock their own accounts, thus create their passwords based on the password criteria determined by the infrastructure.

You can read this article for more detailed information.

You think that you are secure against Cyber Attacks?

Even though digitalization grants us with a faster and more productive working, it also brings along a lot of threats.  You have to be careful about the security of your data, files, and most importantly your accounts.

According to the “The Global Risk 2019” report of World Economic Forum, cyber attacks are seen as one of the biggest problems after global warming and economic issues. Companies need to have international standards and their certificates concerning security and privacy in order not to face many situations that affect security like cyber attacks.


Having security certificates is an advantage for the companies. The certificate that we come across the most is ISO 27001. But, what is ISO 27001?

ISO 270001 Information Security Management System is a management system that includes people, processes and information systems in guaranteeing the corporate information security and that is supported by the senior management. It has been designed to protect information entities, secure parties and enable sufficient and proportional security controls. ISO 27001 Information Security Management Systems contains the corporate structure, policies, planning activities, responsibilities, applications, procedures, processes and resources.

Why is it necessary?

Enabling business continuity, keeping and protecting data are among the most important factors. When you lose your data, you face outcomes that cannot be compensated. Lost or stolen data can cause many disaster scenarios.

By means of ISO 27001, companies can define, manage and decrease their risks. Since it is a must to take all security measure to get the ISO 27001 certificate, companies can execute all their controls and minimize security vulnerability.

Companies can get the ISO 27001 document that has many metrics from keeping information safe, internet outcome to physical security by meeting all the security criteria. One of the most important criteria is password security but as the passwords get more complex, the employees might forget their passwords or write their passwords on note papers in order not to forget! Here come the systems where users can reset their passwords on Web or via SMS to your help.

The password resetting with SMS feature which allows you to include your blue-collared employees to the process is very important for these solutions.

You are sure that you have a secure password?

While choosing your password, make sure that you determine a strong password and reset your password the moment there is a suspicious action. Online systems like social webs are not good at all at reminding you how old your password is, how week it is and when it is better to change it. The best method to protect your account and take measures against cyber attacks is for your company to have a password resetting solution.

GEOGRAPHY LINKED DATA TYPE

GEOGRAPHY DATA TYPE

There were always data types in Excel. But they were traditional data types like text and number. Stocks and Geography data types are unique because they are accepted as linked data types. Linked data types have a connection to an online data source. For now, linked data types are only Stocks and Geography. Microsoft plans to share more linked data types in the future with the feedback from the clients. We will be sharing the new linked data types here.

Office 365 users can access a lot of data of countries by clicking their names only. You will see the Geography linked data type in the data Types group of the Data menu. This features allows us to get and list a lot of indicators like flags, capitals, currencies, data ratios, populations, military power, president, average life time of the countries through http://data.worldbank.org/. It is possible to access more detailed information of countries with the link I gave you, and you can even download this data in the Excel, Csv and Xml format and use them in your reports.


It is enough to write the country name in the A column one under another and choose the Geography type.


DATA CART

First, we wrote the names of 5 countries and chose the Geography data type.
After the country name in the cell is turned into the Geography data type, an icon is seen in the cell.
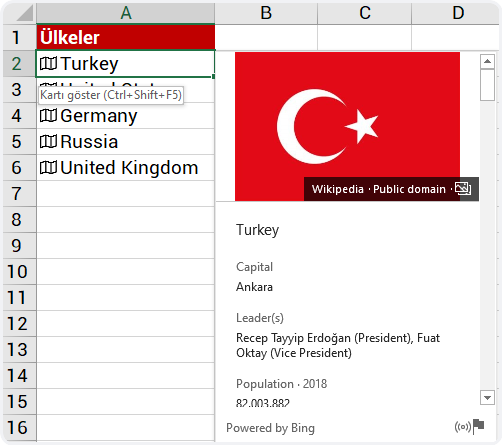
Click the icon to view the cart. Cart shows a list of areas and related values.
There might be a lot of areas that you can view and work with depending on the data. If you click the icon next to the country name, you will see that you can get the flag of that country and a lot more information.


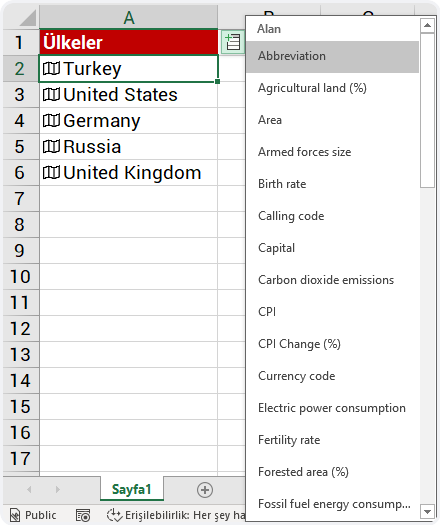
When you select a country in a cell, an option list called Add Data pops up next to it.
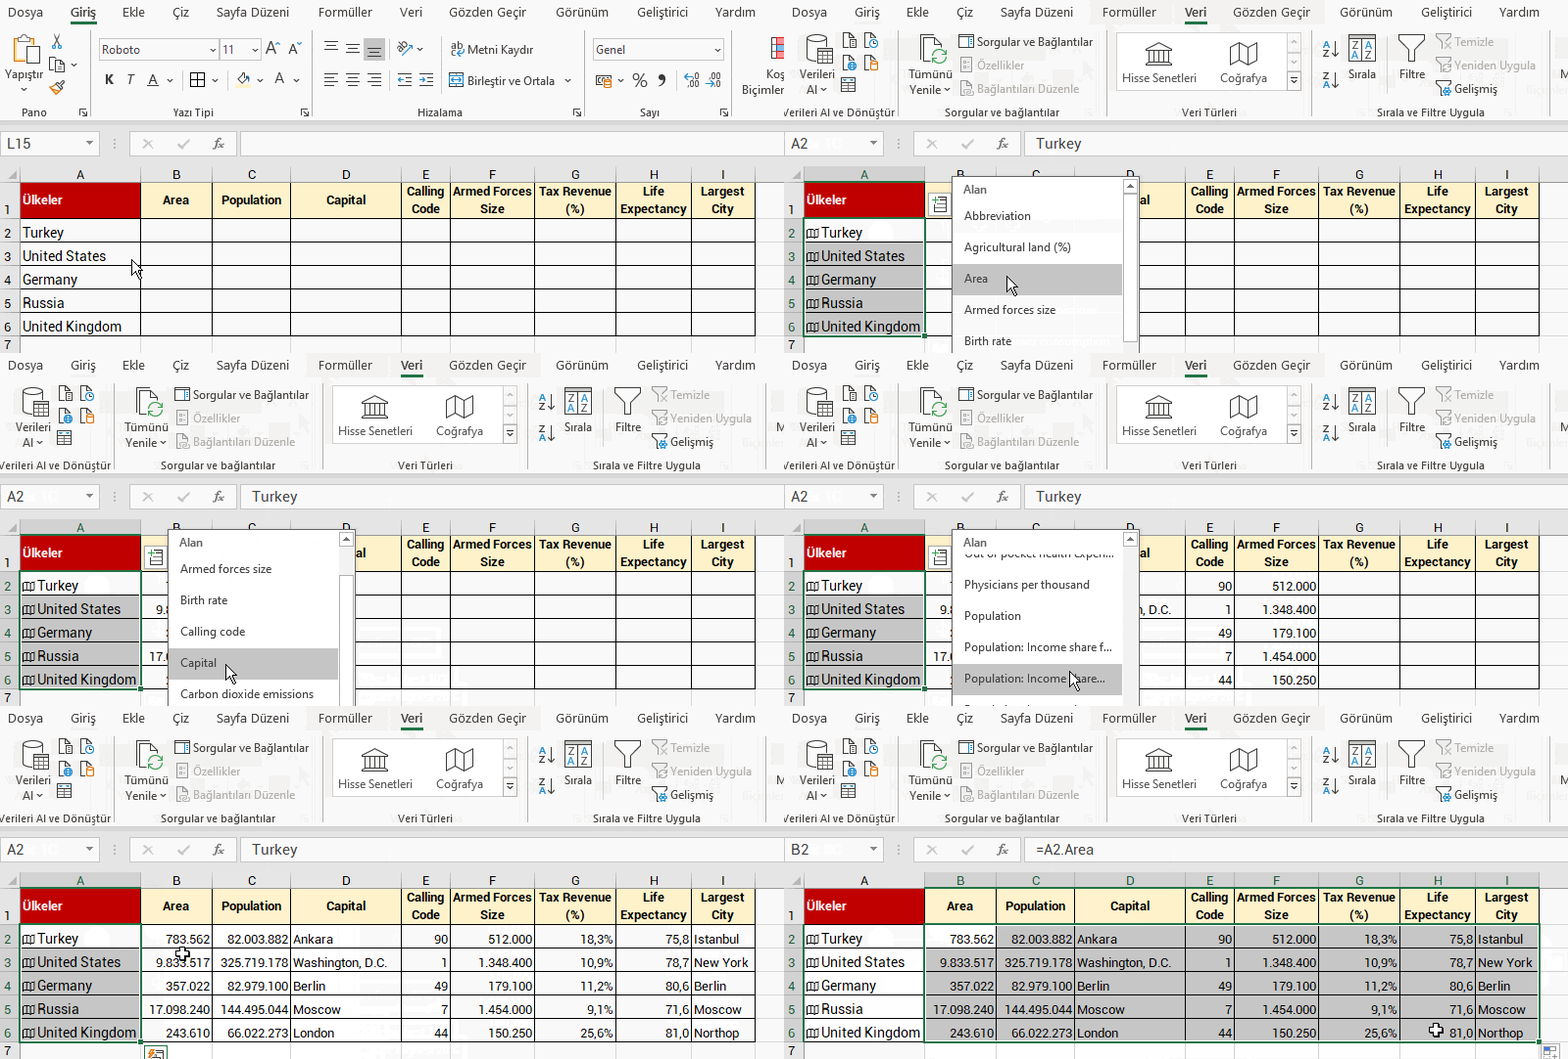
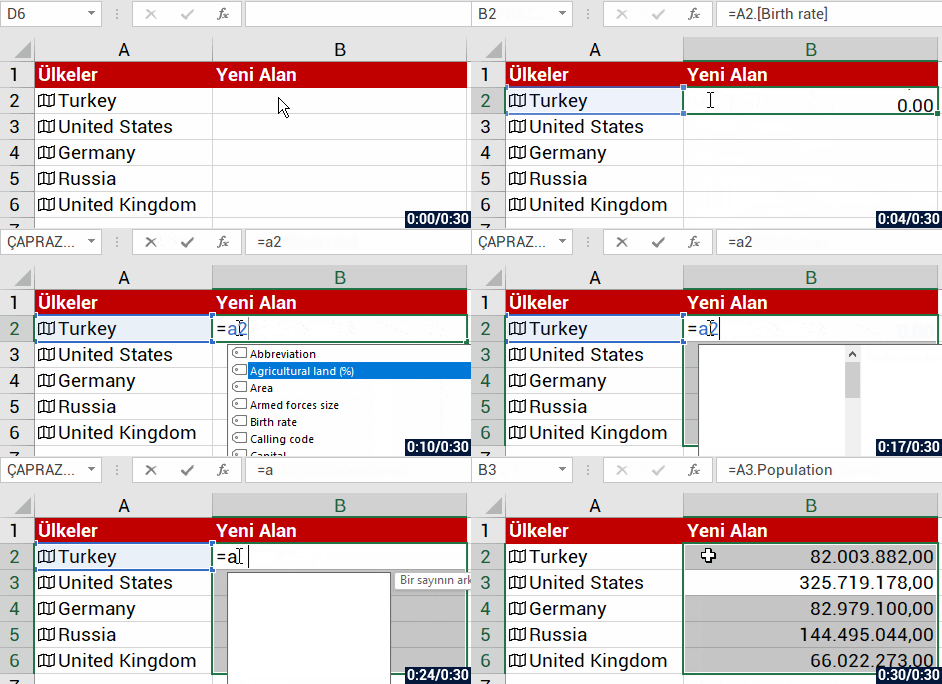
When you choose the information you want to get from that list, that information will be listed quickly next to it.


You can list a lot of information about the country or countries you select next to one other and turn them into a table like below. If you want, you can indicate the data you want to get for a country and then drag it down to list the data of all countries in the indicated area.


You can write =A2. to call the data in the related areas from the defined names with a formula.


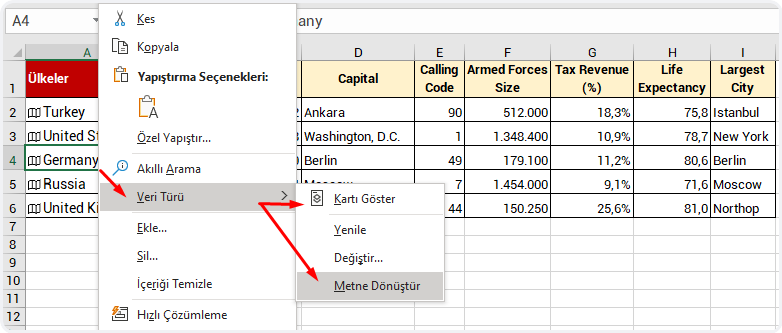
When you right-click the countries, you can see the Show Cart option within Data Type in the menu. (Ctrl + Shift + F5)  You can turn off the feature by converting the data into Text. You can cancel the Geography data type whenever you want like converting the tables into a range.


I hope this helps you.👍🏻
You can share this article with your friends and make it reach out to many people. Don’t forget: The more information is shared, the more valuable it gets.

Create Poll Rules with MS Forms

Polls play an important role in enabling communication with your employees and customers, tracking and analyzing or determining business strategies. You can easily and quickly prepare and share e-forms with MS Form during your digitalization process.

In this article, we will be talking about adding rules to the Forms polls. You can manage polls based on questions by adding rules. You will be able to manage the next question that will be displayed depending on the answer user gave to the questions.

How Does It Work?

For example, while collecting personal information of the employees:

  • The What is your license class? question can be displayed if Yes is chosen from the Yes/No options of the Do you have driving license? question.
  • Detailed questions like the Ages of the children, Number of children can be displayed to the user when the Married option is chosen from Married/Single of the What is your marital status? question.

Thanks to the feature, user will not see all the questions while collecting information from them and polls will be answered more quickly and consistently and interactive work will be executed.

How Is It Done?

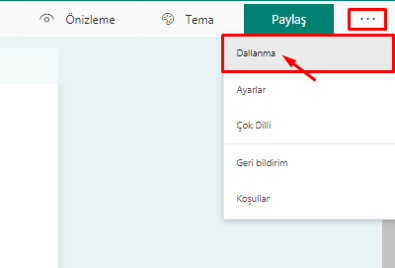
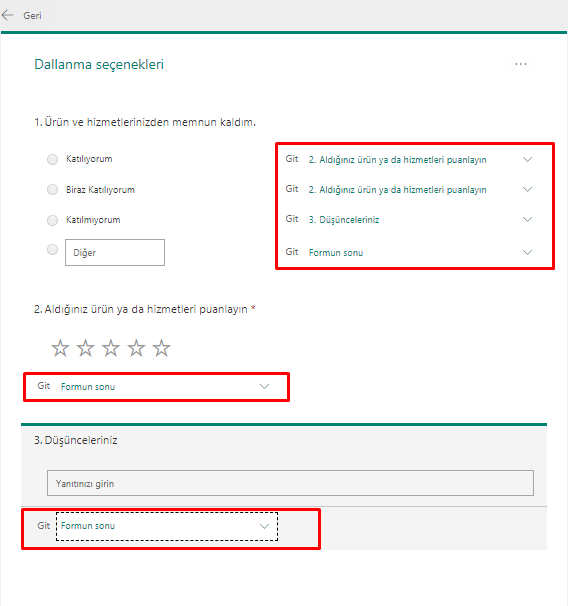
First, you need to create the poll questions. After you create the poll questions, choose Branching within … that is next to the Share button on top right.


We have created the first question with 4 options.
The directing action is complete by choosing the next question that you want to be asked for each option from the list that pops open.

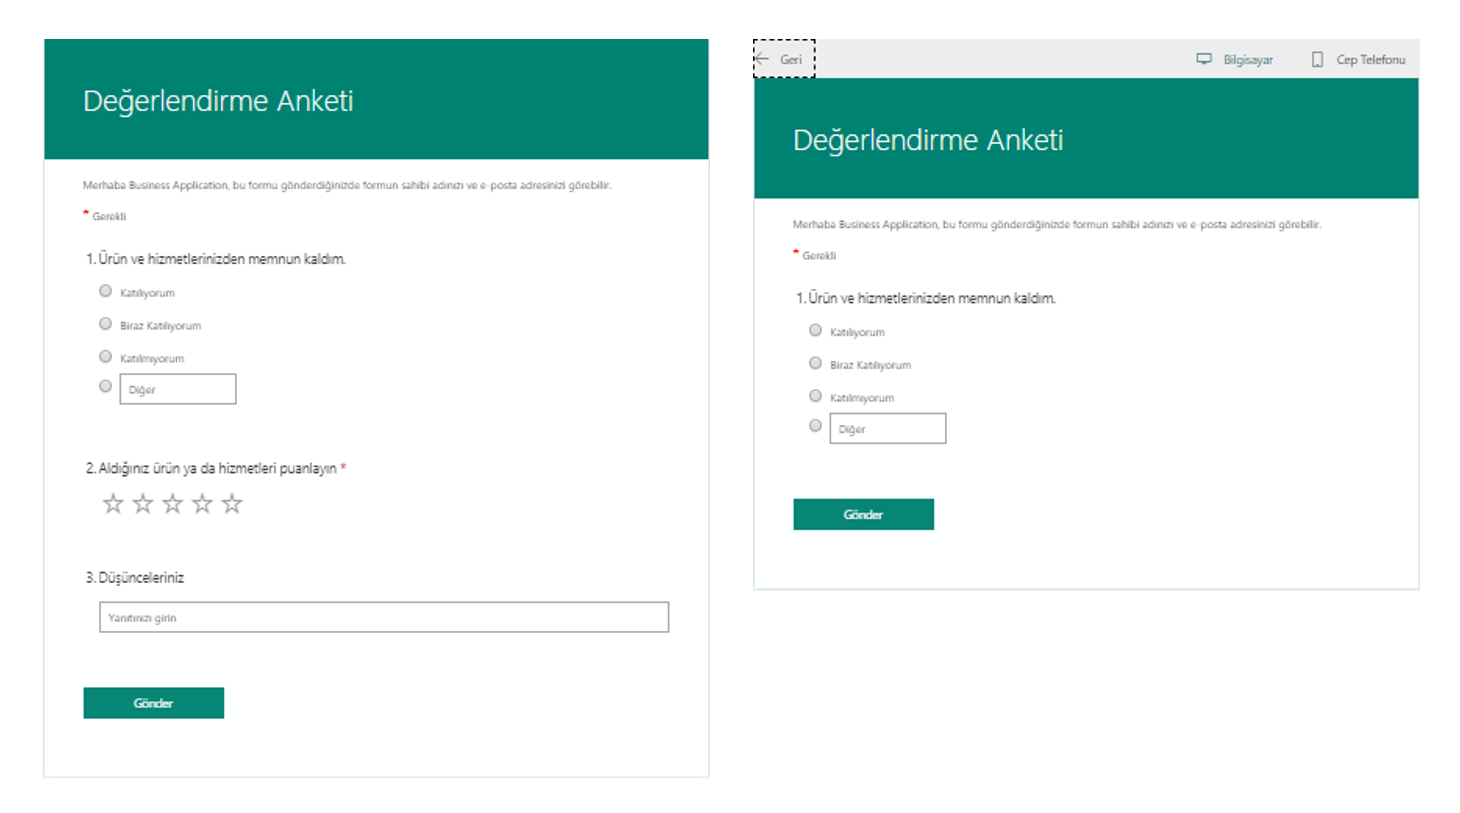
Your actions will be saved that moment and you will be able to test your scenario whenever you want with the preview feature.

Let’s analyze the scenario below.

For the 1st question
If the 1st option is chosen –> It will lead to the 2nd question
The 2nd question will be answered –> the form will be complete

For the 1st question
If the 2nd option is chosen –> It will lead to the 2nd question
The 2nd question will be answered –> the form will be complete

For the 1st question
If the 3rd option is chosen –> It will lead to the 3rd question
The 3rd question will be answered –> form will be complete

For the 1st question
If the 4th option is chosen –> It will be waited for the user to write a text into the Other field.

We have analyzed that the form questions can be connected to rules and the sort of the questions can be changed.

When you want to cancel the actions you have executed, you can reset your document by clicking Reset withing … that is on the top right of the same screen.